


sabell2012

Mega Sage
Options
- Subscribe to RSS Feed
- Mark as New
- Mark as Read
- Bookmark
- Subscribe
- Printer Friendly Page
- Report Inappropriate Content
11-08-2015
12:25 PM
NOTE: MY POSTINGS REFLECT MY OWN VIEWS AND DO NOT NECESSARILY REPRESENT THE VIEWS OF MY EMPLOYER, ACCENTURE.
DIFFICULTY LEVEL: INTERMEDIATE
Assumes having taken the class SSNF and has good intermediate level of knowledge and/or familiarity with Scripting in ServiceNow.
I thought I would use this and the next article to tackle advanced email notifications. In this article I will be modifying an existing notification template to use an email notification script. Notifications scripts are used to dynamically modify the content of an email, and can be really useful in listing additional information pertaining to the record that triggered the notification.
Prerequisites:
- Familiarity with how to edit forms to add fields not currently showing.
- Familiarity with email notifications, how to add them, how to modify them.
For those of you using a personal instance you will have to do a couple of things prior to being able to get emails to fire.
- Review this article to make sure your notifications are set up correctly (they should be OOB with your PDI): Setting notification preferences in Core UI (servicenow.com)
- You can no longer send emails from a PDI (no matter that you set up the properties correctly). Read here for further info: https://developer.servicenow.com/blog.do?p=/post/sending-emails-from-pdis/
Here is a quick diagram of Notification dependencies
NOTE: You don't need a template or a script, but they help in code reuse (a best practice).
Lab 1.1: Email Notification Script
We will be modifying an existing Email Notification that contains a Mail Script tag and moving that code down a level to be a Notification Script that will be included in the notification. We will be saving all of this down as our own and deactivating the original out-of-the-box version (another best practice).
- Navigate to System Notification -> Email -> Templates. The Email Templates List View will be displayed.
- Search for the template named incident.ess.resolve, and edit that template up. We will be moving the script currently embedded in the Message into its own Email Script.
- Change the following:
a. Name: incident.ess.resolve.css
Note: I will be expanding on the use of CSS in a future article.
b. Message HTML (you will need to click on the <> button to place the following source code):
Your incident ${number} has been resolved and will automatically close ${mail_script:autoCloseStatement}.
If you feel the issue is not resolved, please click the following link to reopen your incident:
${mailto:mailto.unsatisfied}

Short description: ${short_description}
Priority: ${priority}
Category: ${category}

Comments:
Additional comments: ${comments}
<hr/>
Click here to view Incident: ${URI_REF}
Your form should look like this:
c. IMPORTANT: Right-click on the form header and pick Insert. Do NOT update or save as this will update the out-of-the-box version.
NOTE: All we did here was rip out everything (including the tags) that were between the <mail_script> tags and replace it all with a call to our new Notification Script, um, which we haven't written yet. That's next!
4. Navigate to System Notification -> Email -> Notification Email Scripts. The Notification Email Scripts list view will be displayed.
5. Click the New button. This will display an empty Email Script form.
6. Fill in the form with the following:
a. Name: autoCloseStatement
b. Script:
(function runMailScript(/* GlideRecord */ current, /* TemplatePrinter */ template,
          /* Optional EmailOutbound */ email, /* Optional GlideRecord */ email_action,
          /* Optional GlideRecord */ event) {

	var days = parseInt(gs.getProperty("glide.ui.autoclose.time"));
	var hours = days * 24;

	var result = '';
	if (days == 0) {
		result = 'now';
	}
	else if (days <= 3) {
		result = 'in ' + hours + ' hour' + ((hours>1) ? 's' : '');
	}
	else {
		result = 'in ' + days + ' day' + ((days>1) ? 's' : '');
	}

	gs.info('---> email script result: ' + result); //debug
	template.print(result);

})(current, template, email, email_action, event);
Your form will look like this:
c. Click the Submit button to save your work.
Did the script look familiar? It was everything we removed from the Email Notification Template that was between the <mail_script> tags. Easy!
7. Navigate to System Notification -> Email -> Notifications. The Email Notifications list view will be displayed.
8. Search for notification named "Incident Resolved". Edit this notification.
9. Change the Active field to un-checked, right-click the form header to bring up the context menu, and click Save. This deactivates the out-of-the-box Notification.
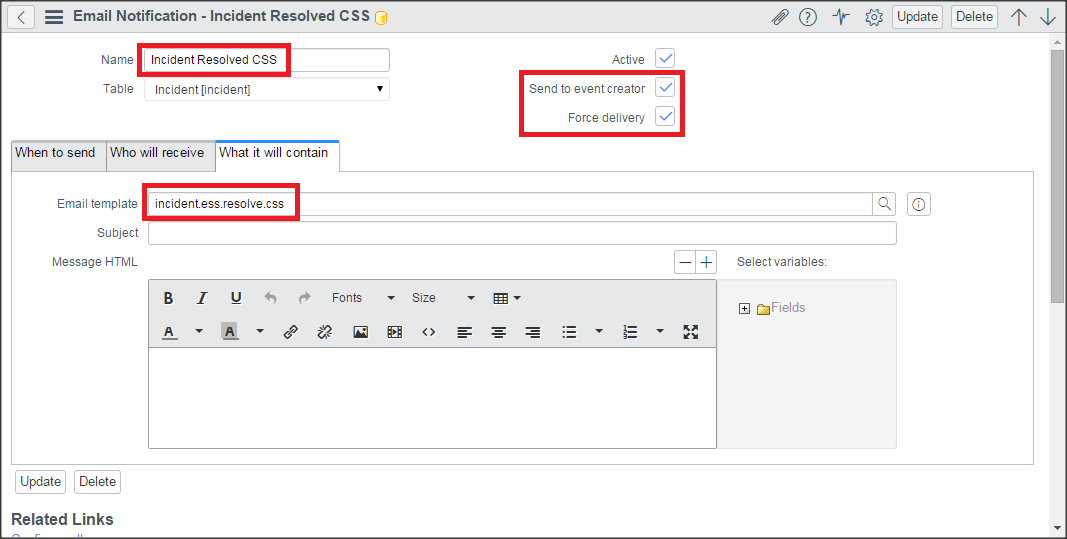
10. Change the following on the still open form:
- Name: Incident Resolved CSS
- Active: Checked.
- What it will Contain -> Email Template: incident.ess.resolve.css
- Subject: BLANK!!!
- Message HTML: BLANK!!!
NOTE: This is where we reference our new Email Notification Template.
IMPORTANT: You MUST blank out the Subject field AND the Message HTML field or they WILL override your template and give you the wrong results during testing.
IMPORTANT: Right click on the form header and choose Insert And Stay so that we do not save over the out-of-the-box Notification!
f. Click on the Preview Notification button to validate that the template is being fired (hint: you should see your new template Subject and Message HTML displayed).
11. Right click on the form header and click on Configure -> Form Layout. The Form Layout form will be displayed.
a. Add the following fields to the righthand column:
Send Event to Creator
Force delivery
b. Click the Save button. This will return you to the Email Notification form.
NOTE: Send Event to Creator makes sure an email is sent (it should be checked automatically). Force delivery makes sure an email is sent even if the user has notification disabled (I just wanted to make sure the email is sent - a bit of overkill since in our prerequisites the users we will be using for testing should have Notification enabled).
12. Make sure both new fields are checked. Click the Update button to save your work.
Your form should now look like this:
Okay, that is it! We are ready to test our creation!
Lab 1.2: Testing The Notification Script
1. Navigate to Incidents -> Open. The Open Incidents list view will be displayed.
2. Click on any Incident whose status is not Resolved. The Incident form will be displayed. Note the Incident number.
3. Click on the Resolve Incident button at the top-right of the form. A pop-up will be displayed stating that you have fill in a handful of required fields. Do so, and then click on the Resolve Incident button again. This should mark the incident as resolved.
4. Navigate to System Policy -> Events -> Event log. The Event log list view will be displayed.
5. Filter for the Name "incident.updated". You should see that this event has recently (a within a couple of seconds) fired.
6. Navigate to System Logs -> All.
7. Search in the Message column for --->. An info messsage with our result should be displayed looking something like this:
8. Navigate to System Logs -> Emails. This will display the Email Log list view.
9. Filter for Subject contains "was resolved". You should see the email notification sent out for your incident number.
10. Edit this notification up.
11. Examine the notification body and verify that there the text contains something like "has been resolved and will automatically close in". Your form should look something like this:
That's it! If you see that type of message then it worked! The "7 days" was generated by the script. So let's spiff it up a bit.
Lab 1.3: Email Notification Script Best Practice
Here we will up the game a bit by making the script more extensible, and maintainable. We will also be introducing a new twist on a switch statement, and implementing the script as a generic function to isolate it from accidental execution.
1. Navigate to System Policy -> Notification Email Scripts. The Email Notification Scripts list view will be displayed.
2. Filter for the script named "autoCloseStatement", and edit up the script.
3. Change the script to the following:
(function runMailScript(/* GlideRecord */ current, /* TemplatePrinter */ template,
          /* Optional EmailOutbound */ email, /* Optional GlideRecord */ email_action,
          /* Optional GlideRecord */ event) {

	var days = parseInt(gs.getProperty("glide.ui.autoclose.time"));
	var hours = days * 24;

	var result = '';

	switch (true) {
		case (days == 0):
			result = 'now';
			break;
		case (days <= 3):
			result = 'in ' + hours + ' hour' + ((hours>1) ? 's' : '');
			break;
		default:
			result = 'in ' + days + ' day' + ((days>1) ? 's' : '');
			break;
	}

	gs.info('---> email script result: ' + result); //debug
	template.print(result);

})(current, template, email, email_action, event);
Notes:
- Switches are much easier to read and to maintain and are a best practice when dealing with if/then/else statements that are a depth of three or greater, as in this case.
- The template.print places the generated string back into the email template text at the location of the script call.
Here we have two best practices:
1) Anonymous function - this keeps the code from being accidentally executed and is the default template that you have been working with. Only this Notification Script can execute this code.
2) As stated before: Whenever an "if" statement goes beyond one if/then/else you should look at converting it to a "switch" statement. This improves readability, flexibility, and extensibility.
Twist: Note the unusual switch statement. This has a "true" in the argument! This is how you can convert mixed "if" statement code into a "switch". You do so by making the passed value "true", and then each argument of the if/else if/etc. can be included in parenthesis in each case statement. Pretty cool, huh? 🙂
4. Click the Submit button to save your work.
5. Now repeat lab 1.2 to test. You should get the same results as before.
There you go! A definite upgrade from out-of-the-box! 🙂
In the next article we will be exploring CSS in email notifications.
Enjoy!
Steven Bell.
If you find this article helps you, don't forget to log in and mark it as "Helpful"!
Originally published on: 11-08-2015 02:25 AM
I updated the code and brought the article into alignment with my new formatting standard.
- 7,494 Views
2 Comments
You must be a registered user to add a comment. If you've already registered, sign in. Otherwise, register and sign in.

