


Sush3

ServiceNow Employee
Options
- Subscribe to RSS Feed
- Mark as New
- Mark as Read
- Bookmark
- Subscribe
- Printer Friendly Page
- Report Inappropriate Content
06-22-2016
08:11 PM
Service Portal is the quick and flexible way to build an application portal that your employees will love. I have been playing with it a lot and thought I would share with you all few things I learned. This topic is targeted towards advanced users/web developers.
People who have worked with angular might have used the built in filters for formatting expression values like dates, currencies etc or limiting the number of items displayed and more. Most of the time these built-in filters will do the job for us, but sometimes in your application, you might have a need to create a custom angular filter.
With angular providers in Service Portal, we can create angular directives, services and factory that can be automatically injected into your client script controller.
If you see the type dropdown above, it doesn't have the option to create a "filter". So you cannot use angular providers for creating filters.
I will walk you through the steps to create a custom filter that we can use on a list of Incidents.
- Step 1: Create a portal or use an existing one.
If you have a portal you are already working with just use that or to create a sample one to play with. Attaching a screenshot of my example portal.
- Step 2: Create a Service Portal page and add that to your example portal.
For demo purpose, I am going to create a new page and call it homepagetest and add that to my portal I created in the previous step.
- Step 3: Create a simple widget to get a list of incidents and displaying it.
Click on widgets under "Service Portal" application menu. Create a new widget by clicking on the new button.
Below is the example widget i have created.
Please use the below snippets to create your widget
HTML:
<div class="container">
<!-- your widget template -->
<div class="col-md-12">
<h3 style="display:inline-block;float:left;">Incident List</h3>
<div class="form-group" style="display:inline-block;float:right;margin-top: 10px;margin-bottom: 0px">
<div class="col-sm-12"> <input type="text" ng-model="filterValue" class="form-control" placeholder="Search" style=""> </div>
</div>
</div>
<div ng-repeat="incident in data.incidentList | startsFilter:filterValue" class="each-incident">
<h4>{{incident.number}}</h4>
<p style="margin-bottom:0px;">{{incident.short_desc}}</p>
</div>
</div>
CSS:
.each-incident{
display:flex;
justify-content:space-between;
align-items:center;
padding:10px;
border-top:1px solid #ddd;
clear:both;
}
Server Script:
(function() {
/* populate the 'data' object */
/* e.g., data.table = $sp.getValue('table'); */
data.incidentList = [];
var gr = new GlideRecord('incident');
gr.addQuery('active', true);
gr.query();
while(gr.next()){
var temp = {};
temp.number = gr.number.toString();
temp.short_desc = gr.short_description.toString();
data.incidentList.push(temp);
}
})();
After populating your widget with above code, go ahead and save it.
- Step 4: Creating our filter and adding a dependency to our widget.
We will be coding our filter inside good old UI Scripts. So go ahead and create a new UI Script record.
Here is the filter code. copy and paste this into UI script.
(function() {
angular.module('startsWithFilter', []).filter('startsFilter', function() {
return function(input, filtervalue) {
if (filtervalue) {
var output = [];
for (var i = 0; i < input.length; i++) {
if (input[i].short_desc.toLowerCase().substring(0, filtervalue.length) === filtervalue.toLowerCase()) {
output.push(input[i]);
}
}
return output;
} else {
return input;
}
};
});
})();
Now that we have the filter script ready let's add this as a dependency. Under "Service Portal" application menu there is a module called "Dependencies", go ahead and click on that. Once you are in, click new and fill in the form as below.
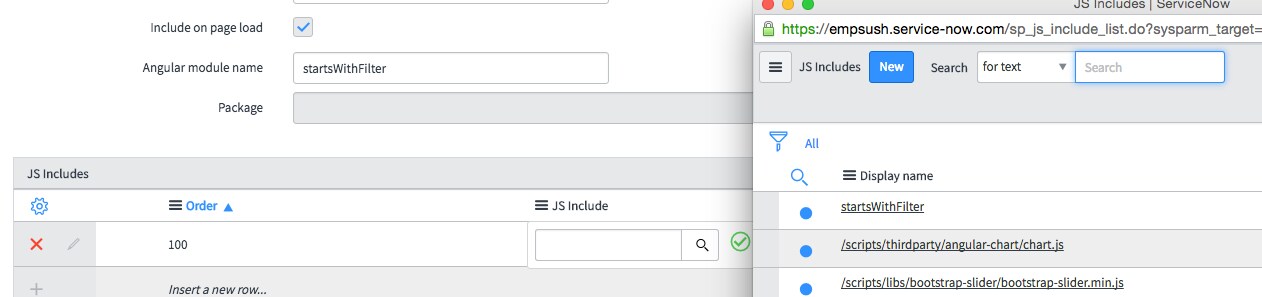
Now we have to create a JS includes record and link the UI Script.
On JS Includes table click on new and create a record for our "startsWithFilter" and select the source as UI Scripts, the search box appears for you to select the UI Script, here please select "startsWithFilter" and hit save.
Now your widget dependency record is complete and it should look something like this.
We now our filter script added to Dependencies list, next let's link this to our simple widget created in step 3. Open the widget record and scroll down to the section that says "Dependencies".
insert a new row and select the dependency we added above, save the widget record.
- Step 5: Adding our widget to a Service Portal page.
The last and final step is to add the widget we created to a Service portal page using Service portal designer.
click on "Service portal configuration" which takes you to a new page with a list of options.
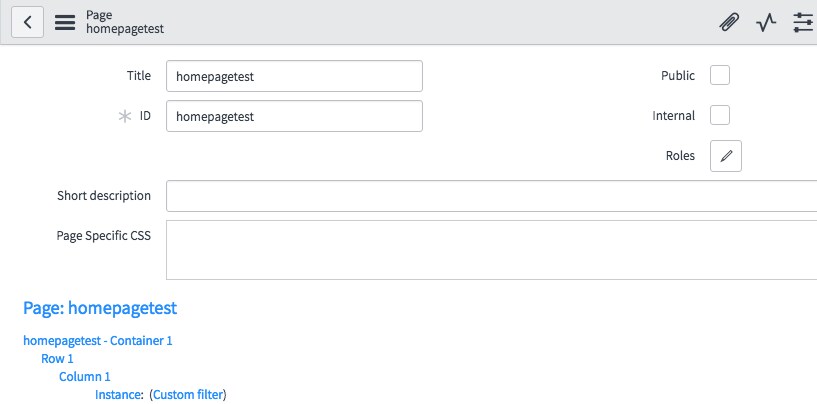
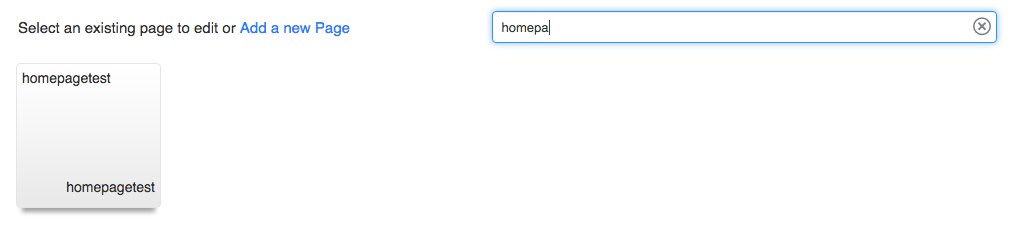
Select designer, A new page opens up and u can see all the "Service portal pages", search for your page, in my case its "homepagetest"
Now in the page designer view drag and drop "Container" on the page followed by 12 column layout. On the left side you can see all the widgets available for us to use, we will just search for our widget we created in step 3 and drag and drop that into the 12 column layout. It should look something like this.
We have successfully added our new widget on the page. Now let's check out this widget in action. Click on "portals" under "Service Portal" Application menu. Select the portal we used for this tutorial and hit "try it" button at the bottom.
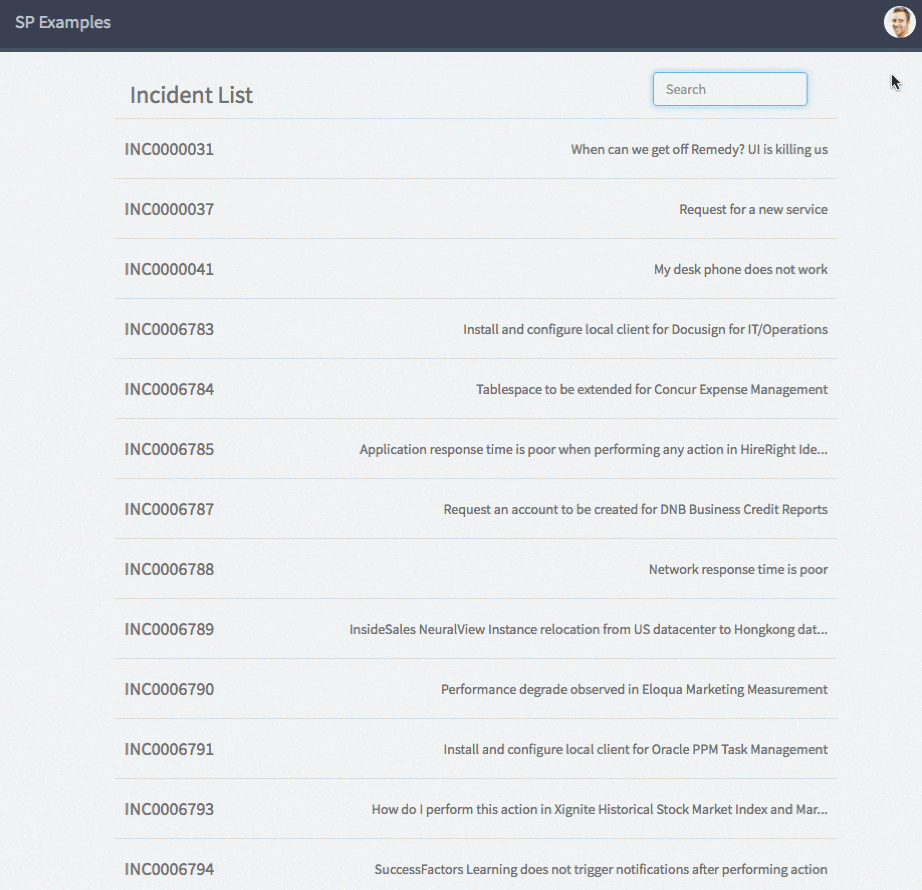
you should see your Incident List Widget with a search field on the top right. Just start typing and you can see our "startsWithFilter" doing its magic.
Sorry for the long blog, I wanted to make it as straightforward as possible for anyone with any level of expertise to follow this. Hope this helps.
Thanks,
Sush
- 37,662 Views
22 Comments
- « Previous
-
- 1
- 2
- 3
- Next »
You must be a registered user to add a comment. If you've already registered, sign in. Otherwise, register and sign in.

