- Mark as New
- Bookmark
- Subscribe
- Mute
- Subscribe to RSS Feed
- Permalink
- Report Inappropriate Content
03-24-2019 02:59 AM
Hi EveryOnce,
How to add columns fields in list.
i want to add columns , i just edited server side script and as well added table namd, fields under Mobile view .
but here details are showing something like this , i don't want to display this way.

i want to see columns like below screenshot
Server side script:
HTML scriptL
<div class="panel panel-{{c.options.color}} b" ng-if="c.always_show ||c.data.list.length">
<div class="panel-heading" >
<h4 class="panel-title">{{c.options.title}}</h4>
<i class="fa fa-filter" aria-hidden="true" tabindex="0" ng-click="c.showFilter = !myreq.showFilter;" title="Show filters for {{c.options.title}}"></i>
<div ng-show="c.showFilter">
<input ng-model="c.filterText" sn-focus="c.showFilter" style="color: grey; width: 100%; margin-top: .5em;" placeholder="{{data.filterMsg}}">
</div>
</div>
<div class="list-group" style="max-height: none; overflow-y: auto;">
<div class="list-group-item" ng-repeat="item in c.data.list | filter:c.filterText" >
<a ng-click="c.onClick($event, item, item.url, {})" href="javascript:void(0)">
<div ng-class="{'l-h-40': !item.secondary_fields.length}">{{item.display_field}}</div>
<small class="text-muted" ng-repeat="f in item.secondary_fields">
<span ng-if="!$first"> • </span>
<span ng-switch="f.type" title="{{::f.label}}">
<span ng-switch-when="glide_date"><sn-time-ago timestamp="::f.value" /></span>
<span ng-switch-when="glide_date_time"><sn-time-ago timestamp="::f.value" /></span>
<span ng-switch-default="">{{f.display_value}}</span>
</span>
</small>
</a>
</div>
</div>
<div class="panel-footer" ng-if="c.options.maximum_entries && c.data.count > c.options.maximum_entries">
<h4 class="panel-title">${First {{c.options.maximum_entries}} of {{c.data.count}} shown}</h4>
</div>
</div>
Server script:
(function() {
if (!options.maximum_entries)
options.maximum_entries = 20;
var gr = new GlideRecordSecure('sc_request'); // does ACL checking for us
gr.addActiveQuery();
options.title = options.title || gr.getPlural();
data.display_field = 'sys_created_on';
data.secondary_fields = ['number','sys_updated_on','request_state' ,'opened_at','requested_for','price'];
data.filterMsg = gs.getMessage("Filter...");
gr.addEncodedQuery('requested_for=javascript:gs.getUserID()');
gr.orderByDesc('sys_created_on');
gr.query();
data.count = gr.getRowCount();
data.list = [];
var recordIdx = 0;
while (gr.next()) {
if (recordIdx == options.maximum_entries)
break;
var record = {};
record.sys_id = gr.getValue('sys_id');
var ritm = new GlideRecord("sc_req_item");
ritm.addQuery("request", gr.getUniqueValue());
ritm.query();
if (ritm.getRowCount() == 0)
continue;
if (ritm.getRowCount() > 1)
record.display_field = gs.getMessage("{0} requested items", ritm.getRowCount());
else {
ritm.next();
record.display_field = ritm.cat_item.getDisplayValue() || ritm.getDisplayValue("short_description");
}
record.secondary_fields = [];
data.secondary_fields.forEach(function(f) {
record.secondary_fields.push(getField(gr, f));
});
record.url = {id: 'sc_request', table: 'sc_request', sys_id: record.sys_id};
data.list.push(record);
recordIdx++;
}
function getField(gr, name) {
var f = {};
f.display_value = gr.getDisplayValue(name);
f.value = gr.getValue(name);
var ge = gr.getElement(name);
f.type = ge.getED().getInternalType()
f.label = ge.getLabel();
return f;
}
})()
Solved! Go to Solution.
- Mark as New
- Bookmark
- Subscribe
- Mute
- Subscribe to RSS Feed
- Permalink
- Report Inappropriate Content
03-24-2019 09:55 AM
create one custom page,then you need to create widget here,add that widget on that page,once you will add that then go to the main manu ( sp header menu)
- Mark as New
- Bookmark
- Subscribe
- Mute
- Subscribe to RSS Feed
- Permalink
- Report Inappropriate Content
03-24-2019 03:04 AM
the widget you shown in last screenshot is different
can you just click on ctrl+ right click and open in widget editor
- Mark as New
- Bookmark
- Subscribe
- Mute
- Subscribe to RSS Feed
- Permalink
- Report Inappropriate Content
03-24-2019 03:33 AM
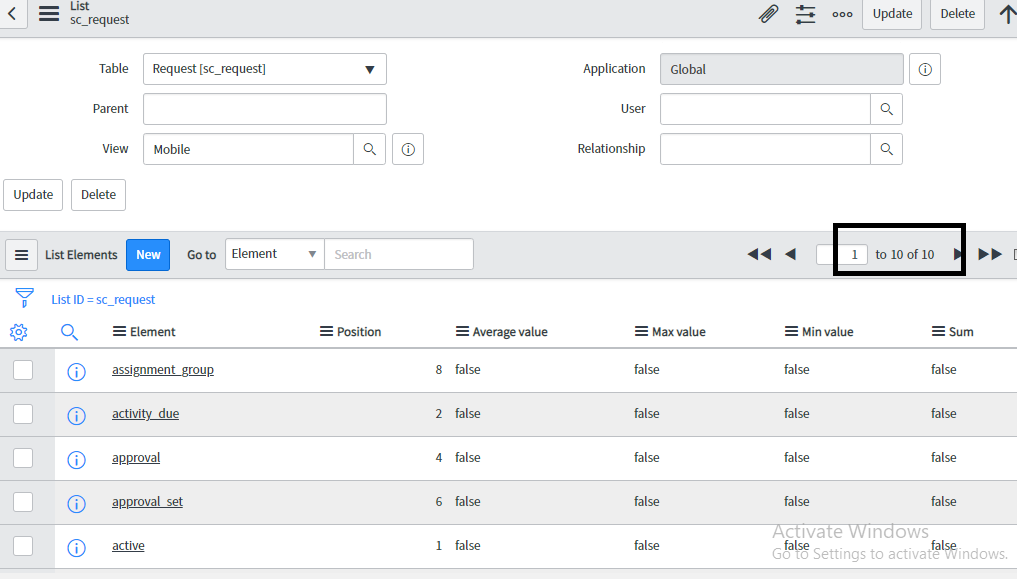
did you try to add mobile view for your custom table then try to add the columns .
Steps:
System UI >> View >> search for view name as Mobile>> open that view and click on List related list and click on "New" it will ask the table name to add.
Now select the table here and save it.
once you will done then go your table list and right click on header >> configure >> list out >> then the view you will select and add the fields you want to show there.
once you will done then clear the cache and it will reflect the columns there.
Hope it will help you
- Mark as New
- Bookmark
- Subscribe
- Mute
- Subscribe to RSS Feed
- Permalink
- Report Inappropriate Content
03-24-2019 05:11 AM


- Mark as New
- Bookmark
- Subscribe
- Mute
- Subscribe to RSS Feed
- Permalink
- Report Inappropriate Content
03-24-2019 05:54 AM
i am able to do that even on custom table as well as ootb table.
did you cleared the cache by writing cache.do in application navigator .
is it possible if i can have look at your PDI instance.
