- Mark as New
- Bookmark
- Subscribe
- Mute
- Subscribe to RSS Feed
- Permalink
- Report Inappropriate Content
12-20-2016 12:39 AM

How to communicate within two widget, I have done some POC. Writing small example to understand the way of communication within two widget.
If You hv found this helpful, guys please vote
Solved! Go to Solution.
- Mark as New
- Bookmark
- Subscribe
- Mute
- Subscribe to RSS Feed
- Permalink
- Report Inappropriate Content
12-20-2016 01:40 AM
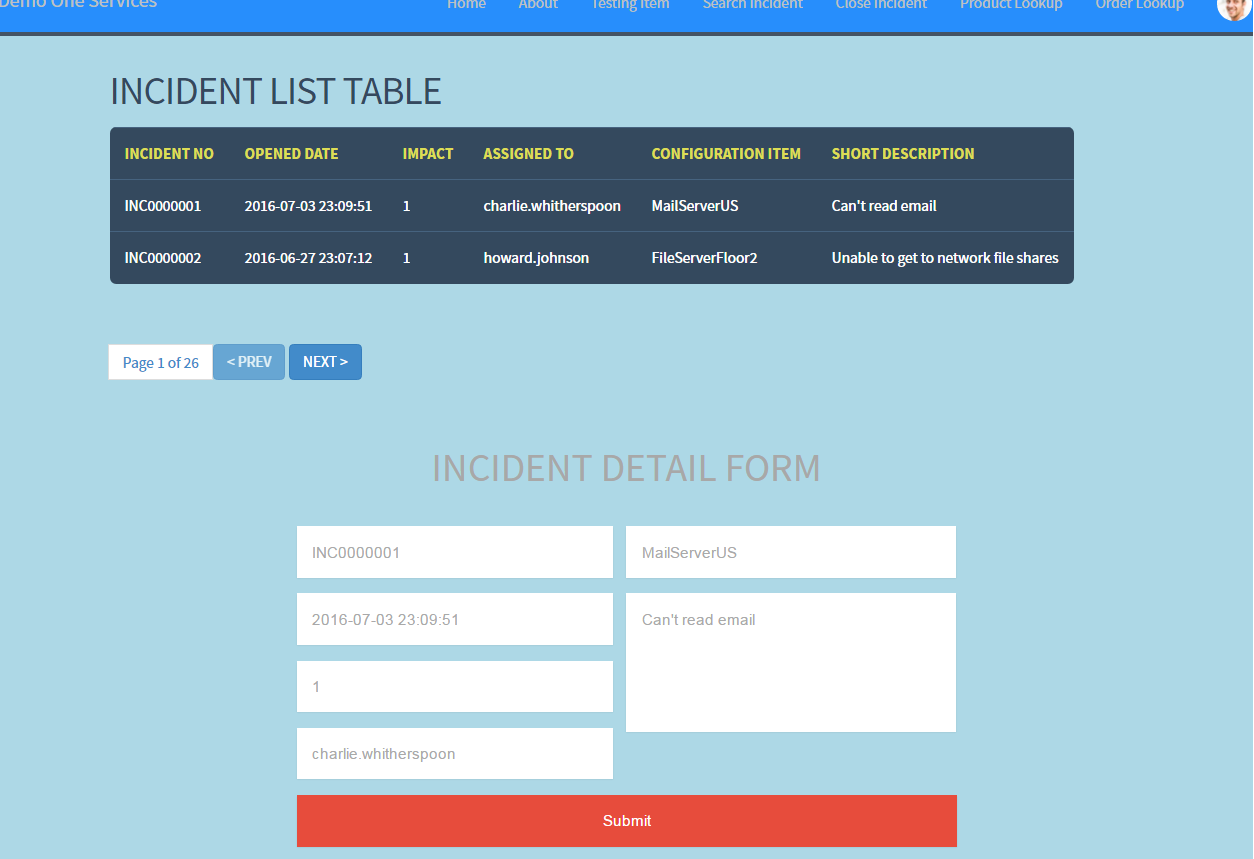
Here I am going step by step - Taking a simple example for incident.
Task :- 1. Create first widget - that contains List Of Incident
2. Create second widget - that contains form to populate the corresponding field of clicked incident in First widget
1. Creating first widget - widget one
HTML Template -
<div class="widgetone">
<h1>INCIDENT LIST TABLE</h1>
<table class="rwd-table">
<tr >
<th>INCIDENT NO</th>
<th>OPENED DATE</th>
<th>IMPACT</th>
<th>ASSIGNED TO</th>
<th>CONFIGURATION ITEM</th>
<th>SHORT DESCRIPTION</th>
</tr>
<tr ng-repeat="item in c.data.incidents" ng-click="selectItem(item)">
<td data-th="INCIDENT NO">{{item.incidentno}}</td>
<td data-th="OPENED DATE">{{item.openeddate}}</td>
<td data-th="IMPACT">{{item.impact}}</td>
<td data-th="ASSIGNED TO">{{item.asgnTo}}</td>
<td data-th="CONFIGURATION ITEM">{{item.cmdb_ci}}</td>
<td data-th="SHORT DESCRIPTION">{{item.shrtDesc}}</td>
</tr>
</table>
</div>
Server Script -
(function() {
data.incidents = [];
var gr = new GlideRecord('incident');
gr.query();
while(gr.next()){
item = {};
item.incidentno = gr.getValue('number');
item.openeddate = gr.getValue('opened_at');
item.cat = gr.getValue('catgory');
item.cmdb_ci = gr.getDisplayValue('cmdb_ci');
item.asgnGroup = gr.getDisplayValue('assignment_group');
item.asgnTo = gr.getDisplayValue('assigned_to');
item.impact = gr.getValue('impact');
item.shrtDesc = gr.getValue('short_description');
data.incidents.push(item);
}
})();
Client Controller -
function($scope,$rootScope,$timeout) {
/* widget controller */
var c = this;
//broadcast the selection when ever cliked on each incident
$scope.selectItem= function(incidentObj){
alert(incidentObj);
c.selectedIncident= incidentObj;
$rootScope.$broadcast('showIncidentDetails', incidentObj);
};
}
2. Creating second widget - widget two
HTML Template -
<div>
<h1>INCIDENT DETAILS FORM</h1>
<form class="cf">
<div class="half left cf">
<input type="text" id="input-no" placeholder="{{showForm.incidentno}}">
<input type="text" id="input-date" placeholder="{{showForm.openeddate}}">
<input type="text" id="input-IMPACT" placeholder="{{showForm.impact}}">
<input type="text" id="input-asgnto" placeholder="{{showForm.asgnTo}}">
</div>
<div class="half right cf">
<input type="text" id="input-cmdbci" placeholder="{{showForm.cmdb_ci}}">
<textarea name="message" type="text" id="input-message" placeholder="{{showForm.shrtDesc}}"></textarea>
</div>
<input type="submit" value="Submit" id="input-submit">// This is another operation
</form>
</div>
Client Controller -
function($scope,$rootScope, $timeout ) {
/* widget controller */
var c = this;
$scope.showForm = "";
//Listening for "showIncidentDetails" event
$rootScope.$on('showIncidentDetails', function(event,data) {
$scope.showForm= data;
});
}
Guys here you can make your table and form interactive Using CSS, This HTML code I am posting here without any CSS.
Please vote if it is helping you.
Regards,
Jeet.
- Mark as New
- Bookmark
- Subscribe
- Mute
- Subscribe to RSS Feed
- Permalink
- Report Inappropriate Content
12-20-2016 12:52 AM
Nathan Firth wrote a blog entry about this. Have you run through this?
- Mark as New
- Bookmark
- Subscribe
- Mute
- Subscribe to RSS Feed
- Permalink
- Report Inappropriate Content
12-20-2016 01:02 AM
Hi Ian Kirby,
Yeah I have gone thru this just now, now It is fine.
I had searched in community for answer but I did not find any at that time and I was unanswered for this same question that's why I had done some POC by my own and now I am able to communicate within my custom widget.
I thought it might help servicenow developer.
By the way sir. Why, Normal users are not allowed to create their blog ?
Regards,
Jeet.
- Mark as New
- Bookmark
- Subscribe
- Mute
- Subscribe to RSS Feed
- Permalink
- Report Inappropriate Content
07-09-2022 04:08 PM
That blog entry probably needs to be updated as the San Diego widget guide says to avoid the use of $rootScope.$broadcast() because it can cause performance issues.
- Mark as New
- Bookmark
- Subscribe
- Mute
- Subscribe to RSS Feed
- Permalink
- Report Inappropriate Content
12-20-2016 01:40 AM
Here I am going step by step - Taking a simple example for incident.
Task :- 1. Create first widget - that contains List Of Incident
2. Create second widget - that contains form to populate the corresponding field of clicked incident in First widget
1. Creating first widget - widget one
HTML Template -
<div class="widgetone">
<h1>INCIDENT LIST TABLE</h1>
<table class="rwd-table">
<tr >
<th>INCIDENT NO</th>
<th>OPENED DATE</th>
<th>IMPACT</th>
<th>ASSIGNED TO</th>
<th>CONFIGURATION ITEM</th>
<th>SHORT DESCRIPTION</th>
</tr>
<tr ng-repeat="item in c.data.incidents" ng-click="selectItem(item)">
<td data-th="INCIDENT NO">{{item.incidentno}}</td>
<td data-th="OPENED DATE">{{item.openeddate}}</td>
<td data-th="IMPACT">{{item.impact}}</td>
<td data-th="ASSIGNED TO">{{item.asgnTo}}</td>
<td data-th="CONFIGURATION ITEM">{{item.cmdb_ci}}</td>
<td data-th="SHORT DESCRIPTION">{{item.shrtDesc}}</td>
</tr>
</table>
</div>
Server Script -
(function() {
data.incidents = [];
var gr = new GlideRecord('incident');
gr.query();
while(gr.next()){
item = {};
item.incidentno = gr.getValue('number');
item.openeddate = gr.getValue('opened_at');
item.cat = gr.getValue('catgory');
item.cmdb_ci = gr.getDisplayValue('cmdb_ci');
item.asgnGroup = gr.getDisplayValue('assignment_group');
item.asgnTo = gr.getDisplayValue('assigned_to');
item.impact = gr.getValue('impact');
item.shrtDesc = gr.getValue('short_description');
data.incidents.push(item);
}
})();
Client Controller -
function($scope,$rootScope,$timeout) {
/* widget controller */
var c = this;
//broadcast the selection when ever cliked on each incident
$scope.selectItem= function(incidentObj){
alert(incidentObj);
c.selectedIncident= incidentObj;
$rootScope.$broadcast('showIncidentDetails', incidentObj);
};
}
2. Creating second widget - widget two
HTML Template -
<div>
<h1>INCIDENT DETAILS FORM</h1>
<form class="cf">
<div class="half left cf">
<input type="text" id="input-no" placeholder="{{showForm.incidentno}}">
<input type="text" id="input-date" placeholder="{{showForm.openeddate}}">
<input type="text" id="input-IMPACT" placeholder="{{showForm.impact}}">
<input type="text" id="input-asgnto" placeholder="{{showForm.asgnTo}}">
</div>
<div class="half right cf">
<input type="text" id="input-cmdbci" placeholder="{{showForm.cmdb_ci}}">
<textarea name="message" type="text" id="input-message" placeholder="{{showForm.shrtDesc}}"></textarea>
</div>
<input type="submit" value="Submit" id="input-submit">// This is another operation
</form>
</div>
Client Controller -
function($scope,$rootScope, $timeout ) {
/* widget controller */
var c = this;
$scope.showForm = "";
//Listening for "showIncidentDetails" event
$rootScope.$on('showIncidentDetails', function(event,data) {
$scope.showForm= data;
});
}
Guys here you can make your table and form interactive Using CSS, This HTML code I am posting here without any CSS.
Please vote if it is helping you.
Regards,
Jeet.