- Mark as New
- Bookmark
- Subscribe
- Mute
- Subscribe to RSS Feed
- Permalink
- Report Inappropriate Content
09-01-2021 10:33 AM
I am able to add fields values using the form fields component from UI Builder, but the question is how I can submit it, I mean how to configure submit button so that record will get created
[ No Submit Button ]
CAN ANYONE PLEASE HELP WITH THE STEPS TO CONFIGURE SUBMIT BUTTON

Solved! Go to Solution.
- Labels:
-
Now Experience UI Framework
-
Studio
- Mark as New
- Bookmark
- Subscribe
- Mute
- Subscribe to RSS Feed
- Permalink
- Report Inappropriate Content
09-02-2021 12:19 AM
Form fields does not support the use of ui actions. It is mainly intended to be as a read only component. You have to use Form component to be able to support ui actions.
Steps to create a form:
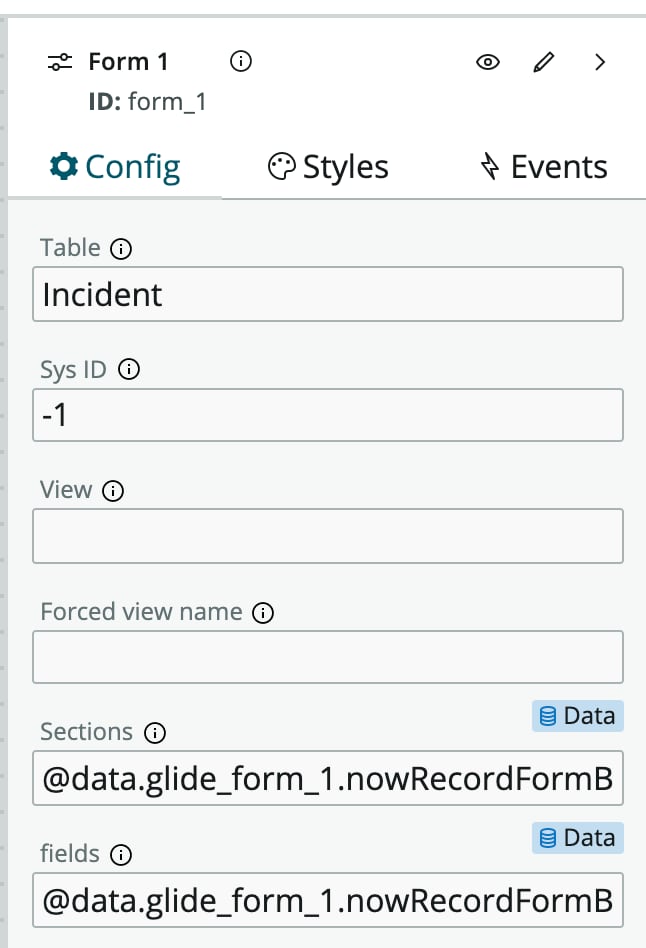
- Take a Form component. Add a Glide Form data broker from @servicenow/now-record-form-connected application

- Update the details for the data broker instance:
- Table: incident
- SysID: -1 (for any new record)

- Now you have form data available in @data.glide_form_1 prop
- Update your form config:
- Sections: @data.glide_form_1.nowRecordFormBlob.sections
- Fields: @data.glide_form_1.nowRecordFormBlob.fields
- Table: incident

- By now, you should have your form ready
- Next step: Setting up UI actions
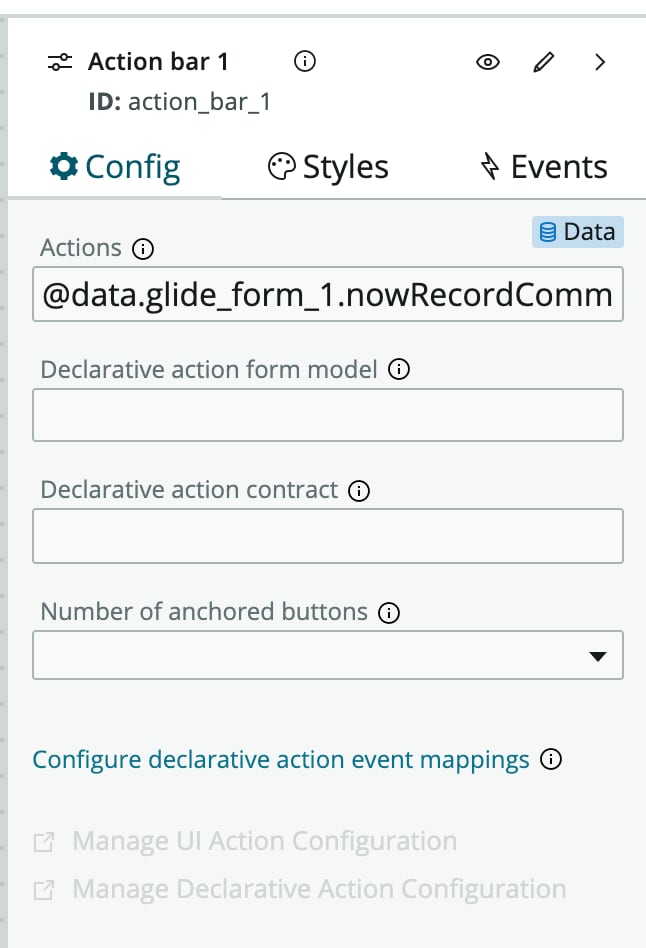
- Add a Action Bar component on the top of form and update the config as:
- Actions: @data.glide_form_1.nowRecordCommonUiactionbar.actionNodes

- That's it! You should have your form ready with a save action. Try creating an incident. It should work as expected.
Let me know if it works or you have any doubts. Thanks!
- Mark as New
- Bookmark
- Subscribe
- Mute
- Subscribe to RSS Feed
- Permalink
- Report Inappropriate Content
09-02-2021 12:19 AM
Form fields does not support the use of ui actions. It is mainly intended to be as a read only component. You have to use Form component to be able to support ui actions.
Steps to create a form:
- Take a Form component. Add a Glide Form data broker from @servicenow/now-record-form-connected application
- Update the details for the data broker instance:
- Table: incident
- SysID: -1 (for any new record)
- Now you have form data available in @data.glide_form_1 prop
- Update your form config:
- Sections: @data.glide_form_1.nowRecordFormBlob.sections
- Fields: @data.glide_form_1.nowRecordFormBlob.fields
- Table: incident
- By now, you should have your form ready
- Next step: Setting up UI actions
- Add a Action Bar component on the top of form and update the config as:
- Actions: @data.glide_form_1.nowRecordCommonUiactionbar.actionNodes
- That's it! You should have your form ready with a save action. Try creating an incident. It should work as expected.
Let me know if it works or you have any doubts. Thanks!
- Mark as New
- Bookmark
- Subscribe
- Mute
- Subscribe to RSS Feed
- Permalink
- Report Inappropriate Content
09-05-2021 07:44 PM
Thanks for detaild steps
- Mark as New
- Bookmark
- Subscribe
- Mute
- Subscribe to RSS Feed
- Permalink
- Report Inappropriate Content
09-05-2021 07:53 PM
If it helps you, consider accepting the solution so that others can find it easier. Thanks!
- Mark as New
- Bookmark
- Subscribe
- Mute
- Subscribe to RSS Feed
- Permalink
- Report Inappropriate Content
09-05-2021 08:00 PM
Can you please specify how to popup notification after record is saved / created
- Mark as New
- Bookmark
- Subscribe
- Mute
- Subscribe to RSS Feed
- Permalink
- Report Inappropriate Content
09-05-2021 08:10 PM
May be you can make use of Client scripts for that. Not exactly sure of it.