- Mark as New
- Bookmark
- Subscribe
- Mute
- Subscribe to RSS Feed
- Permalink
- Report Inappropriate Content
03-07-2019 09:26 AM
Need a workaround to either Edit existing UI Page or Copy UI Page "Source_Request" and make highlighted checkbox = true.
The UI page is called in the UI Action "Source Request" with code as below :
function openSourceRequestPage() {
var gr = new GlideRecord("sc_task");
gr.get(g_form.getUniqueValue());
var url = new GlideURL('$source_request.do'); // without '$' sign the code change can be seen but view is not same as below
url.addParam('sysparm_stack', 'sc_task.do?sys_id='+gr.sys_id);
url.addParam('sysparm_req_sysid', gr.parent);
url.addParam('sysparm_sc_task',gr.sys_id);
url.addParam('sysparm_nostack', 'true');
window.location.href = url.getURL();
}

Solved! Go to Solution.
- Labels:
-
User Interface (UI)
- Mark as New
- Bookmark
- Subscribe
- Mute
- Subscribe to RSS Feed
- Permalink
- Report Inappropriate Content
03-13-2019 10:18 AM
Hi..apologies for the late reply.
We went through lot of trial and error in getting all of this to work. A lot of custom functionality was added (being able to save and retrieve state, vendor /model defaults, etc) which contains proprietary information so unfortunately I cant share out the code but Ill share what I can.
Keeping to the OOB functionality was not a requirement so the main goal was to get either Transfer Orders or Purchase Orders created based on the choices selected by the Procurement team. The system would then handle the rest as intended.
The OOB system functions we were after are contained in the ProcSourceRequestManager Script Include. From there we simply extended the class with a custom script include and then we added new, as well as, overwrote OOB functionality. Keep in mind the main purpose of the OOB Source Request page is to either create a Purchase or a Transfer Order. One other function is to handle entitlements for software requests.
The widget loads the request data using the following server script:
(function() {
	/* populate the 'data' object */
	var transaction = new GlideTransaction.get();
	var request = transaction.getRequest();
	var psrm = new Custom_ProcSourceRequestManager(request);

	//on load, check if there is any saved data
	if(!input){
		data.request = psrm.getREQData();
		data.request.saved = psrm.saveFound(data.request.req_sys_id);
		data.request.sc_task_sys_id = $sp.getParameter("sysparm_sc_task");
		//console.log(data);
	}

	//save function
	if(input.action == "save") {
		data.num = psrm.saveSourceItems(input.data);
	}

	//load default data function
	//get all the RITM info, the defaults, and the associated vendors/stockrooms/licenses for the given RITM
	if(input.action == "loadDefault") {
		var req_items = psrm.getSCRequestItems();
		data.items = psrm.buildDataToSubmit(req_items);
	//	console.log(data.items);
	}

	//load saved data function
	//find all the data for a given saved file
	if(input.action == "loadSaved") {
		data.items = psrm.getSaveData(input.number, input.req_sys_id);
	}

	if(input.action == "submit") {
		data.response = JSON.parse(psrm.processRequest(input.sc_task_sys_id, input.req_sys_id, input.data));
	}

})();
A UI Action on the Procurement Task directs the user to the new form with passed parameters:
function Custom_openSourceRequestPage() {
	var gr = new GlideRecord("sc_task");
        gr.get(g_form.getUniqueValue());

	var url = new GlideURL('pc/?id=custom_source_request');
	url.addParam('sysparm_stack', 'sc_task.do?sys_id='+gr.sys_id);
	url.addParam('sysparm_req_sysid', gr.parent);
	url.addParam('sysparm_scReq', gr.parent);
	url.addParam('sysparm_sc_task',gr.sys_id);
	url.addParam('sysparm_scReqTask',gr.sys_id);
	url.addParam('sysparm_nostack', 'true');
	window.location.href = url.getURL();
}
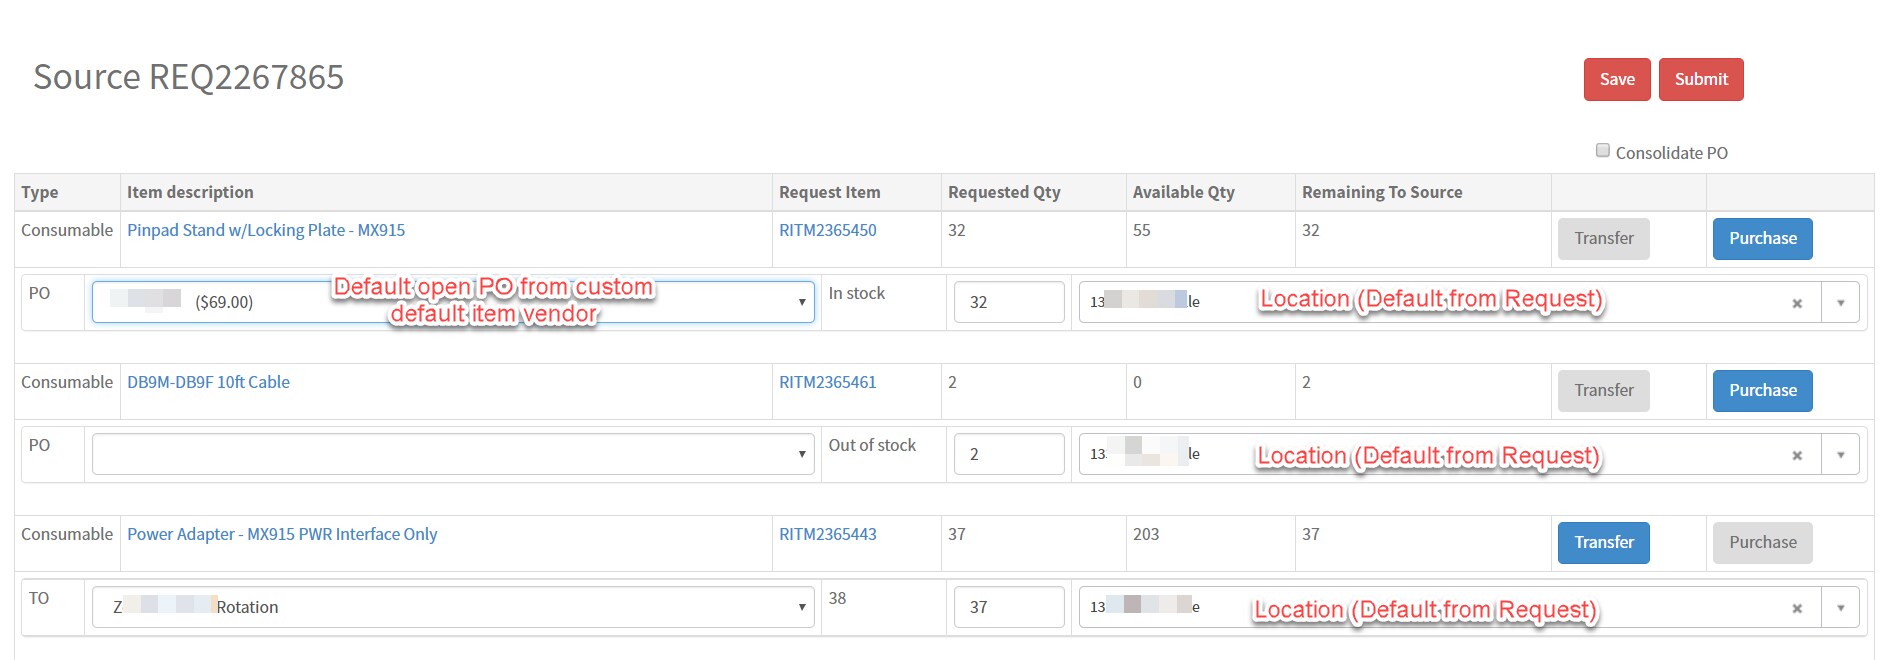
When the new portal Source Request page loads the following is displayed:

Hopefully this helps point you in the right direction.
--David
- Mark as New
- Bookmark
- Subscribe
- Mute
- Subscribe to RSS Feed
- Permalink
- Report Inappropriate Content
03-12-2019 10:31 AM
Hi David,
I am seeing alot of risk in implementing this solution as we dont have any code for reference, there is alot more at the back end than what we see. there are transfer orders, there is add assignment .
How did you manage to cover everything and be sure that all oob functionalities were covered in your custom widget ?
I am wondering how without any back end code knowledge this can be built blindly. I understand we have script include but what functions are to be called when, how did you figure that out without any requirements?
It would be great if you could at least share your approach to make that work!
- Mark as New
- Bookmark
- Subscribe
- Mute
- Subscribe to RSS Feed
- Permalink
- Report Inappropriate Content
03-13-2019 10:18 AM
Hi..apologies for the late reply.
We went through lot of trial and error in getting all of this to work. A lot of custom functionality was added (being able to save and retrieve state, vendor /model defaults, etc) which contains proprietary information so unfortunately I cant share out the code but Ill share what I can.
Keeping to the OOB functionality was not a requirement so the main goal was to get either Transfer Orders or Purchase Orders created based on the choices selected by the Procurement team. The system would then handle the rest as intended.
The OOB system functions we were after are contained in the ProcSourceRequestManager Script Include. From there we simply extended the class with a custom script include and then we added new, as well as, overwrote OOB functionality. Keep in mind the main purpose of the OOB Source Request page is to either create a Purchase or a Transfer Order. One other function is to handle entitlements for software requests.
The widget loads the request data using the following server script:
(function() {
	/* populate the 'data' object */
	var transaction = new GlideTransaction.get();
	var request = transaction.getRequest();
	var psrm = new Custom_ProcSourceRequestManager(request);

	//on load, check if there is any saved data
	if(!input){
		data.request = psrm.getREQData();
		data.request.saved = psrm.saveFound(data.request.req_sys_id);
		data.request.sc_task_sys_id = $sp.getParameter("sysparm_sc_task");
		//console.log(data);
	}

	//save function
	if(input.action == "save") {
		data.num = psrm.saveSourceItems(input.data);
	}

	//load default data function
	//get all the RITM info, the defaults, and the associated vendors/stockrooms/licenses for the given RITM
	if(input.action == "loadDefault") {
		var req_items = psrm.getSCRequestItems();
		data.items = psrm.buildDataToSubmit(req_items);
	//	console.log(data.items);
	}

	//load saved data function
	//find all the data for a given saved file
	if(input.action == "loadSaved") {
		data.items = psrm.getSaveData(input.number, input.req_sys_id);
	}

	if(input.action == "submit") {
		data.response = JSON.parse(psrm.processRequest(input.sc_task_sys_id, input.req_sys_id, input.data));
	}

})();
A UI Action on the Procurement Task directs the user to the new form with passed parameters:
function Custom_openSourceRequestPage() {
	var gr = new GlideRecord("sc_task");
        gr.get(g_form.getUniqueValue());

	var url = new GlideURL('pc/?id=custom_source_request');
	url.addParam('sysparm_stack', 'sc_task.do?sys_id='+gr.sys_id);
	url.addParam('sysparm_req_sysid', gr.parent);
	url.addParam('sysparm_scReq', gr.parent);
	url.addParam('sysparm_sc_task',gr.sys_id);
	url.addParam('sysparm_scReqTask',gr.sys_id);
	url.addParam('sysparm_nostack', 'true');
	window.location.href = url.getURL();
}
When the new portal Source Request page loads the following is displayed:
Hopefully this helps point you in the right direction.
--David
- Mark as New
- Bookmark
- Subscribe
- Mute
- Subscribe to RSS Feed
- Permalink
- Report Inappropriate Content
03-13-2019 11:06 AM
Thank you so much David !! i highly appreciate your time and effort in explaining this.
- Mark as New
- Bookmark
- Subscribe
- Mute
- Subscribe to RSS Feed
- Permalink
- Report Inappropriate Content
03-13-2019 12:11 PM
You are very welcome! I'm glad that I could help. 🙂
- Mark as New
- Bookmark
- Subscribe
- Mute
- Subscribe to RSS Feed
- Permalink
- Report Inappropriate Content
04-25-2019 12:45 PM
Hi David,
Thank you for your solution. Wondering how were you able to create multiple purchase order lines per RITM ?
Thanks,
Nitin