- Post History
- Subscribe to RSS Feed
- Mark as New
- Mark as Read
- Bookmark
- Subscribe
- Printer Friendly Page
- Report Inappropriate Content
on
12-08-2021
04:18 PM
- edited on
06-01-2023
12:05 PM
by
Smriti_Gupta
![]()
Note: For setting up the Employee Center base version, follow the instructions in this article.
This article provides the steps required to configure Employee Center Pro using demo data shipped with the store apps. Customers and Partners who want to evaluate the capabilities of Employee Center Pro in a pre-production environment would need to follow these steps.
These steps are applicable for customer instances on Rome release or higher. Though Utah instance customers might need to skip some steps as pointed out.
Assumptions:
- You are using a fresh ServiceNow instance on Rome release or higher. This means you don’t have any pre-configured portal implementations.
- You want to use the demo data and the content taxonomy shipped out-of-box (OOB) with Employee Center and related apps.
- The steps below don't include the steps required to set up underlying technologies such as AI Search or Virtual Agent on the ServiceNow instance.
Table of Contents:
- Part 1: Setup Employee Center Pro with IT demo data only
- Part 2: Add HR Service Delivery (HRSD) demo data to Employee Center Pro
- Part 3: Add Workplace Service Delivery (WSD) demo data to Employee Center Pro
- Part 4: Add Legal Service Delivery (LSD) demo data to Employee Center Pro
Part 1: Setup Employee Center Pro with IT demo data only
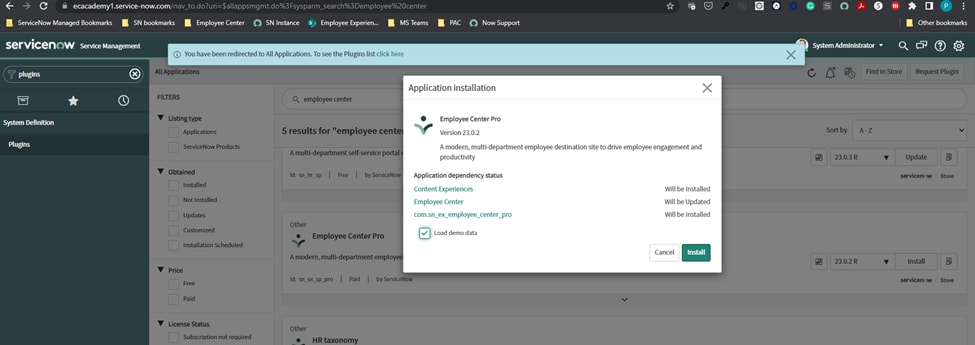
Step 1: Install the latest Employee Center Pro – with the demo data
Install the latest version of Employee Center Pro from the ServiceNow store. Follow the steps below:
- Navigate to System Applications -> All
- Search for “Employee Center Pro”
- Install the Employee Center Pro 28.0.3 or later version. Make sure to check Load Demo Data
Below are the apps that will get installed as part of installing Employee Center Pro —if you haven’t already installed them separately.
- Employee Center (and its dependent apps: Employee Center Core, Employee experience taxonomy, and employee experience foundations)
- Enterprise Service Management Integrations Framework
- Content Experiences (and its dependent Content Publishing app).

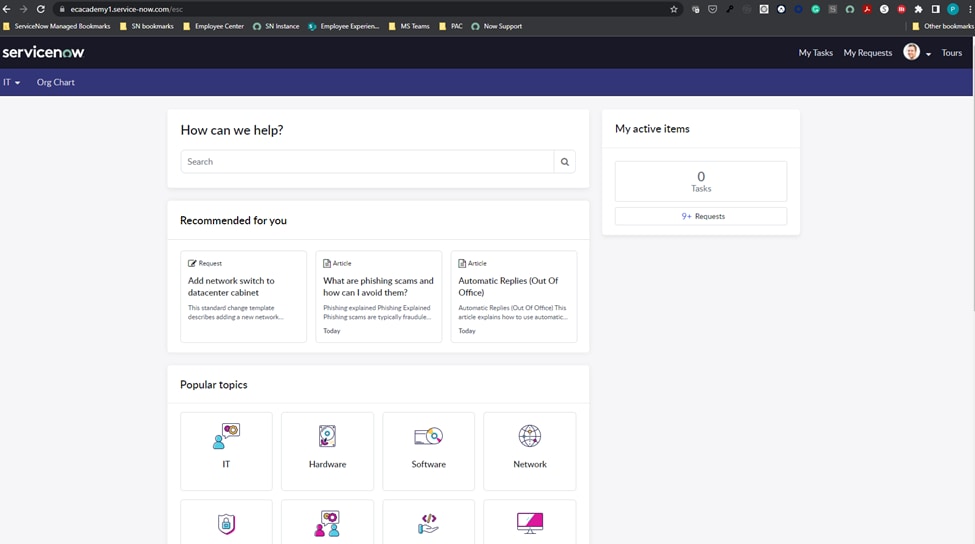
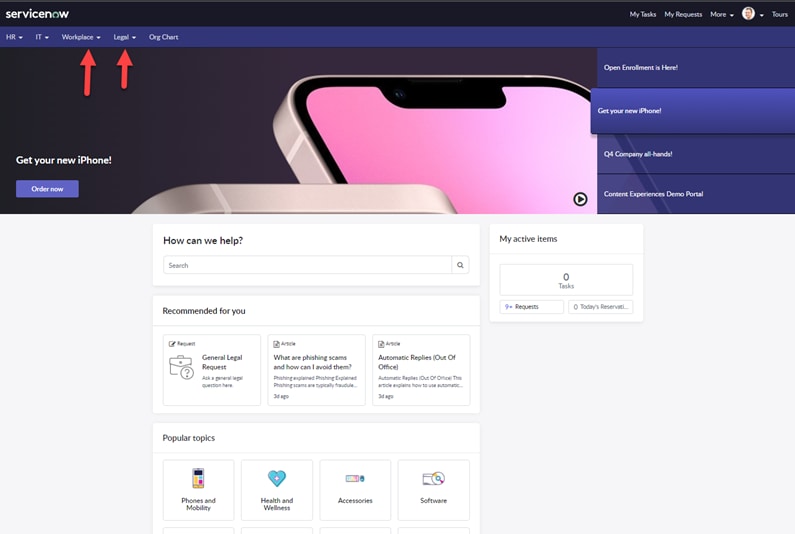
After these steps, if you are on Utah family release or higher, your /ESC page will look like as shown below with all the demo data loaded.

However, if you are on Rome, San Diego and Tokyo family release, below is what the /ESC page will look like — this is expected, as we haven’t finished loading the right demo data to create the experience.

Note: Steps 2 to 4 are not needed for Utah family release or higher.
Step 2: Load demo data for dependent apps.
Applications that get installed as a dependency, don’t load the demo data associated with it automatically. So, we will need to repair the dependent apps and load demo data for them. Follow the below process:
- Navigate to System Applications -> All
- Find the Content Experiences
- Click Repair and check the box to load demo data
Repeat the above three bullets for:
- Content Publishing
- Employee Center
- Employee Experience Taxonomy
Note: Don’t attempt to repair the Employee Center Core application.
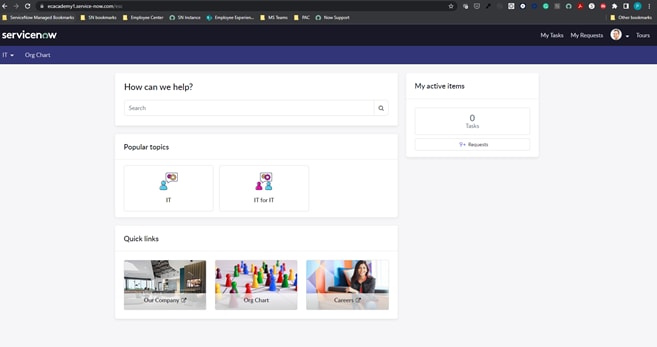
Below is what the /esc portal will look like after this step:

You will notice the “relevant for you” widget is not visible and the search isn't working. While setting up with Demo Data or the OOB employee taxonomy, you need to do the next step.
Step 3: Run “Set Primary topics for taxonomy” fix script
The “Set Primary topics for taxonomy” fix script is required for the “relevant for you” widget and search to function properly on Employee Center while using the OOB "employee" taxonomy. Technically, it sets the “taxonomy_topic” field for the knowledge articles and Catalog items associated with the demo data.
Note: This script is not required if you are using a new/cloned taxonomy, which is then manually associated with the Employee Center Portal.
Follow the steps below to run this script:
- Navigate to System Definition > Fix Scripts.
- Search for Set primary topics for Employee taxonomy script, and click to open.
- Click Run Fix Script.
At this point, you may see some errors pop up when you go to the portal view. Follow the next step o resolve them:
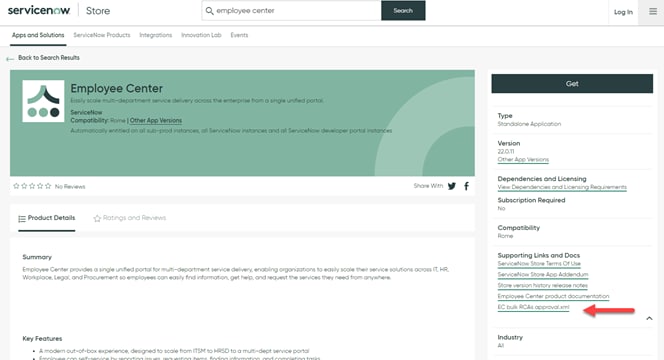
Step 4: Check and allow Requested Caller Access i.e. RCA privileges requested by Employee Center
Follow the instructions on this product docs page to resolve RCA errors. You will need to download a script provided on the ServiceNow Store listing for Employee Center Pro (you may have to press “show more” to see the script, see screenshot below), and run in within your instance:

Note: Sometimes it takes time for the RCA requests to show up on the instance, so you may want to load the /esc page a few times, before running the script.
Alternative to running the script, you can manually approve any RCA requests stuck in the requested state by going to System applications -> Application Restricted Caller Access
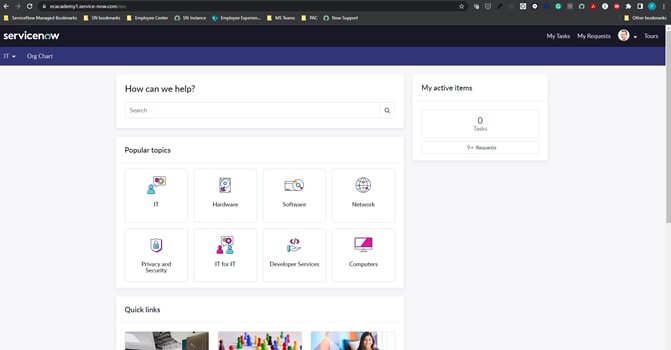
After resolving the errors, below is how the /esc portal will look like:

You will notice that the nice looking banner that you see on top (the Content Experiences Widget) is missing, this is expected because OOB, we don't have any demo data associated with the widget. Thus it doesn't appear on the home page.
Step 5: Create demo data for Content Experiences Widget
Note: For Utah family release or higher, demo data is already shipped out of the box with Content Experiences Header widget. However, you can consider implementing step 5, if you want to add additional content experiences header banners.
For Rome, San Diego or Tokyo releases, since we don't have styled content available as part of demo data, you will need to create a few of your own and then publish them to appear on the Content Experiences Widget. Follow the steps below:
Note: These steps are based on the new content authoring and publishing experience we shipped as part of our Nov'21 store launch.
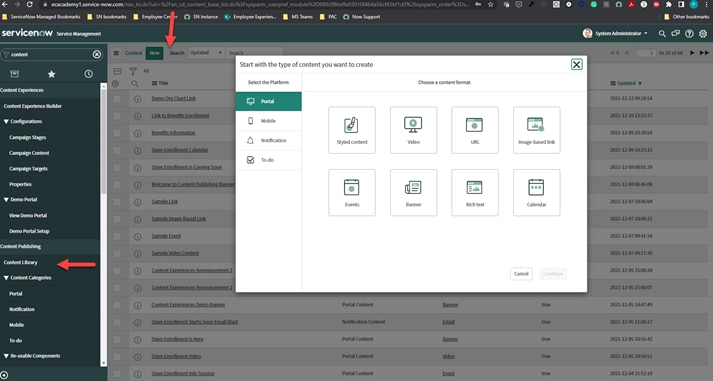
- Go to Content Publishing > content library
- Create new content (see screenshot below)

- Pick styled content from the options on the right
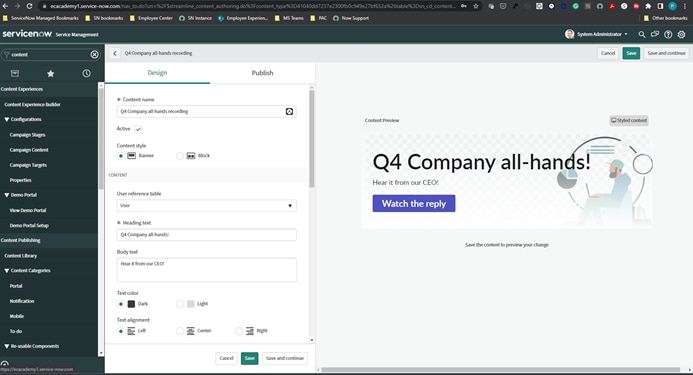
- Design it as per your needs using the options available (see screenshot below)

- Go to the Publish tab or press "Save and Continue"
- Define the publish plan. Make sure to schedule the content to be published to the Employee Center Pro home page (ec_pro_dashboard), to the Content Experience Header widget with an audience of Active Users

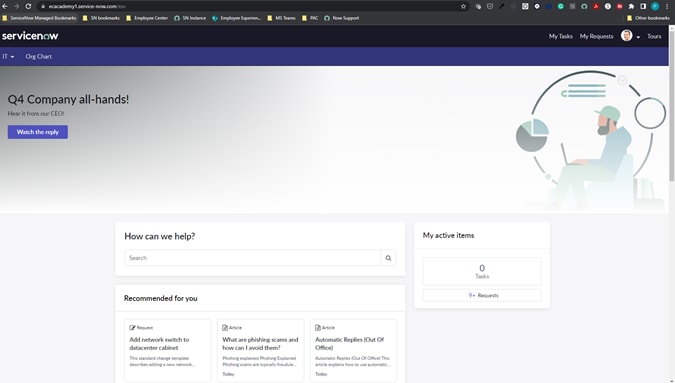
If you have only one content item scheduled for the widget, below is how the portal will look:

Repeat the above steps to create and publish styled content to the content experiences widget, below is how your portal will look once completed.

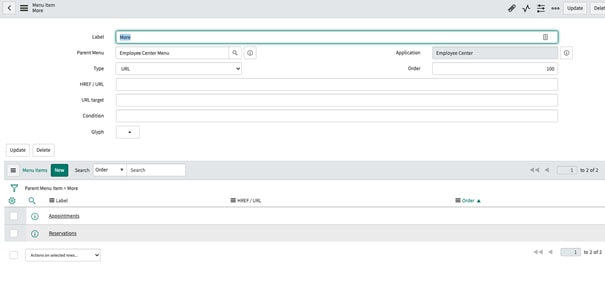
Step 6: Create demo data for the More Menu on Employee Center Header
Finally, since there is no demo data associated with More menu, you may want to follow the below steps to complete the experience:
- Navigate to Service Portal -> Portals
- Go to Employee Center and hit edit
- Open the “Employee Center Menu” record for Main Menu
- Open the menu item called “More”
- Make sure you change the application scope to Employee Center
- Create new menu items in Menu Items the related list. You can use blank URL menu items for demo purposes. For example, Appointments and Reservations

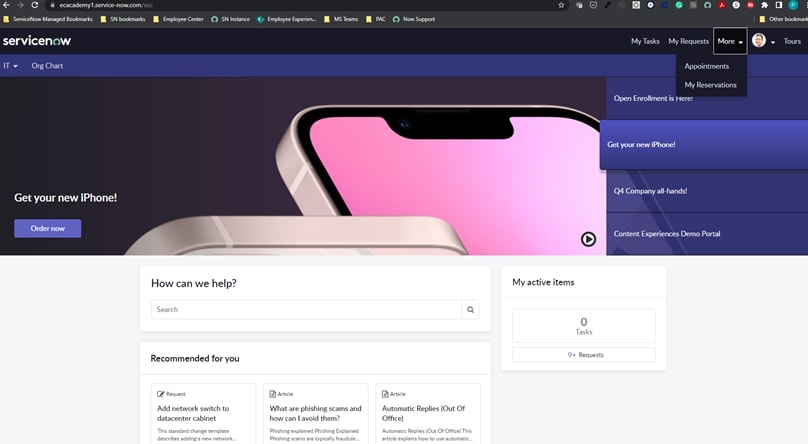
This is the complete EC Pro home page with IT only demo data:

Part 2: Adding HR Service Delivery (HRSD) demo data to Employee Center Pro
Note: These instructions assume you have previously configured Employee Center Pro as per Part 1 of this article and validated the home page looks as shown in the above screenshots. You will need to have HRSD license associated with the ServiceNow instance you are using.
Step 1: Install Human Resources Scoped App: Core with the demo data — this will take time as it will download the HRSD application suite if you haven't done so before.
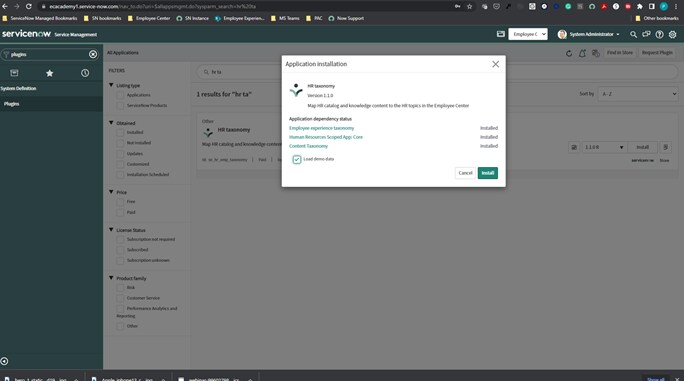
Step 2: Install HR taxonomy app with the demo data — this will be quick as you have already downloaded the required applications and need this step for the demo data

Step 3: Run the fix script "Set primary topics for Employee taxonomy"
Just as before, you will need to run the "Set primary topics for Employee taxonomy" fix script to index the HR demo data into search and "recommended for you" widget. Go to system definitions > fix_scripts to find and run this script.
Step 4: Check and allow any Requested Caller Access i.e. RCA privileges stuck in the requested state
Follow these instructions to run the script to resolve as before.
Below is the Employee Center Pro home page with HR and IT demo data enabled.

Part 3: Adding Workplace Service Delivery (WSD) demo data to Employee Center Pro
Note: These instructions assume you have previously configured Employee Center Pro as per Part 1 of this article and validated the home page looks as shown in the above screenshots. You will need to have WSD license associated with the ServiceNow instance you are using.
Step 1: Install “Workplace Service Delivery suite”
- Navigate to System Applications -> All
- Search for “Workplace Service Delivery suite”
- Install version 9.1-1 or later. This will take some time.
Step 2: Load demo data
- Navigate to these applications and repair them to load their demo data:
-
- Workplace Safety Management
- Workplace Reservation Management
Step 3: Run the fix script "Set primary topics for Employee taxonomy"
Just as before, you will need to run the "Set primary topics for Employee taxonomy" fix script to index the HR demo data into search and "recommended for you" widget. Go to system definitions > fix_scripts to find and run this script.
Step 4: Check and allow any Requested Caller Access i.e. RCA privileges stuck in the requested state
Follow these instructions to run the script to resolve as before.
Part 4: Adding Legal Service Delivery (LSD) demo data to Employee Center Pro
Note: These instructions assume you have previously configured Employee Center Pro as per Part 1 of this article and validated the home page looks as shown in the above screenshots. You will need to have LSD license associated with the ServiceNow instance you are using.
Step 1: Install "Legal: Counsel Center"
- Navigate to System Applications -> All
- Search for “Legal: Counsel Center”
- Install version 4.0.1 or later. This will take some time.
Step 2: Load demo data
- Navigate to these applications and repair them to load their demo data:
-
- Legal: Request Management
- Legal: Matter Management
Step 3: Run the fix script "Set primary topics for Employee taxonomy"
Just as before, you will need to run the "Set primary topics for Employee taxonomy" fix script to index the HR demo data into search and "recommended for you" widget. Go to system definitions > fix_scripts to find and run this script.
Step 4: Check and allow any Requested Caller Access i.e. RCA privileges stuck in the requested state
Follow these instructions to run the script to resolve as before.
Below is the multi-department experience on Employee Center Pro, after following these steps:

To learn more about configuring Employee Center, follow the Employee Center Academy series.
- 46,909 Views
- Mark as Read
- Mark as New
- Bookmark
- Permalink
- Report Inappropriate Content
This is very helpful! Thanks for posting this.
- Mark as Read
- Mark as New
- Bookmark
- Permalink
- Report Inappropriate Content
Since I have updated the employee center core plugin I am not able to see the Popular topics widget even though I have added from page designe, repaired and load demo data for
- Content Experiences
- Content Publishing
- Employee Center
- Employee Experience Taxonomy
Please help

- Mark as Read
- Mark as New
- Bookmark
- Permalink
- Report Inappropriate Content
Try running the Employee Center Easy Install fix script (see this doc page). Since you repaired the core plugin, it likely erased all pre-configurations done OOB.
- Mark as Read
- Mark as New
- Bookmark
- Permalink
- Report Inappropriate Content
Hi Pooja,
Hoping maybe you can share some insight to my problem.
I have an Employee Center portal with AI Search enabled and unified taxonomy, but for some reason the search will not return catalog items unless they have a category defined. This seems counter intuitive, as I thought the intent of taxonomy is to remove reliance of categories. Do you have any thoughts as to why this is and how to ensure the system uses taxonomy instead of category?
The taxonomy (custom, not OOB) is linked on the portal record, and catalog items are linked in "connected content". In "search sources" I have added the taxonomy to the condition and from the preview link I see all the catalog items I expect. I have also disabled the OOB taxonomy just to make sure there is no taxonomy conflict.
Regards,
Rolf
- Mark as Read
- Mark as New
- Bookmark
- Permalink
- Report Inappropriate Content
Thank you for the detailed steps on setting up the ESC pro with dummy data. We are looking to move from ESC to ESC pro and currently playing with it in our sandpit environment but its hard to understand how to not loose our existing categories by adopting the taxonomy concept.
The other feature with ESC Pro is to have the Taxonomy like IT, HR, FInance etc on header menu. However, we dont want to setup ESC pro for individual functions as if we do that for the functions that are currently onboarded around 6-7 then we would see huge flux of demands from other functions to be in the header menu 🙂
We want simplified experieince for end users where they don't need to think about functions but come to the platform for Find information like article, Do tasks like Catalog Requests and Record Producers and connect to human agent using VA if needed.
Users can always apply functions level filter on the searches but we dont want to apply all fuinctions on the Home page main menu.
Looking for some success stories and steps taken by other partners to implement Service Now ESC pro.
- Mark as Read
- Mark as New
- Bookmark
- Permalink
- Report Inappropriate Content
Hi Pooja, Hoping this thread is being monitored. We've recently installed EC Pro per these instructions in a few environments. Running into an error consistently that appears to be a conflict of some sort.
Content Publishing > Content Library, New, select Portal, select Styled Content, fill in Content Name and Heading text and click save. After saving the error appears.
Error: Could not find sn_ca_campaign_item null
This is appearing on all content library records. I've poked around the system and configured some campaigns and campaign bundles but not finding anything. Please let me know.
- Mark as Read
- Mark as New
- Bookmark
- Permalink
- Report Inappropriate Content
I was able to figure this out by updating the Script Includes ca_CampaignContent and cd_contentDelivery. They were both on old versions.
- Mark as Read
- Mark as New
- Bookmark
- Permalink
- Report Inappropriate Content
Very helpful! Thank you for making this and for being so detailed!
- Mark as Read
- Mark as New
- Bookmark
- Permalink
- Report Inappropriate Content
Indeed, So helpful !! Bookmarked 😊
- Mark as Read
- Mark as New
- Bookmark
- Permalink
- Report Inappropriate Content
Hi,
In the ESC portal, I am getting an announcement saying "

" and am unable to remove it.
- Mark as Read
- Mark as New
- Bookmark
- Permalink
- Report Inappropriate Content
Hi,
I added Video in the RICH Content Widget but no sound, I checked volume is high in but no Luck
Any of you faced the similar situation?
- Mark as Read
- Mark as New
- Bookmark
- Permalink
- Report Inappropriate Content
anyone else have their banners resized to be centered? I'd like it to be the entire width of the page like in the example of the original post.
- Mark as Read
- Mark as New
- Bookmark
- Permalink
- Report Inappropriate Content
I did all the mentioned steps on my Personal development instance, and still the Employee center doesn't reflect any of the changes made, could you guide me with what's lacking in the setup?
- Mark as Read
- Mark as New
- Bookmark
- Permalink
- Report Inappropriate Content
has anyone came up with a proper updated list? this sounds like an extra extra outdated content.
- Mark as Read
- Mark as New
- Bookmark
- Permalink
- Report Inappropriate Content
So I figured out something that you need to log out and log in back into your instance to view the changes.
- Mark as Read
- Mark as New
- Bookmark
- Permalink
- Report Inappropriate Content
@shaikhsana1 hahahahah that's awesome. You know what I told to one of my devs today? There's some unknown stuff going on. I do make changes. - Refresh the page - and nothing is happening. I'm giving up and coming back next day to find out everything is working. This is the funniest thing I discovered. But you nailed it. Relogon. I wonder if this recommendation is HIDDEN away from people's eyes somewhere in top hints. I want to cry. But thanks!