


Deepak Ingale1
Mega Sage
Options
- Subscribe to RSS Feed
- Mark as New
- Mark as Read
- Bookmark
- Subscribe
- Printer Friendly Page
- Report Inappropriate Content
04-23-2016
04:25 AM
Microsoft has built a very Powerful scripting interface "PowerShell" . We can not only interact with windows server but also with the other infrastructure related components like VMware, NetApp storage. The only thing we require is to add cmdlets (commands of Powershell are known as cmdlets) of these technologies/ platforms via import-module command. Once done, we are free to interact with these platforms.
In a series of this blog, I am going to start with "Creating your own AD Server" and thinking to extend it further to demonstrate different types of automations that we can achieve.
So let's start first with "Creating your own AD Server"
No separate Server, Laptop or Desktop is required. We are going to host this AD Server on VMware work station.
Requirements:
1) A machine with CPU Clocked at 1.4GHz x86/64. This is the minimum requirement
2) A drive space of at least 40Gb. This is the minimum requirement
3) Windows Server 2008 R2 evaluation version OS with 180 days .You can download it from https://www.microsoft.com/en-in/download/details.aspx?id=11093.
4) VMware workstation 10, https://my.vmware.com/web/vmware/details?downloadGroup=WKST-1007-WIN&productId=362&rPId=8482. We will create Virtual Server using this workstation
5) Host machine with at least 2GB RAM. Server 2008 R2 requires at least 512MB, you can increase it for better performance and experience if your host machine has more RAM
6) MID Server installed on your local machine pointing to your personal developer instance. sabell2012 has already written an article ServiceNow Discovery 101: Setting Up a Local MID Server for it. MID Server is required to interact with our ServiceNow instance. So go ahead and complete this installation
Steps:
1) Download and install VMware workstation
2) Download evaluation copy of Server 2008 R2
3) Create a new Virtual Machine (VM) and install Server 2008 R2 OS https://kb.vmware.com/selfservice/microsites/search.do?language=en_US&cmd=displayKC&externalId=10184...
4) Once done, create your own domain , you can refer to steps for it.
https://technet.microsoft.com/en-us/library/dd883274(v=ws.10).aspx
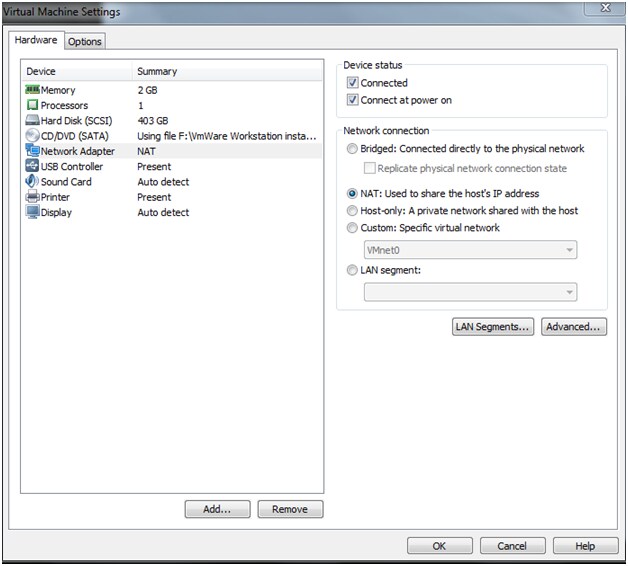
5) Go to "VM" >> "Settings" and "Network Adaptor" menu option via workstation and set networking mode to NAT. This is important for our MID Server, instance to communicate with Virtual machine.
6) Now we need to add "NAT" type connection. For this, launch "Virtual Network Editor" from "Edit" menu option of the Vmware workstation
It will open a configuration window like one shown above. It may happen that you will not see "NAT"
We require to create "NAT" type network connection. If you do not find anything of this type, you can add via "Add Network" option. Make sure you are selecting the check boxes as above.
For IP address range, you can use any of the private IP address series
- e.g. 10.0.0.0 to 10.255.255.255 OR 172.26.31.0 OR 192.168.10.0 etc
Let's use 192.168.10.0 for our set-up.
Add 192.168.10.0 in subnet IP address box, keep subnet mask to 255.255.255.0
You can see network adapter with name corresponding to your NAT network also got created in your local machine. In my case it is "VMnet8". Yours might be different.
This is an network adapter via which we are going to communicate between "AD server" to "External world" like ServiceNow instance.
Check the IP address of this virtual network adapter, it must be from the range 192.168.10.0 to 192.168.10.254 based on our subnet.
😎 Check the IP address of the VM created, it must also be from the range 192.168.10.0 to 192.168.10.254.
9) Install Orchestration plugins on your instance
That's it, we are now good to go ahead with activities related to window active directory server.
Advantages:
1) AD server is VM, do not forget to take a snapshot after successful installation. This helps in reverting your virtual machine in case we spoil it after some days. Its like a backup.
2) Use the same AD server for LDAP integration related operation, we will require users and groups populated. we will create those in next post.
Kindly do not forget to like or bookmark this article if it helps you.
- 4,089 Views
3 Comments
You must be a registered user to add a comment. If you've already registered, sign in. Otherwise, register and sign in.

