


sabell2012

Mega Sage
Options
- Subscribe to RSS Feed
- Mark as New
- Mark as Read
- Bookmark
- Subscribe
- Printer Friendly Page
- Report Inappropriate Content
06-05-2016
06:37 AM
NOTE: MY POSTINGS REFLECT MY OWN VIEWS AND DO NOT NECESSARILY REPRESENT THE VIEWS OF MY EMPLOYER, ACCENTURE.
THE FOLLOWING ARTICLE IS A SUGGESTED METHOD FOR DEVELOPING AND TESTING ORCHESTRATION CODE AND NOT AN ENDORSEMENT OF ANY PARTICULAR PRODUCT MENTIONED.
WARNING: THIS IS AN ADVANCED ARTICLE as it assumes knowledge or familiarity of several different areas.
____________________________________________________________________________
This particular solution had been a holy grail of mine for some time: How to create my own virtual network/set-of-devices that would allow me to self-train (in advanced topics), write articles/labs, do my own development, help me work through problems I had encountered, and so-on.
So, thought I would share how I made it work!
Turning to the Virtual Machines that are available for download. I picked one that I was very familiar with: VirtualBox, but you could do this with Microsoft Hyper-V ($$, and btw Virtual PC is not supported after Windows 7), or VMWare ($$$), or Parallels ($).
Five Best Virtual Machine Applications
In this lab we will be doing the following:
- Installing and Configuring Oracle VirtualBox
- Installing and Configuring Windows 2008 Standard Server (60-day evaluation copy)
- Creating an Orchestration Workflow to test the Server
Pre-requisites
1. Personal instance with the Orchestration plug-in installed. This will include the Active Directory activities which we will be using in another lab.
2. Install and configure a local MID Server (see the ServiceNow Wiki for how-tos)
3. Knowledge of the ServiceNow platform, Workflow Editor, Constructing Workflows, Orchestration
4. Familiarity with Microsoft Windows Server environment. A knowledge on how to transfer files from one system to another is recommended. The purpose of this article is not to teach Windows Server management.
5. Personal computer with enough space (RAM, Disk) to install and run VirtualBox with the Windows image loaded.
6. If you have problems with running PowerShell commands on your local PC then consider changing your execution policy: Using the Set-ExecutionPolicy Cmdlet
Lab 1.1: Installing and Configuring Oracle VirtualBox
1. Download and install Oracle VirtualBox:
2. Download Windows 2008 Server 32-bit iso file. You could opt to go with 64-bit if you wish, but 32-bit will be fine.
Side Note (these are interesting and worth investigating, but we will not be using them in the labs):
Microsoft tells developers: Download our free virtual machines | ITworld
Virtual Machine (VM), Windows Virtual PC & BrowserStack
3. From you PC open a Command Prompt (cmd.exe) window, and do an IPConfig to find out what your current IP and gateway are.
Note: I put mine in the parenthesis as an example. Your results will likely be different.
a. Write your local IP here: ____________ (192.168.43.99)
b. Write your Subnet Mask here: _____________ (255.255.255.0)
c. Write your Default Gateway here: _____________ (192.168.43.1)
4. Open VirtualBox on your PC.
5. Click the New button
a. Name: Microsoft Server 2008
b. Type: Microsoft Windows
c. Version: Windows 2008 (32-bit)
d. Click the Next button
e. Memory size: 512 Mb (default). Click the Next button.
f. Hard disk: Create a virtual hard disk now. Click the Next button.
i. Hard disk file type: VDI (default). Click the Next button.
ii. Storage on physical hard disk: Dynamically allocated. Click on the Next button.
iii. File location and size: 25.00 GB, take the defaults. Click on the Create button.
iv. You will be returned to the main VirtualBox console, and your new Virtual Machine should be visible.
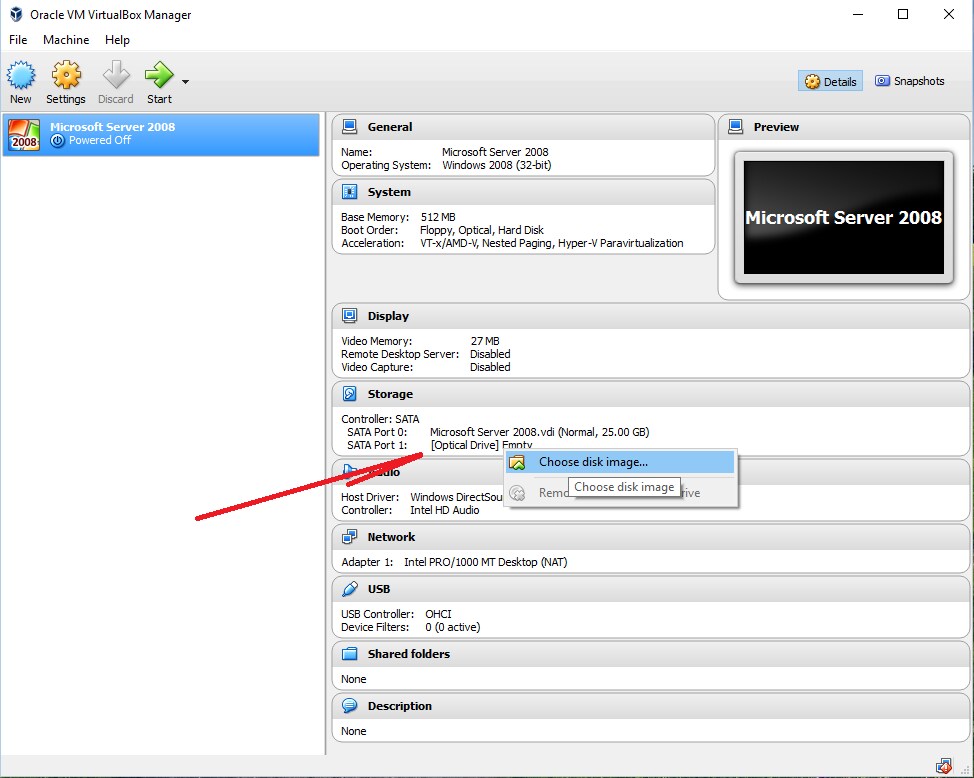
g. Under Storage, click on the [Optical Drive] empty link, and click on Choose Disk Image...
i. Navigate to where the Windows 2008 Server iso is stored
ii. Choose the iso and click ok. You should see the iso attached on SATA Port 1.
Lab 1.2: Installing and Configuring Windows 2008 Standard Server
6. Now click the big green Start button! This will boot up your new server, and install from the iso image.
a. Install Windows: Take the defaults. Click next.
b. Click the big "Install now" button.
c. Type your product key for activation: Leave blank to evaluate the software (if you wish to purchase a license later). Un-check Automatically activate Windows...
d. Do you want to enter your product key now? Click the no button if you are only evaluating.
e. Windows Version: Choose Standard (Full Installation). Then click on the "I have selected the edition of Windows that I purchased". Again, if still an evaluation copy, then you will need to check this box to get the Next button to be clickable.
f. License terms: Read the terms. If you agree, check the box and click the Next button.
g. Which type of installation do you want? Custom should be the only choice. Click on Custom.
h. Where do you want to install Windows? There should only be the 25Gb drive. Click Next.
i. At this point Windows will begin installing. Go get some coffee as this could take a bit. Allow the software to restart your device as needed.
j. When it finishes Windows will have you change the password when logging in for the first time. Do so. Windows will then be up and running!
k. Log into Windows using your Administrator credentials.
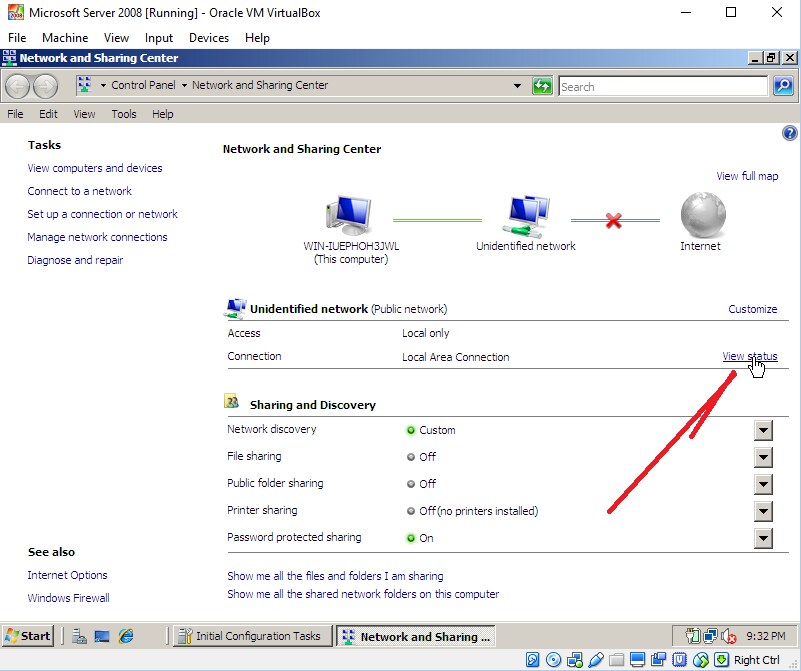
l. In the lower-right corner click on the double monitor symbol and then click on the Network and Sharing Center link. This will open the Network and Sharing Center form.
m. Click on the View Status link to bring up the Local Area Connection Status form.
n. From the Local Area Status Form click on the Properties button. This will display the Connection Properties form.
o. From the Connection Properties form click on the Internet Protocol Version 4 (TCP/IPv4) item. Do NOT uncheck this. Then click on the Properties button.
p. Now using the IP information you recorded back in step 3 configure your Server's IP information. I made an IP up for my server that was below the .10, but not .1 or .0. The Default gateway also served as my DNS server. You have to have a fixed IP for any server being used as an Active Directory or for DNS work.
i. Fill in the information.
ii. Click OK to save your work. Then click Close on the Connection Properties form. Then click the Close button on the Connection Status form. It might be necessary to reboot your Virtual Machine to get the network settings to take.
q. Now open the Windows Firewall link (in the lower left of the Network and Sharing Center form).
r. Click on the Change settings link. This will open the Windows Firewall Settings panel.
s. Click on the Exceptions tab. Make sure Remote Administration is checked (if this is off it will block your MID Server from performing PowerShell commands against your new server). Then click the OK button to save your work. Close out the Windows FIrewall form.
t. At the top of the VirtualBox form click on the Machine menu item. Then choose Settings...
u. Click on Network to display the network settings.
v. Click on Attached to and choose Host-only Adapter. This will set up the ability to communicate between your PC and the Virtual Machine Server.
w. Click the OK button to save your work. Your Server is now configured and ready to be accessed from your personal ServiceNow instance.
x. Open a Command Prompt on your PC and ping your new server to verify that communication is good. Use the IP address you gave it. You should get results similar to the screen shot below:
y. You now will need to download and install the latest updates for your new server (requires quite a bit of time to babysit through several install cycles to bring it up to date). The reasoning is to get to R2, and you will have the latest administrative tools including (important) Powershell 2. Alternatively you could download it from the following location and move it to your new Server.
z. Once you have installed PowerShell then go into the PowerShell console and run the following command to allow remote PowerShell access to your new Server.
NOTE: To do this will be fine for your "local" setup, but you will want to review enabling this with your network engineers when doing this in a corporate environment.
Enable-PSRemoting -Force
Now let's test the new Windows 2008 Server!
Lab 1.3: Creating an Orchestration Workflow to test the Server
7. On your Personal Instance navigate to Orchestration -> Credentials
a. Click on the New button and choose Windows Credentials
i. Name: Win2008Server
ii. Applies to: All MID Servers
iii. User Name: Administrator
iv. Password: **********
v. Tag: Win2008Server
vi. Click Submit to save your work.
8. Navigate to Workflows and open the Workflow Editor
a. Click the "Plus" button to start a new workflow
i. Name: Windows 2008 Access Test
ii. Table: Global
iii. If condition matches: None
b. Click submit to create the workflow
c. Navigate to Core -> Orchestration - PowerShell and drag out a Run Powershell Activity.
d. Fill in the form with the following:
NOTE: The values in parenthesis are what I had for my network.
i. Name: Test Windows 20018 Server Alive
ii. Credential: Win2008Server
iii. Hostname: <<IP Address of your host server>> (192.168.43.4)
iv. Command: Test-WSMan <<your new Server's name>> (WIN-IUEPHOH3JWL)
v. Click on the Submit button to save your work.
e. Wire up your workflow to look like the following:
f. Click on the Run button to execute your workflow. Wait until execution has completed. You should get a successful run.
g. From your instance navigate to ECC -> Queue. Filter for Topic: *Windows - Powershell, and Queue: input. Sort by Created date descending. There should be a record at the top with the name: Windows - Powershell (nodes: 3). Open this record.
h. Open that record. A successful Test-WSMan command execution should look like this:
You are done! Now you have your own local Windows 2008 server to work with. Remember that in 60 days (the length of the Windows evaluation) you will need to determine if you would like to purchase the Server software; as it will deactivate itself at that time.
In my next article I will show how you can set up an Active Directory server, and manipulate it using Orchestration.
Steven Bell
For a list of all of my articles: Community Code Snippets: Articles List to Date
Please Share, Like, Bookmark, Mark Helpful, or Comment this blog if you've found it helpful or insightful.
Also, if you are not already, I would like to encourage you to become a member of our blog!
Click for More Expert Blogs and also Find Expert Events!
- 9,802 Views
9 Comments
You must be a registered user to add a comment. If you've already registered, sign in. Otherwise, register and sign in.

