
sheeraz_memon

ServiceNow Employee
Options
- Subscribe to RSS Feed
- Mark as New
- Mark as Read
- Bookmark
- Subscribe
- Printer Friendly Page
- Report Inappropriate Content
03-23-2021
01:58 PM
Summary
In March 2021, ServiceNow and Qualtrics announced a strategic partnership to help companies deliver next-generation service, leveraging the combined power of ServiceNow’s digital workflows with Qualtrics’ Experience Management™ data on a single platform. The alliance empowers companies to capture the true customer and employee experience, respond in real time, and get the insights they need to continuously optimize service performance and offerings.
Introduction
Together, ServiceNow and Qualtrics will help joint customers deliver exceptional, feedback-driven service at scale. Today, companies can automatically query customers and employees after a case or incident is closed to gauge service performance. This capability is available through Qualtrics’ ServiceNow extension and a Qualtrics spoke released by ServiceNow. Phase two will enable organizations to bring powerful insights from Qualtrics directly into ServiceNow workspaces, providing a consolidated view of operational metrics and experience data. Both ServiceNow and Qualtrics expect to continue enhancing these solutions as part of our joint roadmaps.
This blog was created to help users quickly get up and running on some basic use cases. The use case below depicts closing an incident, triggering a survey, and appending results to a ServiceNow incident.
For this example, we will be configuring Qualtrics’ ServiceNow extension
Requirements: ITSM/CSM, and Qualtrics with ServiceNow extension activated.
How to set up the ServiceNow and Qualtrics integration?
|
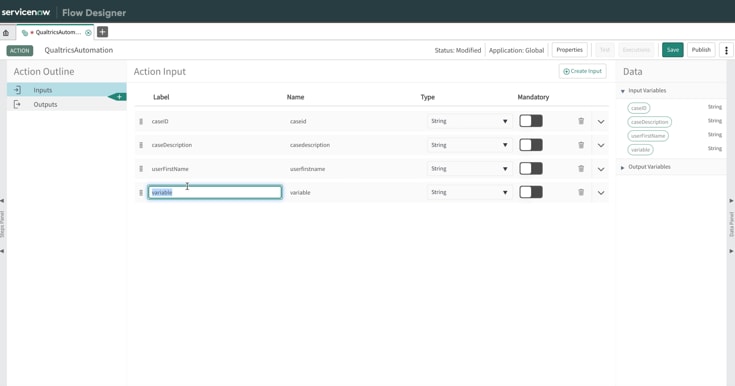
1. Set up an Action with 5 variables: caseID, caseDescription, userFirstName, userLastName, and userEmail.
|
|
|
2. Create a Script as a next step for your Action, and assign all of your input variables to the script input variables.
|
|
|
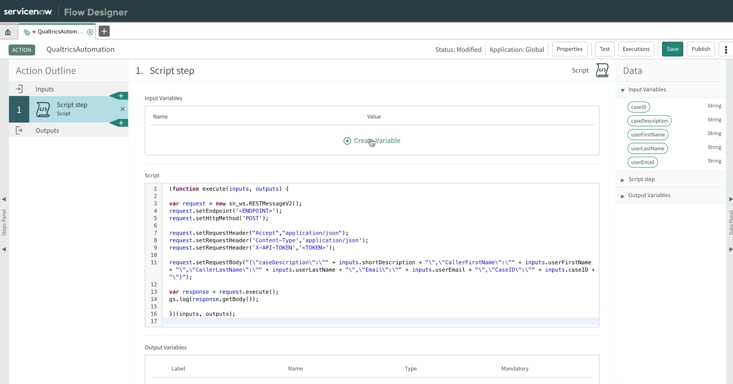
3. Paste the provided script, which is as follows:
(function execute(inputs, outputs) {
var request = new sn_ws.RESTMessageV2(); request.setEndpoint('<ENDPOINT>'); request.setHttpMethod('POST');
request.setRequestHeader("Accept","application/json"); request.setRequestHeader('Content-Type','application/json'); request.setRequestHeader('X-API-TOKEN','<TOKEN>');
request.setRequestBody("{\"caseDescription\":\"" + inputs.shortDescription + "\",\"CallerFirstName\":\"" + inputs.userFirstName + "\",\"CallerLastName\":\"" + inputs.userLastName + "\",\"Email\":\"" + inputs.userEmail + "\",\"CaseID\":\"" + inputs.caseID + "\"}");
var response = request.execute(); gs.log(response.getBody());
})(inputs, outputs);
|
|
|
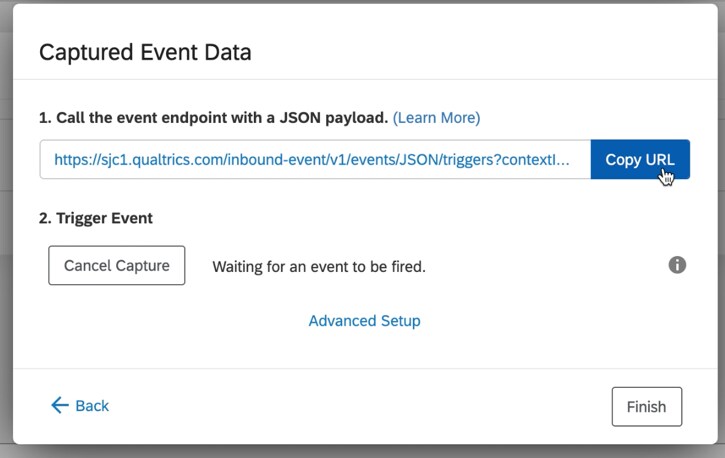
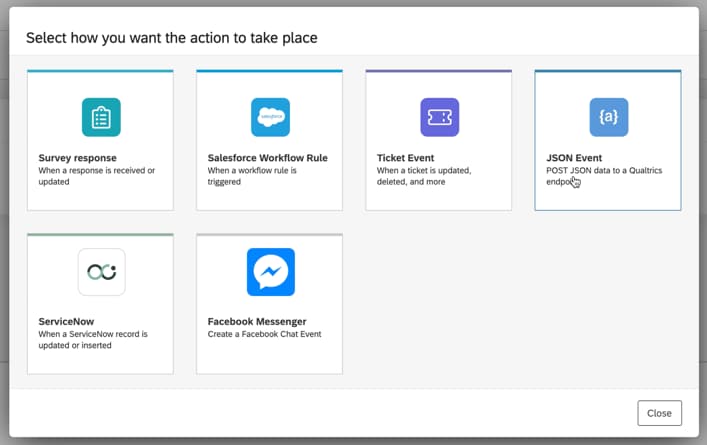
4. In the Qualtrics interface: Create the endpoint to be called by ServiceNow by creating a new Action for your Qualtrics survey and selecting the JSON Event as the triggering action. The provided URL will be the endpoint for the script provided. Copy and paste this URL in the Script where it says ENDPOINT. |
|
|
5. For the Token value within the ServiceNow script, copy it from the profile icon --> Account settings --> Qualtrics IDs and select the Token ID.
|
|
|
6. In order to test the Flow Designer Action, we will need to navigate to the Qualtrics survey action and click on the JSON Event. Click on ‘Capture Next Event’ (if enabled), so that the pop up appears as follows:
|
|
|
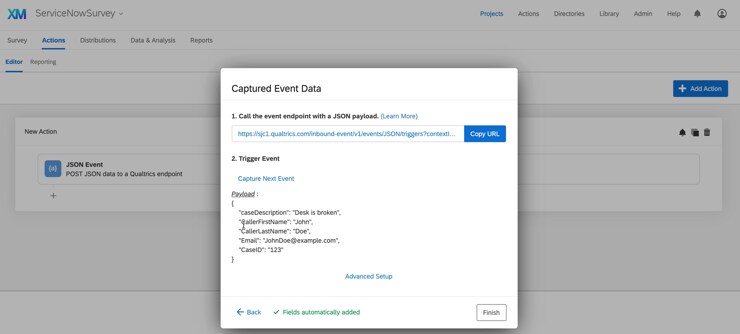
7. Attempt to test the action you have created by inputting mock values. You will see the JSON Payload come through with the values provided in ServiceNow on the Qualtrics interface.
|
|
|
8. Publish the action.
|
|
|
9. Now that the action is working and tested, create a flow that will call this action. |
|
|
10. In the flow, the caseID will take the Incident Sys ID pill. For the caseDescription will take the incident short description pill. The userFirstName will take caller First name. The userLastName will take the caller Last name. The userEmail will take the caller Email.
|
|
|
11. Activate the flow.
|
|
|
12. On the Qualtrics interface, add another task to the same action under the JSON Event. This will be a XM Directory task. Specify a contact list (or add a new one), first name, last name, email address, and language (optional). You will click on “Add or remove embedded data fields”, and specify the caseID and caseDescription as shown in the screenshot.
|
|
|
13. Choose a survey of your choice.
|
|
|
14. Subject line may have a static string, in addition to a reference to the caseDescription.
|
|
|
15. Click Save.
|
|
|
16. Name this action as “Send Survey”. The embedded fields defined within the Distribute Survey Task need to be defined within the survey. Within the survey, select Survey Flow. Click Add New Element Here and select Set Embedded Data. Add the fields defined above in the task and move the Embedded field block to the top of the survey. It should look like the image to the right.
|
|
|
17. Go back into the actions section of the survey and create a new event-based Action which is triggered by a Survey Response coming in.
|
|
|
18. You will need to ensure you click on “Response created” and then Finish. |
|
|
19. Click on the + sign to add a new Task. Select the ServiceNow tile. |
|
|
20. Click on “Update Record,” and click Next.
|
|
|
21. For Choose Account, choose the Authenticated user. If there is not an account available, review the information at https://www.qualtrics.com/support/integrations/servicenow-integration/#About. |
|
|
22. Fill in the ServiceNow instance name, for recordID choose embedded data field and write caseID, and for table name write incident.
|
|
|
23. Click on Add Field, and choose Description (or any other field that you would like the survey results to be appended to). For this field, write Survey Results, and then refer to your survey question(s) and then selected text for your question(s). Click Save.
|
|
Integration Execution
Now that you’ve installed and configured the system, it’s time to test it.
|
1. Close an incident.
|
|
|
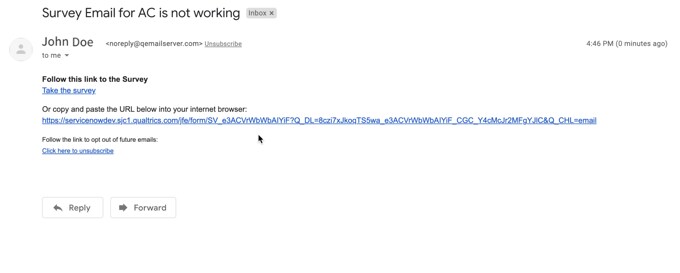
2. You will receive a survey email soon.
|
|
|
3. Take the survey, and submit.
|
|
|
4. In a few minutes, you should see the results appended to the Description field of the incident that was closed.
|
 |
And you’re done!
Special thanks to Todd Rentschler from Qualtrics for his support in compiling these steps!
Labels:
- 8,313 Views
You must be a registered user to add a comment. If you've already registered, sign in. Otherwise, register and sign in.
