- Mark as New
- Bookmark
- Subscribe
- Mute
- Subscribe to RSS Feed
- Permalink
- Report Inappropriate Content
08-20-2018 02:39 PM

Solved! Go to Solution.
- Labels:
-
Service Catalog
- Mark as New
- Bookmark
- Subscribe
- Mute
- Subscribe to RSS Feed
- Permalink
- Report Inappropriate Content
08-27-2018 06:47 PM
Just checking on on this one. Has this question been answered or is there more information I can help you with? If it's been answered, please mark the answer above as the correct one so people know this has been taken care of. Thanks!
- Mark as New
- Bookmark
- Subscribe
- Mute
- Subscribe to RSS Feed
- Permalink
- Report Inappropriate Content
08-20-2018 08:36 PM
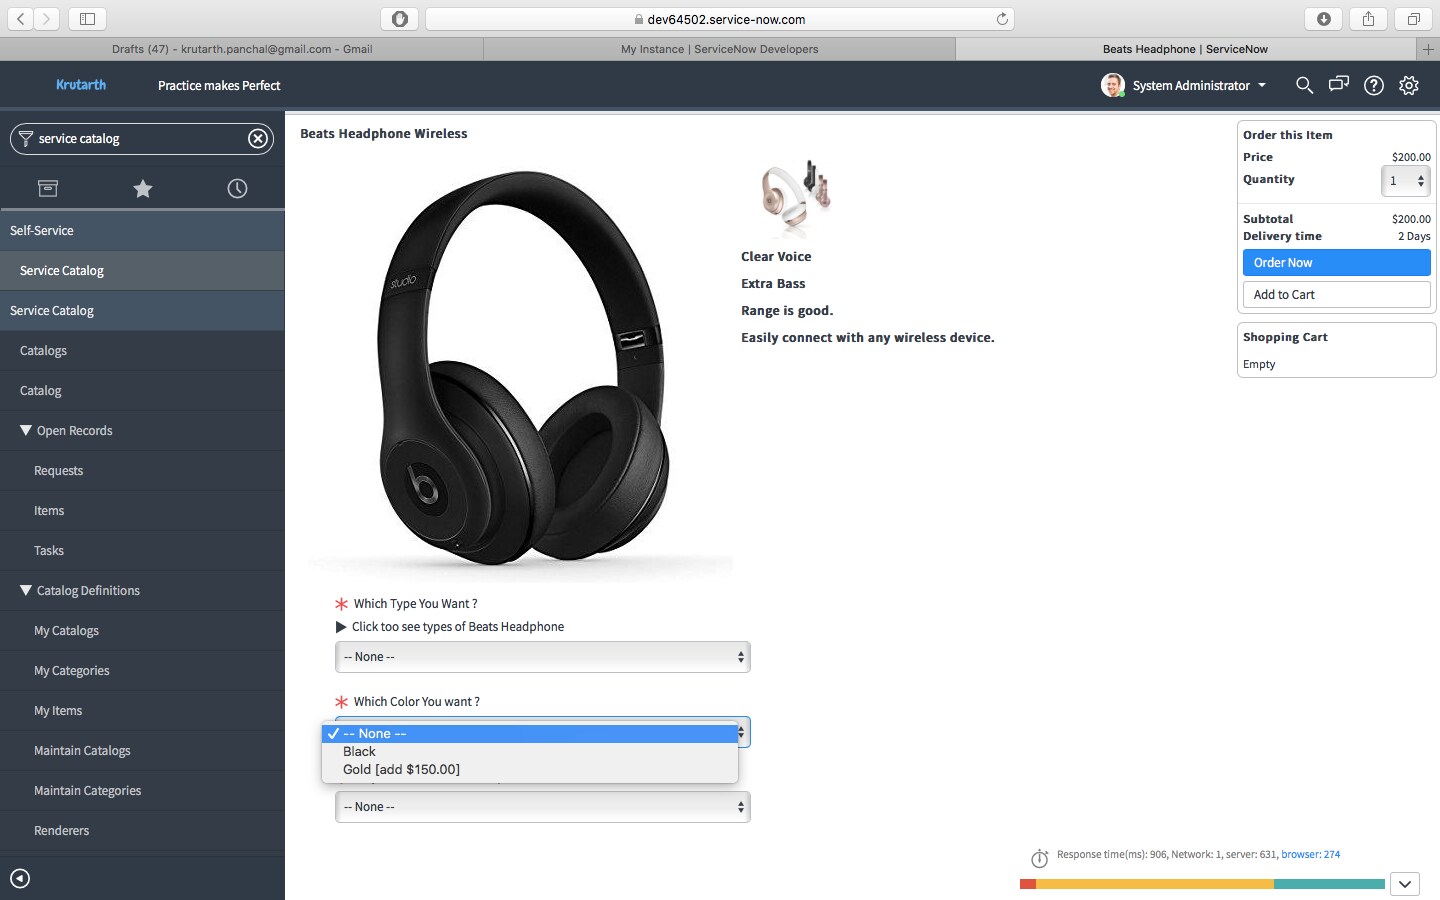
This is possible (though it takes a bit of a workaround to make it work in the Service Portal). It's actually a pretty fun little project to try out. 🙂 Here are the steps you'll need to take.
1) Navigate to your catalog item and open it from 'Service Catalog -> Maintain Items'
2) Upload all of your image variations for each color by attaching them to your catalog item record. You should see all of them in the attachments list at the top of the screen. Note that this effect is going to look a lot better if all of your images are identically-sized and look similar with a white background (like you see on an Amazon listing). Here's the link where I pulled my sample images.
https://www.amazon.com/dp/B075G56GZD


4) Next, you'll need to fix up the HTML a bit so that we've got the images in elements that we can show and hide. In your item 'Description' field, click the '<>' button in the editor. You'll probably see a bunch of lines that look kind of like this.
<p><img style="align: baseline;" title="Beats Grey" src="sys_attachment.do?sys_id=6e3ba6a1db00e70048f171efbf96199e" alt="Beats Grey" align="baseline" border="" hspace="" vspace="" /></p>You need to replace all of the '<p>' and '</p>' tags with '<div>' and '</div>' tags and then add a unique 'id' attribute to each '<div>' tag so that you end up with a line like this for each of your images. The unique 'id' attribute is critical to being able to easily identify, show, and hide the correct images in our client script later.
<div id="beatsGrey"><img style="max-width: 100%; height: auto;" title="Beats Grey" src="sys_attachment.do?sys_id=7a3beaa1db00e70048f171efbf961900" alt="Beats Grey" /></div>In my example, I have 5 images that I uploaded as attachments to my item definition. My final working HTML looks like this...
<div id="beatsGrey"><img style="max-width: 100%; height: auto;" title="Beats Grey" src="sys_attachment.do?sys_id=7a3beaa1db00e70048f171efbf961900" alt="Beats Grey" /></div>
<div id="beatsBlue"><img style="max-width: 100%; height: auto;" title="Beats Blue" src="sys_attachment.do?sys_id=a23ba6a1db00e70048f171efbf9619a6" alt="Beats Blue" /></div>
<div id="beatsRed"><img style="max-width: 100%; height: auto;" title="Beats Red" src="sys_attachment.do?sys_id=fa3beaa1db00e70048f171efbf961908" alt="Beats Red" /></div>
<div id="beatsWhite"><img style="max-width: 100%; height: auto;" title="Beats White" src="sys_attachment.do?sys_id=f23beaa1db00e70048f171efbf961911" alt="Beats White" /></div>
<div id="beatsBlack"><img style="max-width: 100%; height: auto;" title="Beats Black" src="sys_attachment.do?sys_id=6e3ba6a1db00e70048f171efbf96199e" alt="Beats Black" /></div>
5) Create a new 'Select box' variable with an option for each image/color variation you have. IMPORTANT! Make sure the 'value' of the choice is identical to the 'id' attribute you added to your HTML for each image in step 4.

6) Next, you'll need to create a catalog client script that runs onChange of your Color choice variable. We'll run our script on all UI types, and if we're running on London and beyond we need to have the 'Isolate script' checkbox unchecked. The script should look like this...

function onChange(control, oldValue, newValue, isLoading) {
	if (!document) {
		// Service portal override for DOM access
		document = myDocument;
	}

	try{
		// Hide all color option images
		document.getElementById('beatsGrey').style.display = 'none';
		document.getElementById('beatsBlue').style.display = 'none';
		document.getElementById('beatsRed').style.display = 'none';
		document.getElementById('beatsWhite').style.display = 'none';
		document.getElementById('beatsBlack').style.display = 'none';

		// Show the color option image for selected option
		document.getElementById(newValue).style.display = 'block';
	}catch(e){}
}
Again, we have 5 lines, one for each of the images we're switching out. You'll also notice that each one targets the same 'id' attribute that we set up in step 4. The 'document.getElementbyId' lines find all of our images and hide them every time our variable changes, then we simply show the one selected. Notice in the last line we are simply passing in 'newValue' as the ID, which is why the IDs in step 4 need to match the choice values in step 5.
That's it! You should now have a working catalog item that swaps out description images based on a variable change in the standard catalog views.
Service Portal Compatibility:
Odds are you'll need this to work in the service portal at some point as well. The biggest problem with this is that Service Portal kills any non-native API calls from the client so our 'document.getElement' DOM manipulation isn't going to work there. Fortunately, there's a great solution from Tim Woodruff that helps make this possible. I've watered down his solution considerably to meet this specific use case, but his whole solution is documented here.
https://snprotips.com/blog/2017/7/21/how-to-enable-dom-manipulation-in-the-servicenow-service-portal
Here are the simple steps you can take to make this work for this example in the service portal interface.
1) Create a new UI script named 'setupDOM' and make sure that the 'Global' checkbox IS NOT checked. Here's the script you'll use.
setupDOM();

function setupDOM() {
	myDocument = document;
}
This is a pretty simple script, but it's critical to making any of this work in the service portal. The basic idea is that it brings back access to the 'document' object (along with the 'if (!document)' statement in our client script) so that we can manipulate the DOM and show/hide our images.
2) Open your Service Portal theme from 'Service Portal -> Themes' in your left nav (the default theme is 'Stock' but you can also access the theme from your Service Portal definition in the 'Theme' reference field). Scroll to the bottom of the 'Theme' form and add a New 'JS Includes' record using the related list button there. The JS Include pulls the UI script in as a dependency for the portal.

If you've done everything correctly you should now have this working in the standard catalog interface as well as the service portal!

- Mark as New
- Bookmark
- Subscribe
- Mute
- Subscribe to RSS Feed
- Permalink
- Report Inappropriate Content
08-27-2018 06:47 PM
Just checking on on this one. Has this question been answered or is there more information I can help you with? If it's been answered, please mark the answer above as the correct one so people know this has been taken care of. Thanks!