- Post History
- Subscribe to RSS Feed
- Mark as New
- Mark as Read
- Bookmark
- Subscribe
- Printer Friendly Page
- Report Inappropriate Content
on 08-14-2020 03:33 AM
Introduction
If in this article I spoke about how to create a dashboard, and in this other about the navigation from the report to the data, now I'm going to explain how you can implement something similar to an Interactive Filter on a mobile dashboard, functionality which is not supported OOTB.
Keep in mind that the previous articles have a No Code approach, but due that the techniques that I’m going to describe, here you need some programmatic skills and database knowledge (user level).
I assume that you have the right foundations about ServiceNow technology, and specifically the Mobile approach, so if you are a newbie, feel uncomfortable with new ServiceNow mobile technology, or even you are unfamiliar with Studio, I strongly recommend you the next resources prior to start:
- Mobile Configuration and Navigation on documentation
- Mobile Development Fundamentals (Orlando) on NowLearning
- Mobile Applications on Developer site
- How Studio Works
Working time: 240 minutes
Approach
This is the plan:
- Create a table to manage the relationship between user and category choices, so each person can define what categories can see. I’m going to call it “Incidents by Category” and auto populate it
- Create a view with Incident and the new table “Incidents by Category”
- Create an Applet List to control “Incidents by Category”, a navigation to call them, and a few function actions to give it some functionality
- Create the reports using “Incidents by Category” instead of Incidents, and adding on the filter that the Category is visible, and user is Me
- Create the dashboard and the navigation
- Have fun!
I know, I know, it seems complicated, but if you have a clear understanding from the other articles, you have more than half of the work done.
Create “Incidents by Category” Table
It will be a quite simple table:
| Column Label | Column Name | Type | Reference | Default Value | Display |
| Default | u_default | True/False | 0 | FALSE | |
| Category | u_category | Choice | TRUE | ||
| User | u_user | Reference | User | FALSE | |
| Visible | u_visible | True/False | 1 | FALSE |
After saving it we have to ensure that the right elements will be retrieved from the Choice list, so you need to add the proper conditions on the reference specification:
- Choice table: incident
- Choice field: category
On this specific example, the table will be managed by ITIL people.
Don’t forget to test it!
Once you are happy with your table, it needs to populate those fields. There are a lot of different approaches, but is out of scope of this article, so let me keep it simple: I’m going to create a BR before on query to autopopulate the field for ITIL people, so the first time that the user checks the table, the info will be there. Enough for demo purposes:


The code:
(function getQueryString(input) {
    var incidentIds = [];
    // Recover the records of the view
    var grIncCat = new GlideRecord("sn_itsm_mobile_agt_incident_category");
    // We use as encoded query the same filter that the report has
    grIncCat.addEncodedQuery(input.URL);
    grIncCat.query();
    while(grIncCat.next()) {
        // Recover the id of the incident (remember, is inc_sys_id because in the view inc is the prefix of incident)
        incidentIds.push(grIncCat.inc_sys_id + '');
    }
    if (incidentIds.length < 0) {
        return '';
    }
    // return all the incidents
    var encodedQuery = 'sys_idIN' + incidentIds.join();
    return encodedQuery;
})(input);
Of course, this is not a complete approach, we should do something in order to update the table if any category is added or removed. But as I said, let me keep it simple since it is just a demonstration about Interactive Filter on mobile dashboard.
Create the view
The view is quite easy in this example, with Incident (inc prefix) and Incidents by Category (inccat prefix). I named it sn_itsm_mobile_agt_incident_category.
The where clause is inc_category = inccat_u_category, so now, per each user we have their preferences about visibility.
Remember that is possible to limit the fields that you’re going to recover from each table. On this case I don’t feel that is a good idea to do that, but can be interesting in other application.
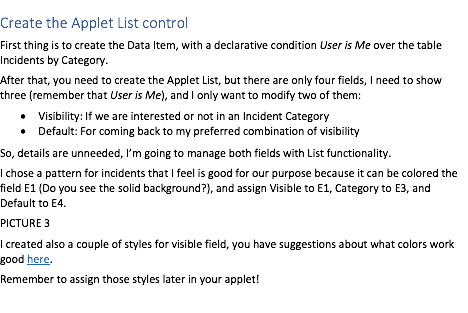
Create the Applet List control
First thing is to create the Data Item, with a declarative condition User is Me over the table Incidents by Category.
After that, you need to create the Applet List, but there are only four fields, I need to show three (remember that User is Me), and I only want to modify two of them:
- Visibility: If we are interested or not in an Incident Category
- Default: For coming back to my preferred combination of visibility
So, details are unneeded and I’m going to manage both fields with List functionality.
I chose a pattern for incidents that I feel is good for our purpose because it can be colored the field E1 (Do you see the solid background?), and assign Visible to E1, Category to E3, and Default to E4.
I created also a couple of styles for visible field, you have suggestions about what colors work good here.
Remember to assign those styles later in your applet!


You will have available the styles for the colored field of the applet, in this case is E1 on the pattern (do you remember?) so everything related to field u_visible will be there. If you don’t see it, try to close and open again the applet, and if the problem persists check the table on UI style, is relatively easy to make a mistake here.
What functionality do I need?
- Change value of Visible from true to false and vice versa (swipe to left)
- Change value of Default from true to false and vice versa (swipe to right)
- All visible (top function)
- Default visible (top function)
- Select category (top function)
All changes by swipe are quite simple, since you are on the record that I want to change you don’t need any parameter or scripting.

Be careful with the condition of the Function Action, if you want to modify to False the visibility you have to check that currently is True.

Remember: “Insert and Stay” is your friend for this kind of things.
The All Visible also is simple, since all you need is to set visible = true when the User is Me.

In my example, this functionality is global and will be always available. Remember to check the “Show refresh on previous screen” in order that the user can reload the list.
On the other hand, Default visible is a little bit tricky, because we need to set visible = default for the rows of the current user, so we need to script it.

The code:
(function WriteBackAction(input) {
    // Visible categories are only default categories
    var grIncCat = new GlideRecord("sn_itsm_mobile_agt_inc_cat");
    grIncCat.addQuery("u_user", gs.getUserID());
    grIncCat.query();
    while (grIncCat.next()) {
        grIncCat.setValue("u_visible", grIncCat.getValue("u_default"));
        grIncCat.update();
    }
})(input);
As I said previously, this functionality is global and will be always available in my example. Once more, remember to check the “Show refresh on previous screen” in order that the user can reload the list.
Select Category is similar to the previous one, but in this case we need a parameter called category. That parameter can be accessed on the script via input artefact.


The code:
(function WriteBackAction(input) {
    // Visible category only selected one
    var grIncCat = new GlideRecord("sn_itsm_mobile_agt_inc_cat");
    grIncCat.addQuery("u_user", gs.getUserID());
    grIncCat.query();
    while (grIncCat.next()) {
		var visible = false;
		if(grIncCat.u_category == input.category) {
			visible = true;
			gs.addInfoMessage("Category " + grIncCat.getDisplayValue("u_category") + " selected.");
		}
        grIncCat.setValue("u_visible", visible);
        grIncCat.update();
    }
})(input);
Create the Function Action with the “Show refresh on previous screen”.

Add the parameter about Category:

And don’t forget to map it!
Last, we need to add the functionality to our applet:

So, everything done about the control! I’ll check it when we have the new applet launcher completed. If you are eager to test it, just add it to whatever applet launcher and later remove it.
Create the reports
In order to maintain the readability of the article, I’m only going to create only two reports in this new dashboard:
- Open Incidents
- Overdue Incidents
Once you have the view, we need to recreate the work done that I explained on Mobile Dashboards (1/2), but using the view instead of the table.
Remember to add the filter Visible = true and User is (dynamic) Me.


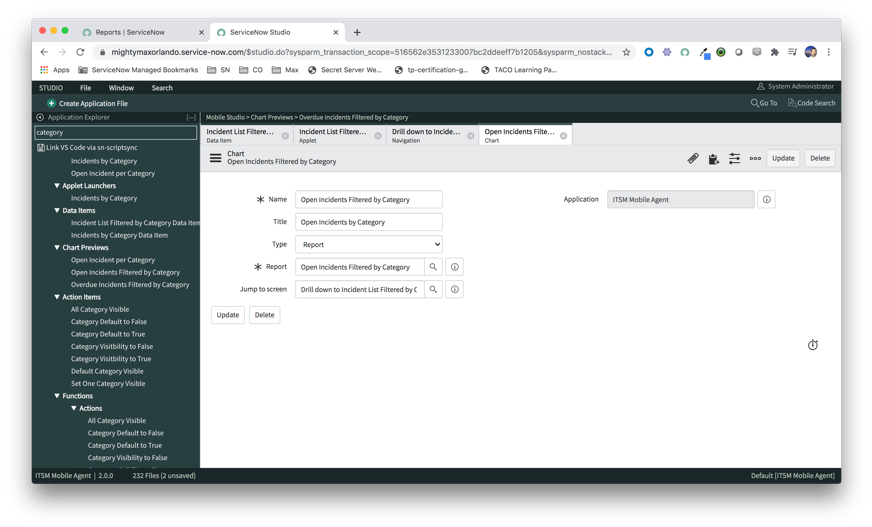
Create the Dashboard and the Navigation and Applet List
About the dashboard, you can understand how it works on Mobile Dashboards (2/2), but the data item is different and needs to be scripted, so let’s put the focus there.
Data Items only can be referenced to a table, not a view, but we can script the condition using the URL parameter, in a similar way that I explained on tMobile Dashboards (2/2):


For better understanding, you have to pay special attention to the input artefact that we are using as parameter of the addEncodedQuery, because that is the way to access to the parameters from the Preview to the Data Item.
The code:
(function getQueryString(input) {
    var incidentIds = [];
    // Recover the records of the view
    var grIncCat = new GlideRecord("sn_itsm_mobile_agt_incident_category");
    // We use as encoded query the same filter that the report has
    grIncCat.addEncodedQuery(input.URL);
    grIncCat.query();
    while(grIncCat.next()) {
        // Recover the id of the incident (remember, is inc_sys_id because in the view inc is the prefix of incident)
        incidentIds.push(grIncCat.inc_sys_id + '');
    }
    if (incidentIds.length < 0) {
        return '';
    }
    // return all the incidents
    var encodedQuery = 'sys_idIN' + incidentIds.join();
    return encodedQuery;
})(input);
For the Applet there is nothing different than what I wrote on Mobile Dashboards (2/2), actually could be exactly the same but with different Data Item. Remember that we need to create the Autofill Parameter Definition with the instance_relative_url, and map it to the Data Item parameter:
After that, all that you need is to create the navigation as usual:


And the preview chart (both reports are Single Score, so we don’t need an applet report):

Later you can add your reports to an existing applet launcher or create a new one.
In this case I preferred to create a new one with two sections:

- Incidents by Category, for both Single Score reports
- Category Visibility, for applet control

Create a navigation:

And add it as a quick action in the My Work applet:

Have fun!
In this article I showed you how you can do a kind of interactive filter dashboard, since this functionality is not available on Mobile OOTB.
I also took the opportunity to explain a few techniques about scripted actions and scripted conditions taking advantage of input artefact on Data item and Action item, so I hope that it helps you to build awesome things over mobile platform at ServiceNow.

- 37,219 Views
- Mark as Read
- Mark as New
- Bookmark
- Permalink
- Report Inappropriate Content
Wow.. Interesting.
- Mark as Read
- Mark as New
- Bookmark
- Permalink
- Report Inappropriate Content
Thanks
- Mark as Read
- Mark as New
- Bookmark
- Permalink
- Report Inappropriate Content
Great article, thanks Max!
- Mark as Read
- Mark as New
- Bookmark
- Permalink
- Report Inappropriate Content
Thanks a lot, Alicia.
- Mark as Read
- Mark as New
- Bookmark
- Permalink
- Report Inappropriate Content
Appreciate it
- Mark as Read
- Mark as New
- Bookmark
- Permalink
- Report Inappropriate Content
Good article and I really very informative.
- Mark as Read
- Mark as New
- Bookmark
- Permalink
- Report Inappropriate Content
Thanks a lot
- Mark as Read
- Mark as New
- Bookmark
- Permalink
- Report Inappropriate Content
I can't see interactive filters anywhere on mobile dashboard in your demo. Also it is currently not possible to implement it.
Please refer this link : https://www.servicenow.com/community/platform-analytics-forum/mobile-dashboards-does-it-support-inte...
- Mark as Read
- Mark as New
- Bookmark
- Permalink
- Report Inappropriate Content
Hi @Shobhit Sharma1
Thanks for your feedback. I wrote this a couple of years ago, so I was surprised to see new comments here 😅
Maybe the title is confusing 🤷🏻, the idea is to allow to each user to select the categories that it is interested like an interactive filter. This is interesting because is not an OOTB feature, as you said, so this is a work around that can be used.
It worked properly last time that I did it in a customer, and of course it has some limitations and concerns about performance, but maybe can be useful in some use cases
Regards,
Max.