Fu

ServiceNow Employee
Options
- Post History
- Subscribe to RSS Feed
- Mark as New
- Mark as Read
- Bookmark
- Subscribe
- Printer Friendly Page
- Report Inappropriate Content
on 01-21-2021 02:27 PM
Multi-provider SSO
The ServiceNow Product Documents provide an overview on multi-provider SSO but it doesn't provide instructions on how to integrate with an identity provider. In this article, you'll learn how to setup SSO using Azure Active Directory on your ServiceNow instance step-by-step.
Prerequisites
-
Have admin role on your ServiceNow instance
-
Have a Microsoft Azure account. If not, please go to https://azure.microsoft.com/ and create a free account.
Step 1 - ServiceNow Multi-Provider SSO setup
-
On your ServiceNow instance, navigate to Plugins
-
Search for Integration - Multiple Provider Single Sign-On Enhanced UI and activate.
-
Navigate to Multi-Provider SSO->Administration->Properties and toggle Enable multiple provider SSO to Yes


Step 2 - Configure Azure Active Directory
-
Go to https://portal.azure.com/
-
From Azure services, click on Azure Active Directory
-
On the side menu, click on Enterprise applications then click on New application
-
Search and add ServiceNow
-
Once created, go into your ServiceNow app and select Set up single sign on
- Select SAML
- On Basic SAML Configuration, perform the following:
-
On identifier fields, add your instance URL. Ex: https://<instancename>.service-now.com/
-
On Reply URL and Sign on URL fields, add your instance URL with /navpage.do. Ex: https://<instancename>.service-now.com/navpage.do
-
Click Save
-
-
On User Attributes & Claims, the Unique User identifier has a default value of user.userprincipalname. Change the value to user.mail.
-
On Set up ServiceNow (step 4), click on View step-by-step instruction, provide admin credentials, and click Configure Now. Azure will create a new identity provider on your instance called Microsoft Azure Federated Single Sign-on for Default Directory.
-
Create a new user on Azure and map it to a user from your ServiceNow instance. On Azure Active Directory, click on Users then click on New user. Create a user name David Loo. After the user is created, edit the user and add david.loo@example.com under the Contact info email.David Loo is a demo user in ServiceNow with email david.loo@example.com. After the user is authenticated with Azure credentials, it will use the email value to map to a ServiceNow user. This is the reason why we changed the Claim value to user.mail on Step 2.8.
-
After the user is created, go to Default Directory -> Enterprise application and select ServiceNow. On Users and groups, click Add user/group and add David Loo from user list.


Step 3 - Configure ServiceNow
-
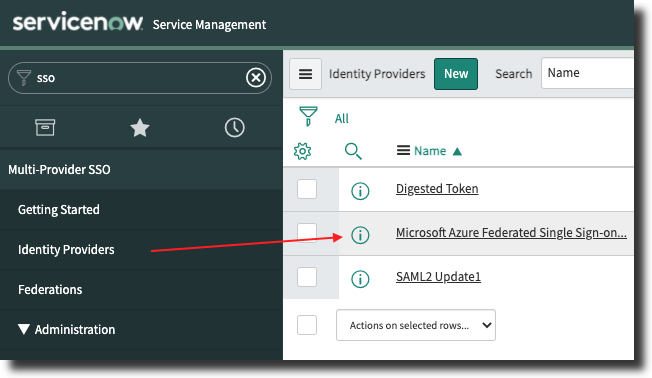
On your instance, search for SSO and select Microsoft Azure Federated Single Sign-on for Default Directory
-
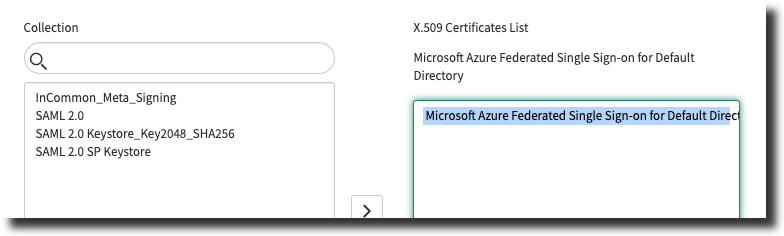
Scroll down to X.509 Certificates and click Edit
- Add Microsoft Azure Federated Single Sign-on for Default Directory and hit Save
-
Click on Set as Auto Redirect IdP


Configuration is complete. Open your ServiceNow mobile app and point to your SSO instance. You should be prompted by a Microsoft login.

Labels:
.gif)
- 4,476 Views
Comments
Paulsylo

Tera Sage
- Mark as Read
- Mark as New
- Bookmark
- Permalink
- Report Inappropriate Content
04-17-2021
08:49 PM
one question. what if my AD is not accessible by external network?
Fu
ServiceNow Employee
- Mark as Read
- Mark as New
- Bookmark
- Permalink
- Report Inappropriate Content
05-12-2021
09:12 AM
Hi Paul,
You will need to use a VPN if AD is only accessible within an internal network.