- Post History
- Subscribe to RSS Feed
- Mark as New
- Mark as Read
- Bookmark
- Subscribe
- Printer Friendly Page
- Report Inappropriate Content
on 10-03-2020 01:15 AM
Intro
A dashboard is a visual display of the most important information needed to achieve one or more objectives. This information is consolidated and arranged on a single screen so the information can be monitored at a glance. A dashboard typically becomes a gateway to other more detailed information.
ServiceNow® Dashboards follow the principles described in the previous paragraph and are created as drag and drop canvas for gathering visualizations organized by tabs.
In order to display data from different sources, specific objects named widgets are deployed on the dashboards. These components usually are used to show simple reports or performance analytics indicators.
Here's is an example taken from SAM pro: the Software Publisher Overview dashboard.
Software asset data from different publishers have been grouped using multiple tabs.
Each tab highlights multiple aspects of the software asset management process through the combination of several widgets created to visualize a specific report/indicator.

Dashboards and Widgets
Platform admins can easily add a widget to a dashboard.
They need to open the dashboard and then use the Widget Picker.

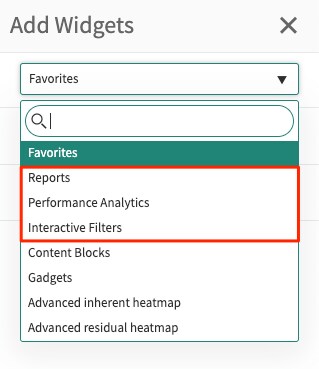
The 'Add Widgets' pane opens showing multiple options.
The user can select the right category of content from the drop-down.
Click an option from the list, and preview the widget before adding it to the dashboard.

Click the Add button to add a widget to the dashboard.

As visible in the next images, ServiceNow allows selecting from multiple categories of content.
Some categories are easy to recognize and commonly used. (e.g. Reports, PA Indicators, Dynamic Filters).

On the other hand, others are very specific (e.g. World Clock).

This last group is used to include UI components different from the classic reports called 'UI Pages'.
For instance, if we add the widget highlighted in the previous image, the example dashboard will look like this.

Few words about UI Pages
UI Pages are used to create custom pages to display forms, dialogs, lists, and other UI components and can be accessed in a browser with the <instance URL> followed by /<UI Page Endpoint>
Global scope
https://myinstance.service-now.com/mypage.doCustom scope
https://myinstance.service-now.com/x_<scope>_myapp_mypage.doA System administrator can create a UI page navigating to 'System UI > UI page'.
The UI Page anatomy is visible here.

Every UI Page is a Jelly template.
Jelly is a Java and XML based scripting and processing engine for turning XML into executable code.
The HTML field is pre-populated in new UI Pages with a default template.
The logic is contained within the <j:jelly> and </j:jelly> tags in the UI Page HTML field.
It is possible to leverage HTML, JavaScript, and Jelly code in order to render the information in the right form.
If you want to know more about jelly here some references for you
- Introducing Jelly Scripting - Part 1 (Video)
- Introducing Jelly Scripting - Part 2 (Video)
- Introducing Jelly Scripting - Part 3 (Video)
- Jelly Tags
- Extension to Jelly Syntax
Dashboards and UI Pages
Clearly, UI pages can be added to our dashboard but in order to do that, we need to follow a specific process.
Suppose we already created a UI page named 'MyUIPageExample', both the content and the Jelly code included are irrelevant.
The developer must
- Navigate to 'System UI > Widgets'
- Click New
On form set the following fields
- Name >
- Renderer type > 'Javascript'
- Script
function sections() {
    return {
        'widget_name': { 'uiPageName' : 'MyUIPageExample'}
    };
}

function render() {
    var uiPageName = renderer.getPreferences().get("uiPageName");
    return renderer.getRenderedPage(uiPageName);
}

function getEditLink() {
    var uiPageName = renderer.getPreference('uiPageName');
    return 'sys_ui_page.do?sysparm_query=' + encodeURIComponent('name=' + uiPageName);
Widgets records are widget category records, not records for individual widgets.
When adding a widget to the dashboard, first select the category and then the widget.
The javascript you specify contains the list of widgets to include in that category.
Quick example.
I created a new UI Page showing some figures named 'MyUIPageExample' and following the steps described, a widget named 'My Community Stats' referencing the UI Page.
function sections() {
    return {
        'My Community Stats': { 'uiPageName' : 'MyUIPageExample'}
    };
}

function render() {
    var uiPageName = renderer.getPreferences().get("uiPageName");
    return renderer.getRenderedPage(uiPageName);
}

function getEditLink() {
    var uiPageName = renderer.getPreference('uiPageName');
    return 'sys_ui_page.do?sysparm_query=' + encodeURIComponent('name=' + uiPageName);
}
Results visible in the next image.

But wait, there is more...

Dashboards and Service Portal Pages
Service Portal pages can be indirectly injected as the content of a new widget changing a little the steps previously described. This will allow us to re-use existing portal widgets without the necessity of writing Jelly code to show information to the end-users.
In order to complete this last task, we need to create a new UI page.
The UI will include an iframe to recall an already created Service Portal page.
<?xml version="1.0" encoding="utf-8" ?>
<j:jelly trim="false" xmlns:j="jelly:core" xmlns:g="glide" xmlns:j2="null" xmlns:g2="null">
	<style>
        #preview{
            text-align: center;
        }
    </style>

	<g:evaluate var="jvar_url" object="true">
	   var url = '/your_portal_name?sys_id=portal_page_id';
	   url;
	</g:evaluate>

	<h1>${jvar_url}</h1>
     <div id="preview">
       <iframe height="500" width="850" scrolling="no" src="${jvar_url}" />
    </div>
</j:jelly>
NOTE
The code above has been created for simplicity suggesting the URL parameters (see. portal name and portal page sys_id) hardcoded. It is usually suggested to store the portal name and page id in system properties and write server-side code inside the <g:evaluate></g:evaluate> tags and retrieve both.
The code to create the dashboard widget stays almost the same, it is necessary to create a new widget record including the name of the new UI Page. That's it!
Here's the final result.

Cheers
R0b0

.gif)
- 14,649 Views
- Mark as Read
- Mark as New
- Bookmark
- Permalink
- Report Inappropriate Content
Well done Ivano!! Can you add the "Update Set" for your example to use in our personal dev instance?
- Mark as Read
- Mark as New
- Bookmark
- Permalink
- Report Inappropriate Content
Hi, Marco thank you for the message!
Give me a few days 🙂
- Mark as Read
- Mark as New
- Bookmark
- Permalink
- Report Inappropriate Content
Any news r0b0_d3vil?
- Mark as Read
- Mark as New
- Bookmark
- Permalink
- Report Inappropriate Content
Thank Marco for the reminder!
File attached in the article.