


Gaurav Diwanji

ServiceNow Employee
Options
- Subscribe to RSS Feed
- Mark as New
- Mark as Read
- Bookmark
- Subscribe
- Printer Friendly Page
- Report Inappropriate Content
08-09-2022
12:00 PM
Customers can configure the Workplace Reservations Outlook Add-in to complement the Workplace Service Delivery Outlook Calendar Synchronization integration.
The Calendar Sync Integration allows users to use Calendar Providers (MS Outlook or Google) reservation events to create reservation records in ServiceNow Workplace Service Delivery.
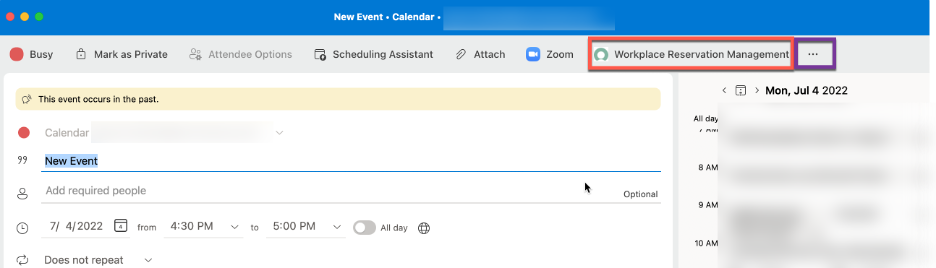
When a meeting such as the one below is created in MS Outlook, if the resource is synced with the ServiceNow Workplace Service Delivery product (SN WSD), it will create a reservation in ServiceNow Workplace Service Delivery.
Extra services like catering, IT support, furniture arrangements, etc. can be configured to be requested alongside a reservation, for reservations made in SN WSD.
The WSD Outlook Add-In enhances the reservation experience in Outlook by adding an ability to request extra services directly from Outlook without having to navigate to SN WSD. It will allow the creation of reservation records in SN WSD along with associated extra services (as Workplace cases), directly from MS Outlook.
Requirements
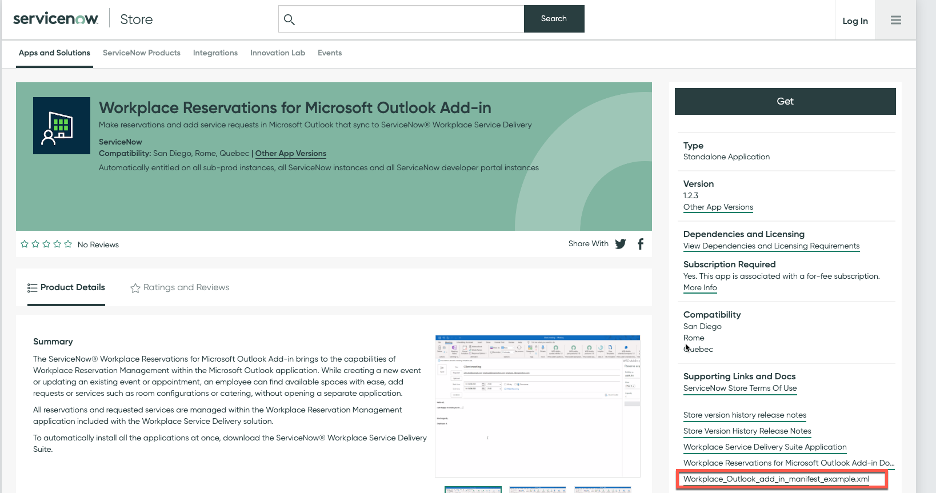
1.) Plugin needed for Add-In: Workplace Reservations for Microsoft Outlook Add-in
2.) Ensure the WSD Outlook Sync is set up. Product documentation for WSD Calendar Sync is linked here.
Make a reservation in SN WSD and ensure the reservation gets synced in Outlook Calendar and is reflected on the user's Outlook calendar.
3.) Ensure Reservable Sync records are created for rooms/spaces that are expected to be shown in the Outlook add-in.
Configuration in SN
Properties to configure or validate: Please review the properties listed here and configure as needed.
sn_wsd_msaddin.default_reservable_module property must point to the sys_id of the Reservable module that will be accessible through the Outlook Add-in.
Please note that only one reservable module can be accessed through the plugin.
The default value for this property is the sys_id of the ‘Meeting Rooms’ reservable module.
Installing Add-In in Outlook
1.) Download the manifest file as noted here.
Link to download the manifest file on the ServiceNow store.
2.) Update manifest file to replace instance-id with customer instance name:
You may also change the add-in icon and add-in name that will be shown to users through this manifest file.
3.) Upload the manifest file to Outlook Client for a single test user as noted here.
4.) Once the add-in has been tested (as described in the next section), it can be deployed org-wide or for specific users/groups as noted here.
Testing the Add-In
1.) Once the add-in has been successfully deployed, the user should see the add-in on the ‘New Event’ form in Outlook. Note that some users may need to click on ‘…’ based on their screen size and number of add-ins installed already.
2.) When the add-in is clicked, first-time users will be asked to log in to their SN instances specified in the manifest file and provide necessary account access and related permissions (as applicable).
3.) Once logged in, users will have an option to search by building, floor, and capacity.
Please note that only buildings in the reservable module associated with the add-in (set through the previously discussed property) are visible.
4.) Users can now select Rooms. Note that only rooms with an active reservable sync record will be visible here. Once the room is selected, click ‘Save and Next'.
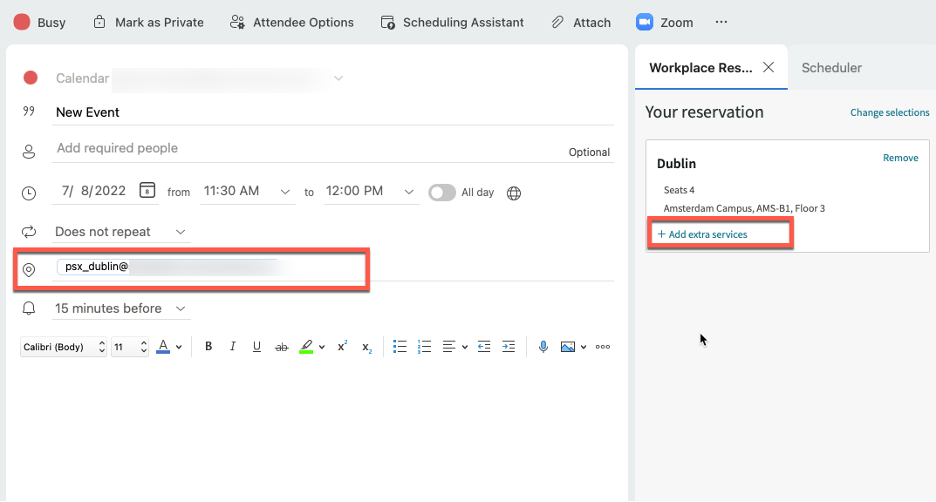
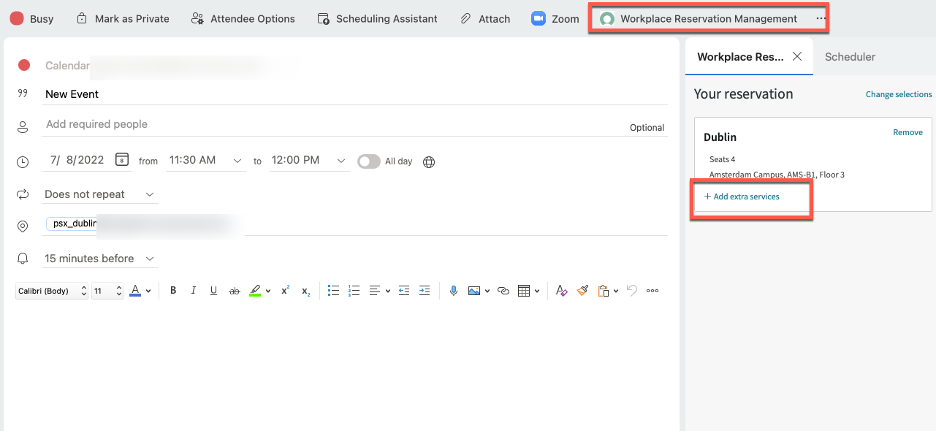
5.) Notice that on the next screen, the room resource email address automatically populates in the location field on the meeting invite.
Users can now add extra services to their reservations on this step as shown below.
6. Once the room details and reservation services are saved, continue adding meeting details and invitees as usual to the form and send.
7. Validate in SN WSD that a corresponding reservation record is created and is associated with the previously requested extra service case.
Product Documentation
Additional details on this feature and configuration steps can be found here.
- 17,084 Views
7 Comments
You must be a registered user to add a comment. If you've already registered, sign in. Otherwise, register and sign in.
