- Post History
- Subscribe to RSS Feed
- Mark as New
- Mark as Read
- Bookmark
- Subscribe
- Printer Friendly Page
- Report Inappropriate Content
on 09-24-2018 04:21 AM
Hello,
A brief introduction to ServiceNow integration via REST APIs is in here. You can kick start to explore REST methods within ServiceNow.
UNDERSTANDING SERVICENOW INTEGRATION AND CAPABILITIES
ServiceNow provides a variety of methods to integrate, most notably Web Services, JDBC, LDAP, Excel, CSV, and Email. Here we focus on the web services integrations via REST, SOAP and more, which you can find here - Supported integration interfaces.
With emerging families that ServiceNow provides biannually (current version - London), there is a lot coming up with best practices and faster integrations. Out there in the London release there are several integrations that offer promising automation opportunities with minimal configurations, IntegrationHub is one of them.
For any integration, we consider input and output with a medium as authorization. Summarizing the integration capabilities, here is a list of ways we can proceed with:
API Explorer | Scripted REST APIs | Using MID Server and Scripts | Import/Exports using Transform Maps | Orchestration | IntegrationHub etc..
Off which, the most common used path is for SOAP/REST APIs which involves a request and response. ServiceNow uses JSON as a medium of data transfer from instance to 3rd party resource. Here we shall proceed with REST API exploration and move on to further articles for integration techniques.
EXPLORING AND CONFIGURING SCRIPTED REST API (TESTING WITHIN SAME INSTANCE)
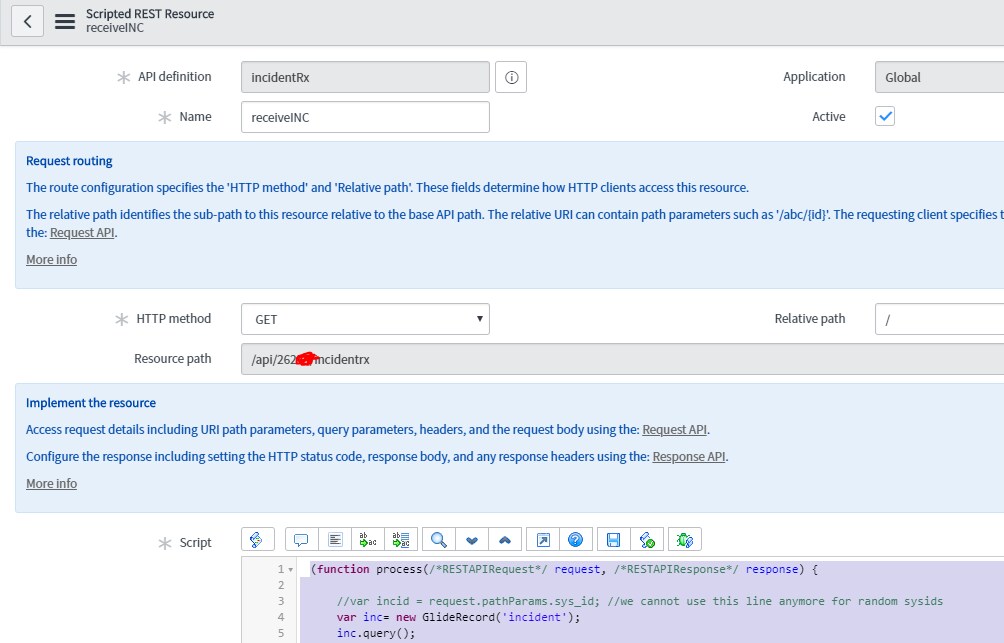
a. Go to System Web Services > Scripted REST APIs > Create New > Submit.
Remember your Base API path, which helps you later to provide the end point details at 3rd party (Note: IncidentRx in the screenshot, Rx = receive)

b. Now, create a new resource - use HTTP Method as GET as shown below:

Here, in the above Relative path, you can use unique field from incident, let's say the sys_id to call a particular incident. To do this, use {custom_sysid} as a value in the relative path and in the script just modify to include this value while doing glide record - at line 1 include var incid = request.pathParams.custom_sysid; and remove the respective line after while loop and there you go for a specific retrieval (Note: you may use if loop instead, while loop is used for generalization)
3. Copy this code in the script:
(function process(/*RESTAPIRequest*/ request, /*RESTAPIResponse*/ response) {
//var incid = request.pathParams.sys_id; //we cannot use this line anymore for random sysids
var inc= new GlideRecord('incident');
inc.query();
while (inc.next())
{
var incid = inc.getUniqueValue();
inc.get(incid);
var incResponse = {
number: inc.getValue("number"),
priority: inc.getDisplayValue('priority'),
sysID: inc.getDisplayValue('sys_id'),
//etc., you can add other variables similar way
};
return incResponse;
}
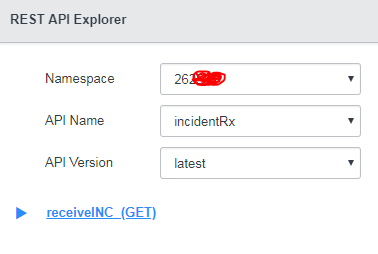
}) (request,response);4. This script shows the output - the first incident number, as we used a while loop here and the REST API brings single record - if we call this via Explore REST API page as seen below:

In the Explorer, the Namespace indicates system scope, which is unique for each instance given by ServiceNow. The API Name is the Scripted Rest you just created and API Version, which is optional for you to select based on V1, V2 etc., but in the later stages this becomes very critical to choose a version. And finally, the GET HTTP method is displayed below these information.

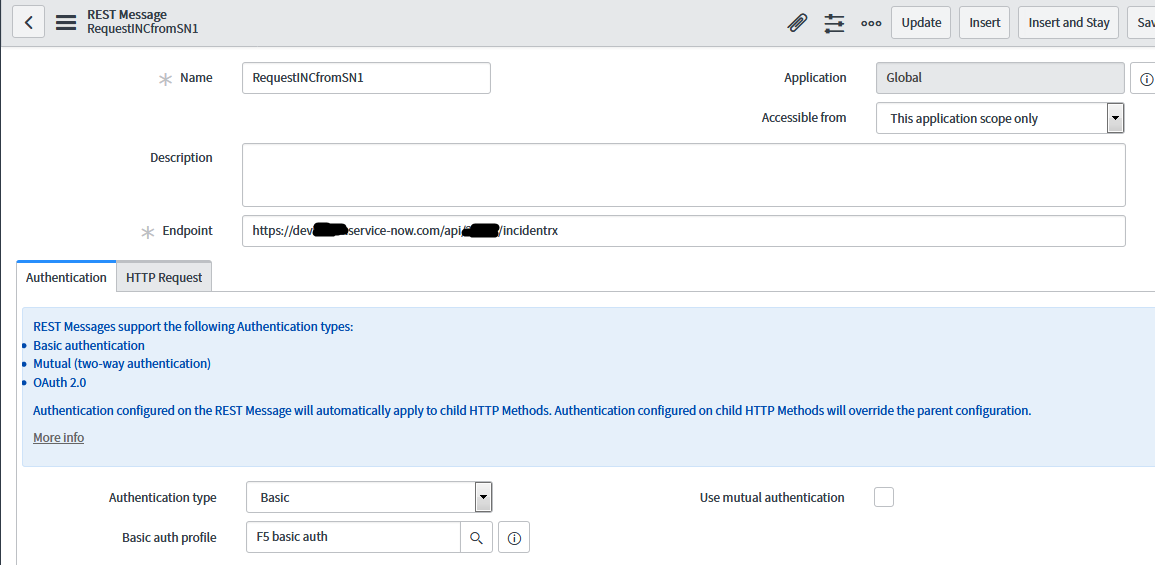
The content shows beside is the GET URL along with the Resource path that gets auto generated while creating the resource in step above. Once, we get on with the testing here, we may use the Query parameters for integrating with 3rd party tools. You can see the request and response formats are defaulted to JSON format, though you can change based on your 3rd party tool, this is recommended from ServiceNow.
Authorization normally require when we access information from other system, but for now we are just testing the REST API call from the same instance, so this is set to 'Send as me', makes sense.
Finally, you may click on SEND and see the response below on-demand.

Note: If you encounter any error, you may verify the API Path, script and variable names from incident table.
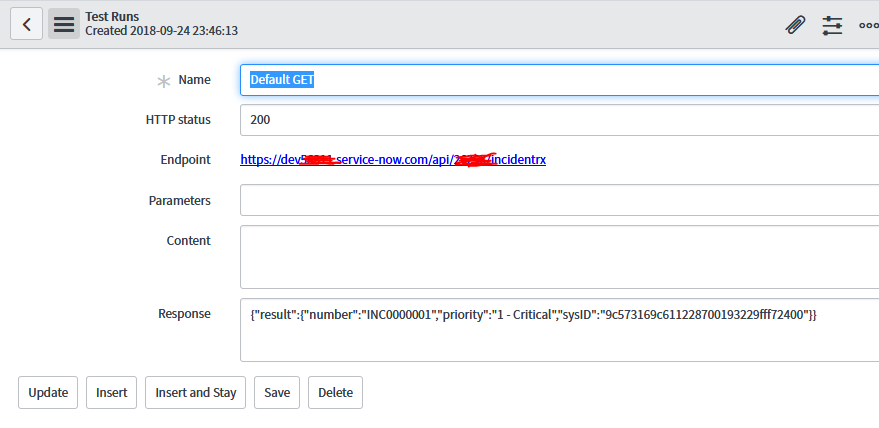
5. Response is shown below:

The response code here is 200 OK meaning successful. Other cases are provided here: rest-http-response-codes
Once, this testing is done, which means you are ready with basic skill to integrate with other systems.
We may proceed further with next steps in the Level 2 article. Thank you for reading out, please leave out your comments and I can improvise the article for better understanding.
Regards, Akash
- 21,905 Views
- Mark as Read
- Mark as New
- Bookmark
- Permalink
- Report Inappropriate Content
does this work in case of one record retrival or can I sync all incidents from one instance to another
- Mark as Read
- Mark as New
- Bookmark
- Permalink
- Report Inappropriate Content
Hello Anil,
I am glad you asked this, once the article is completed this may be like - sync all incidents between two systems.
To be noted: I may use query parameters to filter only unique incidents - say 5 from each instance, not from OOB i.e., pre-loaded data may have same incident details in both instances.
Regards,
Akash
- Mark as Read
- Mark as New
- Bookmark
- Permalink
- Report Inappropriate Content
Hi,
Good information is given above. Thankyou Akash.
If someone still need more information and video representation for the same to understand it in details, you can refer below link:
ServiceNow Integration Using Rest API Video Link
Please mark my answer helpful, if above link help you.
Thankyou!!!!
- Mark as Read
- Mark as New
- Bookmark
- Permalink
- Report Inappropriate Content
Hi Akash,
Thank you for the article, can you share the link to the subsequent article you mentioned at the end of this article. "We may proceed further with next steps in the Level 2 article."