


drjohnchun
Tera Guru
Options
- Subscribe to RSS Feed
- Mark as New
- Mark as Read
- Bookmark
- Subscribe
- Printer Friendly Page
- Report Inappropriate Content
10-27-2016
02:01 PM
Last time, we saw how the processor handles web service requests and responses, executing GQL statements and returning encoded result sets. This time, let's build a simple app where we can edit a GQL statement, run it, and see the results in various formats; we'll call it GQL Pad. This will showcase everything we've done so far and interactively demonstrate the capabilities of GQL.
![]()
REQUIREMENTS
Here are some requirements for GQL Pad:
- GQL Pad is a web application that runs on the ServiceNow Helsinki release.
- User must have the "itil" role.
- GQL Pad provides a user interface (UI) with the following features:
- User can enter and edit a GQL statement in a text editor.
- User can select the desired output format among CSV, HTML, JSAN, JSON.
- User can execute the GQL statement in the editor.
- User can see the results of the execution on the same web page (rather than downloading).
- User can see how long it took for execution.
- GQL Pad provides GQL syntax checker in the editor. [future enhancement]
- GQL Pad provides GQL syntax highlighting in the editor. [future enhancement]
- GQL Pad provides Database Schema Browser showing a list of tables and columns that can be entered into the editor. [future enhancement]
UI PAGE CONFIGURATION
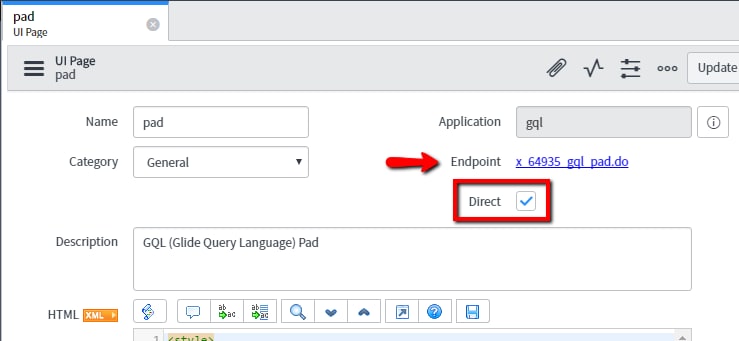
To get started, let's create a new UI Page in the "gql" application scope, as shown in the screenshot below:
Endpoint is what we need to use in the URL to open this UI Page; we'll use it when we create an application module for this. Be sure to check the Direct checkbox. This allows us to bypass Jelly, since we'll be using AngularJS instead, and use simpler HTML of our own without any ServiceNow additions (you can later view the page source and compare with other out-of-the-box pages).
HTML CONTENT
The HTML content looks like
<style>
body { margin-bottom:20pt; }
label { margin-right: 9px; }
table { font:9pt Arial; border-collapse:collapse; }
th,td { padding:3px; border:1px solid #aaa; empty-cells:show; vertical-align:top; }
th { font-weight:bold; text-align:left; background-color:#eee; }
tr:nth-child(even) { background-color:#fafafa; }
tr:hover { background-color:lightyellow; }
</style>
<body ng-app="gqlpad">
<h3>GQL (Glide Query Language) Pad</h3>
<div ng-controller="EditorCtrl">
<textarea ng-model="gql" rows="20" style="font:9pt Consolas; width:100%;"></textarea>
<br/>
<label>Output format:
<select ng-model="format" ng-options="format.name for format in formats"></select>
</label>
<button ng-click="run()" style="width:80px;" accesskey="r"><u>R</u>un</button>
<span ng-bind="timer" style="color:gray; font:9pt Consolas; margin-left:30px;"></span>
<br/>
<div ng-bind-html="result" style="font:9pt Consolas; white-space: pre-wrap;"></div>
</div>
</body>
<script>https://ajax.googleapis.com/ajax/libs/angularjs/1.5.6/angular.min.js"></script>
The HTML adds various AngularJS attributes that start with "ng-"; we will use them later in script.
Line 13 adds the AngularJS directive "ng-app" and is the start of the GQL Pad app.
Line 15 is the start of the ng-conroller "EditorCtrl", which we'll see more of in the script.
Line 16 adds a text editor using the "<textarea>" tag.
Line 19 adds a <select> list of desired output formats (the options will be added by the script later).
Line 21 is the Run button (access key of "r" allows pressing Alt-R on Windows keyboard to invoke the click button action).
Line 22 is a placeholder for displaying execution duration.
Line 24 is a placeholder for displaying result.
Line 28 adds the <script> tag for the AngularJS source, which we're fetching from a CDN (content delivery network).
CLIENT SCRIPT
The Client Script looks like
/**
* GQL (Glide Query Language) Pad
*/
var app = angular.module('gqlpad', []);
app.controller('EditorCtrl', ['$scope', '$http', '$sce', function($scope, $http, $sce) {
// set initial value
$scope.gql = 'SELECT -- sample GQL statement\r number [Number]\r , short_description [Title]\r , dv_state [State]\r , caller_id.email [Caller Email]\r , caller_id.manager.email [Manager Email]\r , dv_cmdb_ci [CI]\r , cmdb_ci\rFROM incident\rWHERE active=true^priority<2^EQ^ORDERBYpriority^ORDERBYDESCnumber\rLIMIT 5,10';
$scope.formats = [
{name:'CSV' },
{name:'HTML'},
{name:'JSAN'},
{name:'JSON'},
];
$scope.format = $scope.formats[1]; // default to HTML
$scope.run = function() {
var timer = Date.now();
$scope.timer = '';
$scope.result = '';
var params = { gql:$scope.gql, format:$scope.format.name, now:Date.now() }; // add now() to prevent caching
$http.get('/x_64935_gql_proc.do', { params: params }).then(function(response) {
var data = response.data;
$scope.result = $sce.trustAsHtml(typeof data == 'object' ? JSON.stringify(data) : data); // stringify to show JSON on page
$scope.timer = 'took ' + ((Date.now() - timer) / 1e3) + ' seconds';
});
}
}]);
This is a simple AngularJS script that works with the above HTML to do the following:
Line 5 defines the GQL Pad app from HTML Line 13.
Line 7 is the beginning of the editor controller, which was declared on HTML Line 15.
Line 12 lists the available formats for the output; these will populate the <select> tag on HTML line 19.
Line 20 is executed when the Run button is clicked. It clears the output fields and sends a GET command to the processor we saw in Part 6, passing on the parameters gql and format in the query string.
Line 27 is the start of the callback function that's executed when a response is returned from the processor. It simply shows the result in the result <div> on HTML line 24; the result is converted to a string to prevent it from opening up in Excel (in case of CSV) or in another window (in case of JSON) to conform to Requirement c.4. It also shows the execution duration in the <span> defined on HTML line 22.
APPLICATION AND MODULE MENUS
To cap this off, let's add application and module menus. Create a new application menu with the settings in the screenshot below:
We set the Roles to "itil" as specified in Requirement b and set Category to "Custom Applications". After saving the application menu configuration page, let's add a new module using the New button in the Modules related list. In the Module configuration page, set the values as in the screenshot below:
We set Roles to "itil", again as per Requirement b. For Link type, set it to "URL (from Arguments)" and set Arguments to "x_64935_gql_pad.do", which is the Endpoint from the GQL Pad UI Page configuration setting.
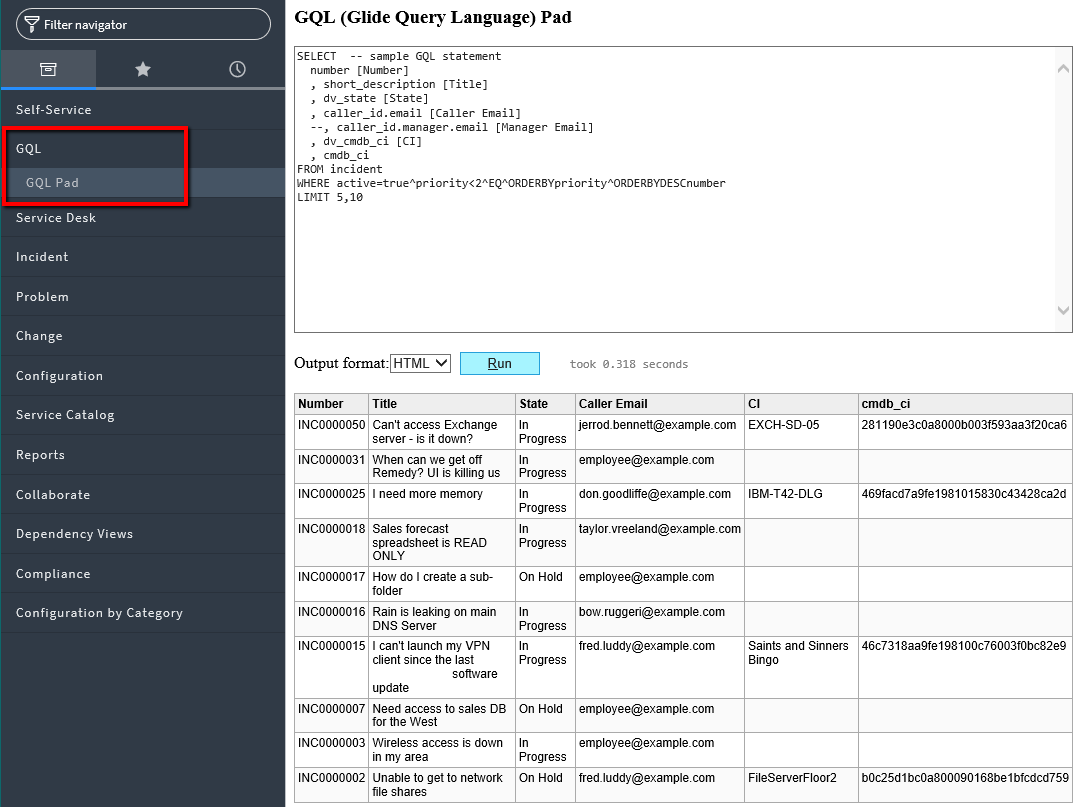
After refreshing the Navigator (or the entire page), let's make sure the new "GQL" application and "GQL Pad" module menus show up in the Navigator.
GQL PAD IN ACTION
Here's a screenshot of GQL Pad in action. When you navigate to GQL > GQL Pad, the GQL Pad UI Page opens up with the default GQL statement in the editor. When you click on the Run button, the result is displayed below the Run button. The screenshot below is showing Incident demo data; your results may look different.
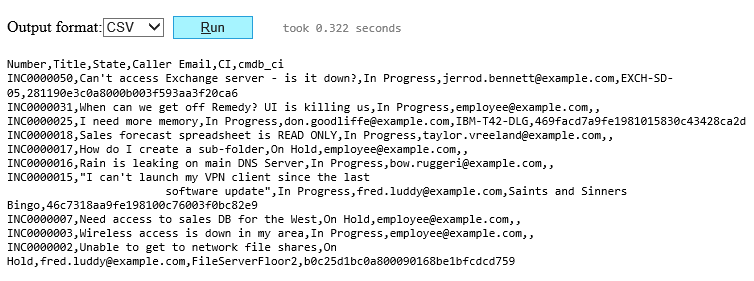
You can change Output format to "CSV" and click Run, which gives the below output:
You can change Output format to "JSAN" and click Run, which gives the below output:
You can change Output format to "JSON" and click Run, which gives the below output:
You can use GQL Pad to try out various GQL statements from other tables and inspect data, which may be useful for some debugging scenarios. You can also use it to test encoded query strings. The beauty is it's very interactive and fast.
This wraps up our work to date. Next time, I'll show you how to get the app from GitHub and discuss limitations and potential enhancements for the future.
Please feel free to connect, follow, post feedback / questions / comments, share, like, bookmark, endorse.
| John Chun, PhD PMP
|  |
- 5,216 Views
7 Comments
You must be a registered user to add a comment. If you've already registered, sign in. Otherwise, register and sign in.

