


sabell2012

Mega Sage
Options
- Subscribe to RSS Feed
- Mark as New
- Mark as Read
- Bookmark
- Subscribe
- Printer Friendly Page
- Report Inappropriate Content
11-30-2015
09:32 PM
Since I have been harping on Soap so much I thought I would take a breather and talk REST a bit. With the release of Fuji ServiceNow has improved on REST. What I thought I would do here is demonstrate what ServiceNow provides for prototyping REST queries, and then how you can also do this with a SOAP client tool.
Pre-requisites:
1. SoapUI installed on your local machine. Actually any REST client would work, but I will be using SoapUI for the purposes of this article.
Download SoapUI Open Source | Downloads
2. Some familiarity with RESTful Web Services. If you are new to REST you might want to go read up on it a bit. The following article may help:
RESTful Web Services: A Tutorial | Dr Dobb's
3. Some familiarity with JSON. If you are new to JSON this article may help:
4. Create a Web Services Group and User. See my previous Web Services Part 1 labs for help with this.
Lab 1.1: Modeling the REST Query With the REST API Explorer
1. The Initial Query - Get Everything in the Table
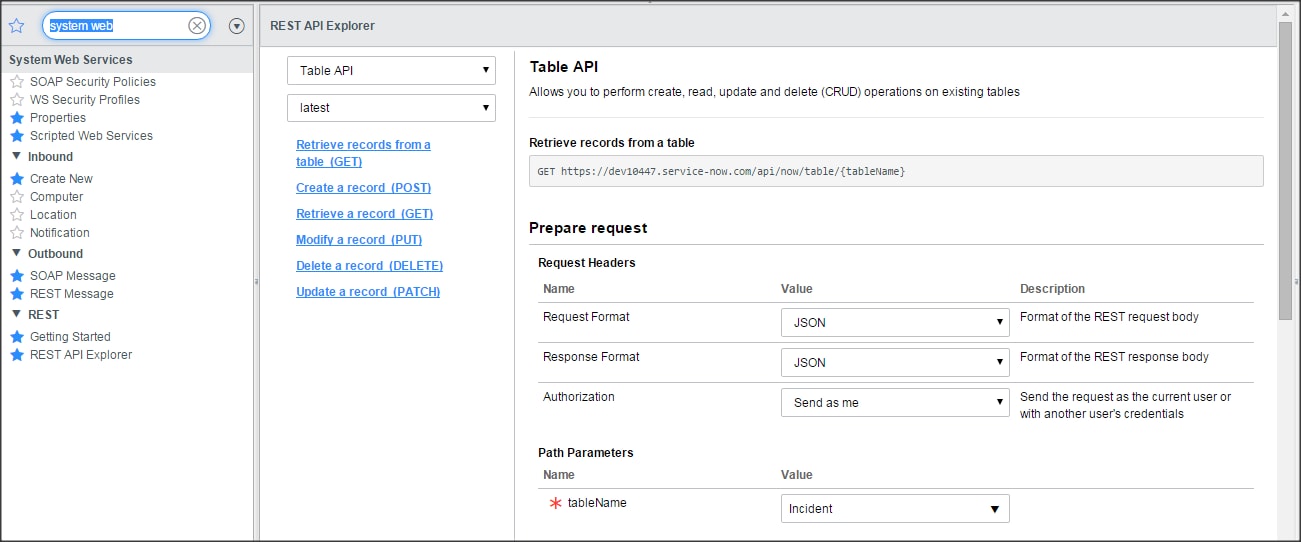
a. Navigate to System Web Services -> REST -> REST API Explorer. The REST API Explorer form will be displayed. The default form is the same as the "Retrieve records from a table (GET)" link.
b. Fill in the form with the folowing:
i. Request Format: JSON
ii. Response Format: JSON
iii. Authorization: Send as me
iv. tableName: Incident
v. Leave everything else as a default (blank). The default Limit will be 10.
c. Scroll to the bottom of the form and click on the Send button. The results of the query will be displayed below the Send button.
d. Under the Request section you will see the label: HTTP Method / URI. Copy the URL into your favorite editor for future use.
e. Scroll all the way down and you will see the actual data retrieved in the Results section. Quite a bit of day is returned. Let's see if we can pare that down a bit.
2. Adding an Encoded Query - Between Two Dates
If you have already done the labs in my previous Web Services Part 1 article you will remember our old friend the "between" query? Here we will be using it again to constrain further the number of records being returned.
a. While you are still on the REST API Explorer form scroll back up above the Send button to see the various query fields.
b. Locate the sysparm_query field. Fill in the value with the following:
sys_updated_on>=2015-10-20 00:00:00^sys_updated_on<2015-10-20 23:59:59
Note that it is not necessary to URL encode the greater and less than signs. You may have to fiddle with the dates to get a return as your data may be somewhat different than mine.
c. Click the Send button, and then scroll to the very bottom when the results are re-displayed. You should notice a significant reduction in the number of records returned.
d. Note that the URL has now changed to look something like this:
https://dev000001.service-now.com/api/now/table/incident?sysparm_limit=10&sysparm_query=sys_updated_on>=2015-10-20 00:00:00^sys_updated_on<2015-10-20 23:59:59&sysparm_fields=
3. Limit the Fields That Are Returned
You should have noticed that we are getting every field back from the table. Well you can limit the fields being brought back by specifying those you really want in a comma-delimited list.
a. Leaving everything as-is scroll to the Query Parameters again, and locate the sysparm_fields field.
b. Fill in the value with: sys_id
c. Click the Send button again. Scroll to the bottom of the form again and you will note that only the sys_ids for each record are returned.
That wraps our short tour of the REST API Explorer. Now, let's go try it all out in SoapUI!
Lab 1.2: Implementing the REST Query With SoapUI
SoapUI like other REST clients has the functionality built in to do REST queries. We will be using similar query progression like we just used with the REST API Explorer. So let's get started.
1. Setting up the project, and running the first query
a. In my ServiceNow instance I had already created a group and user for Web Services to use when accessing my instance. You will need to do something similar. make sure you give your Group the following roles:
soap - for soap calls
itil - for calls into ITIL tables
rest_service - for REST calls
b. Open SoapUI.
c. On the menu navigate to File -> New REST Project. This will display the New REST Project form.
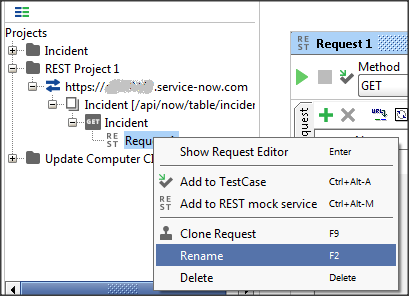
d. Fill in the form with the URL you copied into your editor in Lab 1.1 Step 1d. Click the OK button. This will create a new REST Project.
e. In the Tree View right-click on the Request 1 label. This will display the context menu. Click on Rename. The Rename form will be displayed.
f. Fill in the new name: getIncidents, and click the OK button.
g. In the Tree View right-click on the REST Project 1 label. This will display the context menu. Click on Rename. The Rename form will be displayed.
h. Fill in the new name: ServiceNowREST, and click the OK button.
i. Click on getIncidents in the Tree View. The properties for getIncidents will be displayed.
j. Enter a web service user and password. I am reusing the one that I created in my Web Services Part 1 article.
k. Now click on the green "play" button in the upper left of the getIncidents form. This will run our REST query against our ServiceNow instance.
i. Make sure to click on the JSON tab to see your results. They should look something like this:
2. Adding an encoded query
a. Click on the "+" button in the getIncidents form to add a new query parameter.
b. Fill in the parameter with the following:
name: sysparm_query
value: sys_updated_on>=2015-10-20 00:00:00^sys_updated_on<2015-10-20 23:59:59
NOTE: The value will be the same "between" query you used in the previous lab.
c. Click on the "play button to run our query. Again you will notice a significant reduction in the number of records.
3. Adding a fields limitation
a. Click on the "+" button in the getIncidents form to add another new query parameter.
b. Fill in the parameter with the following:
name: sysparm_fields
value: sys_id
c. Click on the "play button to run our query. This time you will see that only the sys_id's will be returned.
And that is all there is to it! If you have problems getting a return make sure to note the errors in the "SoapUI log" button at the bottom of the screen. This will display what went wrong (for the most part). Usually this will be a credentials or roles issue.
References:
Getting Started with REST Wiki
Steven Bell
If you find this article helps you, don't forget to log in and "like" it!
Also, if you are not already, I would like to encourage you to become a member of our blog!
- 5,098 Views
You must be a registered user to add a comment. If you've already registered, sign in. Otherwise, register and sign in.

