- Mark as New
- Bookmark
- Subscribe
- Mute
- Subscribe to RSS Feed
- Permalink
- Report Inappropriate Content
08-17-2018 08:08 AM
Hi All,
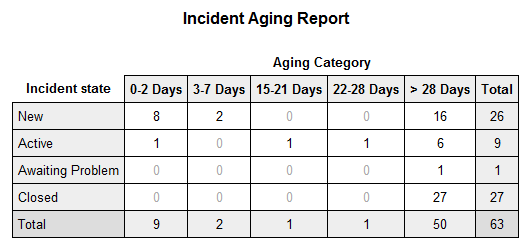
I want to schedule an Aging Report on Incident in which it will display in tabular format like in Pivot Table format.
Can anyone share me some ideas as well as help on the same so that I will configure and implement the same as well.

Like the same as above image.
Solved! Go to Solution.
- 38,076 Views
- Mark as New
- Bookmark
- Subscribe
- Mute
- Subscribe to RSS Feed
- Permalink
- Report Inappropriate Content
08-20-2018 10:29 AM
Here's what you'll need to do...
1) Create a new 'Choice' field on the 'incident' table named 'Aging category'
2) Right-click that field label from your form and select 'Configure choices' to add the following choices. COPY THESE VALUES EXACTLY!
3-7 Days
8-14 Days
15-21 Days
22-28 Days
> 28 Days
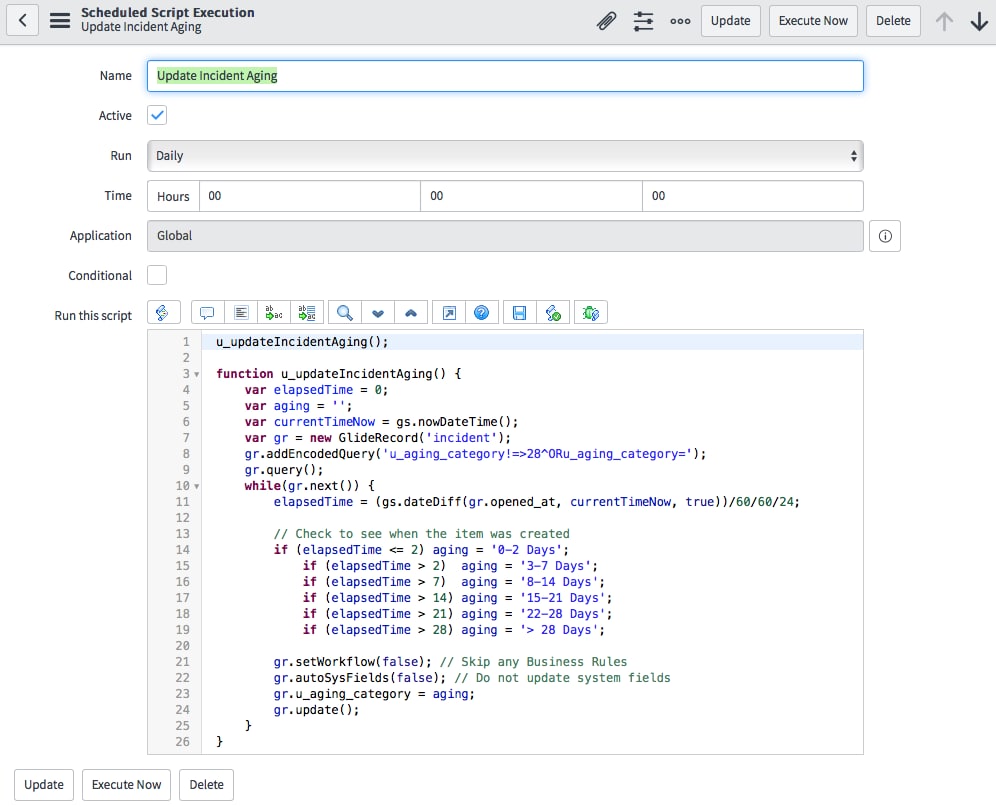
3) Navigate to 'System Definition -> Scheduled Jobs' and select 'Automatically run a script of your choosing'. Here you'll create a scheduled job to run a script to get you accurate counts for your report. You can run this as often as you want, but I'd probably only run it every day or so you don't negatively impact your instance performance. You should use this in the 'Script' field.
u_updateIncidentAging();

function u_updateIncidentAging() {
	var elapsedTime = 0;
	var aging = '';
	var currentTimeNow = gs.nowDateTime();
	var gr = new GlideRecord('incident');
	gr.addEncodedQuery('u_aging_category!=>28^ORu_aging_category=');
	gr.query();
	while(gr.next()) {
		elapsedTime = (gs.dateDiff(gr.opened_at, currentTimeNow, true))/60/60/24;

		// Check to see when the item was created
		if (elapsedTime <= 2) aging = '0-2 Days';
			if (elapsedTime > 2)  aging = '3-7 Days';
			if (elapsedTime > 7)  aging = '8-14 Days';
			if (elapsedTime > 14) aging = '15-21 Days';
			if (elapsedTime > 21) aging = '22-28 Days';
			if (elapsedTime > 28) aging = '> 28 Days';

		gr.setWorkflow(false); // Skip any Business Rules
		gr.autoSysFields(false); // Do not update system fields
		gr.u_aging_category = aging;
		gr.update();
	}
}
Your scheduled job should look like this...

Once this is in place, you can click the 'Execute now' button to run the script and populate your new field. You should be able to go to any incident record and see this value populated correctly.
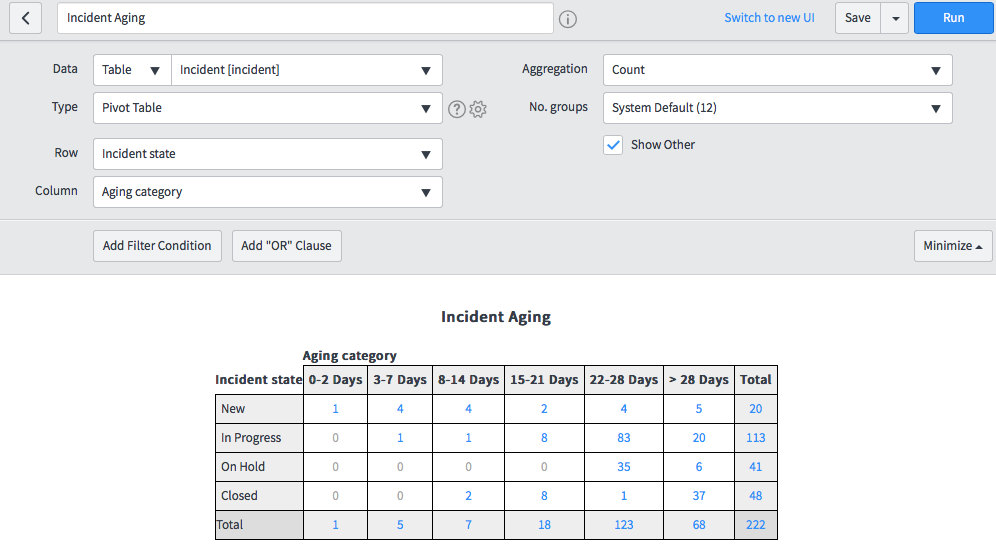
4) Create your report. The report should look like this...

- Mark as New
- Bookmark
- Subscribe
- Mute
- Subscribe to RSS Feed
- Permalink
- Report Inappropriate Content
08-17-2018 08:09 AM
Check out the solution posted here...
- Mark as New
- Bookmark
- Subscribe
- Mute
- Subscribe to RSS Feed
- Permalink
- Report Inappropriate Content
08-17-2018 08:15 AM
I went through that but I am not getting it properly what all conditions I need to define in the report.
Where to use that script include actually. Can you please help me with the same.
- Mark as New
- Bookmark
- Subscribe
- Mute
- Subscribe to RSS Feed
- Permalink
- Report Inappropriate Content
08-17-2018 08:29 AM
Check out the comments on that post for details on the setup. You actually don't need the Script Include if you don't want, just put that script directly into the Scheduled Script Execution 'Script' field. There is also a screenshot in the comments below Jim's answer that shows how you could configure the report.
- Mark as New
- Bookmark
- Subscribe
- Mute
- Subscribe to RSS Feed
- Permalink
- Report Inappropriate Content
08-20-2018 04:22 AM
Hello Mark,
Still I am facing some doubts in the same in order to configure the report.
Can you please help me out.