- Mark as New
- Bookmark
- Subscribe
- Mute
- Subscribe to RSS Feed
- Permalink
- Report Inappropriate Content
11-13-2019 10:02 PM
hi
i have designed a notification which looks like this:

now what i need to do is once i click on approve button it open a reply-to email window. Just Click 'Send' to forward the email back to ServiceNow and approve the request. The reply email is linked directly to the approval request in ServiceNow and it will look like below image

how can i achieve this through email script or any other way......please explain me in detail as am new to now and scripting
thanks in advance!!
Solved! Go to Solution.
- Mark as New
- Bookmark
- Subscribe
- Mute
- Subscribe to RSS Feed
- Permalink
- Report Inappropriate Content
11-13-2019 10:25 PM
Hi,
Use the below code in email script
(function runMailScript(current, template, email, email_action, event) {
var apButStr = '<div><a href="mailto:dev11111@service-now.com?subject=re:' + current.number + ' - approve&body='+ current.number + ' - approve' +'"><br /><img style="align: baseline;" title="Click this button to mark approved" src="/approveButton.pngx" alt="Approved" width="142" height="41" align="baseline" /></a>';
var rejButStr = '<a href="mailto:dev11111@service-now.com?subject=re:' + current.number + ' - reject&body='+ current.number + ' - Reject' +'"><img style="align: baseline;" title="Click this button to mark rejected" src="/rejectButton.pngx" alt="Rejected" width="142" height="41" align="baseline" /></a></div>';
var full = apButStr + rejButStr;
template.print(full);
})(current, template, email, email_action, event);
Note:Use your instance URL.
- Mark as New
- Bookmark
- Subscribe
- Mute
- Subscribe to RSS Feed
- Permalink
- Report Inappropriate Content
11-14-2019 01:17 AM
ok..i will share you code and the inbound action steps.
- Mark as New
- Bookmark
- Subscribe
- Mute
- Subscribe to RSS Feed
- Permalink
- Report Inappropriate Content
11-14-2019 01:36 AM
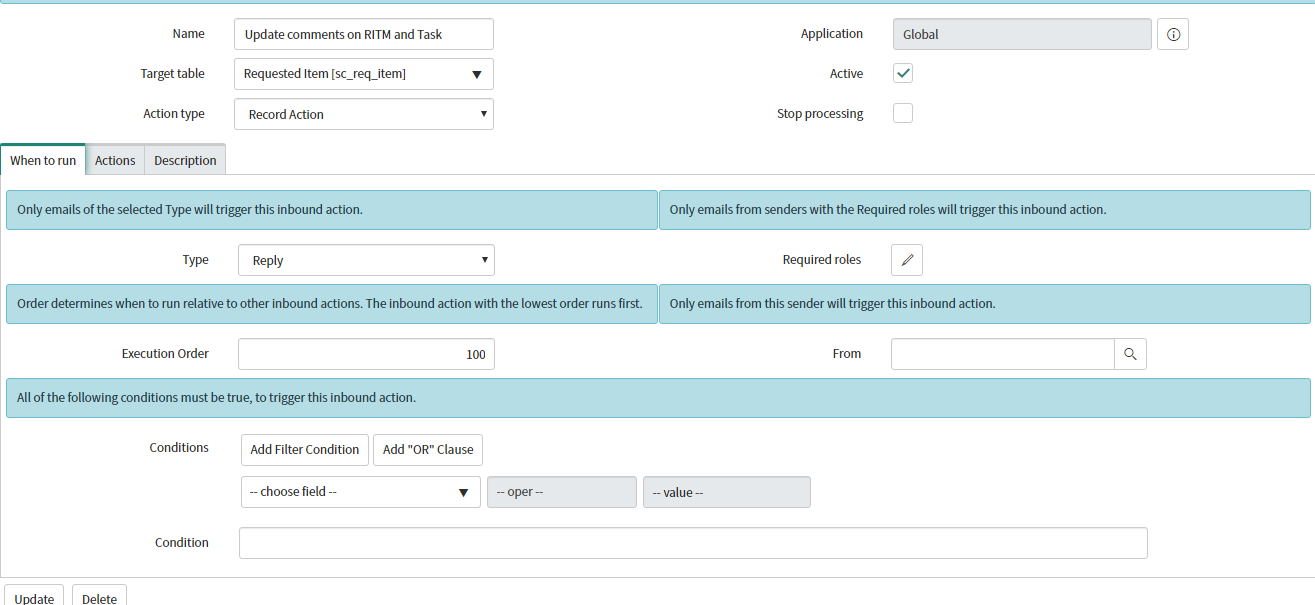
Follow the Steps:
Go to the inbound action and create new.

d
Add below script:
var number = email.subject.substr(3,11);
var item_id='';
var item=new GlideRecord('sc_req_item');
item.addEncodedQuery('number='+number);
item.query();
if(item.next())
{
item_id=item.getValue('sys_id');
}
var apr=new GlideRecord('sysapproval_approver');
apr.addEncodedQuery('document_id='+item_id);
apr.query();
while(apr.next())
{
if(email.subject.indexOf("approve") > -1)
{
apr.state='approved';
}
else if (email.subject.indexOf("reject") > -1)
{
apr.state='rejected';
}
apr.update();
}
- Mark as New
- Bookmark
- Subscribe
- Mute
- Subscribe to RSS Feed
- Permalink
- Report Inappropriate Content
11-14-2019 01:51 AM
i did the above changes and its not updating the approval column to approved/rejected
you have mentioned this in your code and i want to update approval column in my form
apr.state='approved';
where am going wrong and thanks for all these efforts
- Mark as New
- Bookmark
- Subscribe
- Mute
- Subscribe to RSS Feed
- Permalink
- Report Inappropriate Content
11-14-2019 02:04 AM
Can you please share screenshot where you want to change?
- Mark as New
- Bookmark
- Subscribe
- Mute
- Subscribe to RSS Feed
- Permalink
- Report Inappropriate Content
11-14-2019 02:12 AM
please check the below image

i want to update this field when i rejected this it shows approved only which was by default and one more doubt
as you can see the approve link i want to keep space between two buttons and i will share the html code

html code for notification:
<h2>Request approval Mail</h2>
<style>
h2
{
color: white;
background-color: #6699CC;
margin: 20px 2px;
padding: 15px 45px;
text-align: left;
}
table {
font-family: arial, sans-serif;
border-collapse: collapse;
width: 100%;
margin: 20px 2px;
}
td, th {
border: 1px solid #dddddd;
text-align: left;
padding: 2px;
background-color: #dddddd;
}
.button {
background-color: #4CAF50; /* Green */
border: none;
color: white;
padding: 15px 32px;
text-align: center;
text-decoration: none;
display: inline-block;
font-size: 16px;
margin: 4px 2px;
cursor: pointer;
}
.button2 {
background-color: #ff0000; /* red */
margin: 32px 150px;
}
body {background-color: white;}
h1 {color: white;}
p {color: black;}
</style>
<p>Hi Steve,<br /><br />You have been sent request for approval.</p>
<p> </p>
<table>
<tbody>
<tr>
<td>Name</td>
<td>abel </td>
</tr>
<tr>
<td>RITM number</td>
<td>RITM0010002</td>
</tr>
<tr>
<td>Priority</td>
<td>4 - Low</td>
</tr>
<tr>
<td>Requested For</td>
<td>abc</td>
</tr>
<tr>
<td>Requested By</td>
<td>xyz</td>
</tr>
<tr>
<td>Status</td>
<td>Approved</td>
</tr>
</tbody>
</table>
<p>Please approve or reject this request using the buttons below</p>
<p>when rejecting an access request,please include the reason for rejection in the response email.</p>
<p> </p>
<p>${mail_script:test} </p>
<p><button class="button">Approve</button> <button class="button button2">Reject</button></p>
<p> </p>
<p> </p>