- Mark as New
- Bookmark
- Subscribe
- Mute
- Subscribe to RSS Feed
- Permalink
- Report Inappropriate Content
09-24-2020 12:15 PM
Hi all,
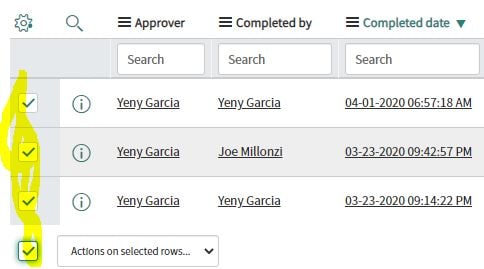
I've been asked to provide a checkbox functionality in the portal to approve/update multiple records at a time similar to the list view in the platform. I'm wondering if this can be done using a data table widget so the user can select all the items they want to update and then just click a button to execute. Has anyone done this before? If so, would you be able to provide some assistance in the html/server part of the widget? If it's not possible in a data table, do you have some suggestions for a custom widget that could provide this same functionality?

Data table where this could possibly be added to:

Thank you!
Yen
Solved! Go to Solution.
- Mark as New
- Bookmark
- Subscribe
- Mute
- Subscribe to RSS Feed
- Permalink
- Report Inappropriate Content
10-16-2020 08:36 AM
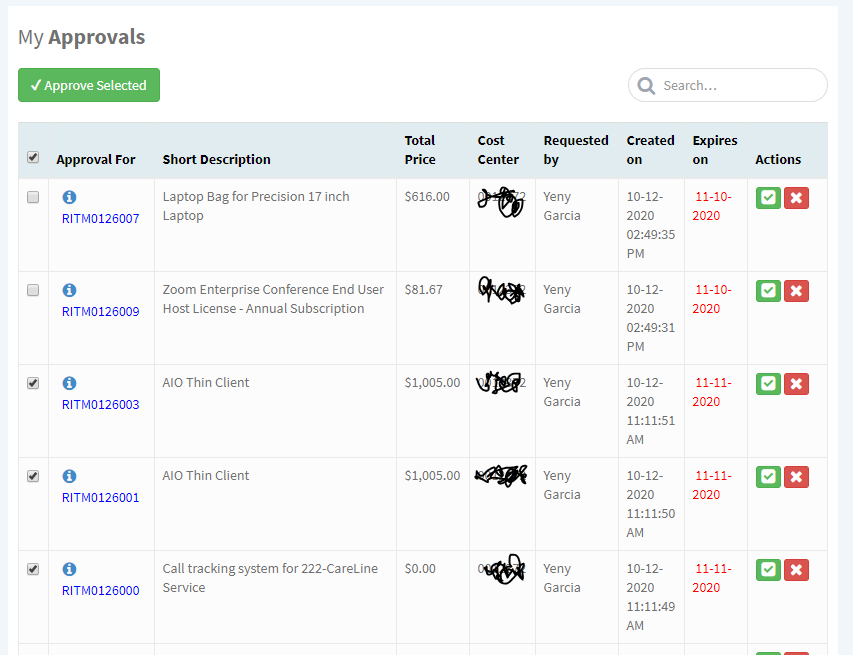
Thank you Jason! Sorry for getting back to you so late! I did add the checkboxes in the table. I decided to create a new widget instead. This is how it's looking. I still have to adjust some column widths to prevent the titles from wrapping. I also need to figure out how to uncheck the check all box when the user clicks it and then removes a check box from the list.

I did go to SNHackery website but didn't end up using the table he had however, i took some design ideas from him so thank you for sharing the website!!!
Yeny
- Mark as New
- Bookmark
- Subscribe
- Mute
- Subscribe to RSS Feed
- Permalink
- Report Inappropriate Content
06-08-2023 11:28 PM
Hi @YenGar ,
Thank you for the sample script, but I could not make my widget show the "Actions" buttons like your screenshot.
Could you please share me with the xml file or entire code of your custom widget?
- Mark as New
- Bookmark
- Subscribe
- Mute
- Subscribe to RSS Feed
- Permalink
- Report Inappropriate Content
12-07-2024 06:53 AM
Detailed Description of the Code
Defines "Approve" and "Reject" buttons with icons, tooltips, and styling. Each button triggers AngularJS functions (approve or reject) with the sys_id of the associated record.
<button name="approve" title="Approve" data-toggle="tooltip"
        ng-click="approve(item.sys_id);"
        class="btn btn-success">
    <i class="fa fa-check-square fa-lg"></i>
</button>
<button name="reject" title="Reject" data-toggle="tooltip"
        ng-click="reject(item.sys_id);"
        class="btn btn-danger">
    <i class="fa fa-times fa-lg"></i>
</button>
Client Script
Handles the logic to send approval or rejection requests to the server:
- Sets operation type (approved or rejected) and target ID.
- Calls the server script to process the operation.
- Displays success or error messages based on the server response.
$scope.approve = function(id) {
    $scope.data.op = "approved"; // Operation type: approved
    $scope.data.target = id;    // Record's unique identifier (sys_id)
    c.server.update().then(function() {
        if (c.data && c.data.result === 'success') {
            alert('Record approved successfully!');
        } else {
            var errorMessage = c.data && c.data.message
                ? c.data.message
                : 'An unexpected error occurred.';
            alert('Approval failed: ' + errorMessage);
        }
    });
};

$scope.reject = function(id) {
    $scope.data.op = "rejected"; // Operation type: rejected
    $scope.data.target = id;    // Record's unique identifier (sys_id)
    c.server.update().then(function() {
        if (c.data && c.data.result === 'success') {
            alert('Record rejected successfully!');
        } else {
            var errorMessage = c.data && c.data.message
                ? c.data.message
                : 'An unexpected error occurred.';
            alert('Reject failed: ' + errorMessage);
        }
    });
};
Server Script
Processes approval or rejection operations:
- Uses GlideRecordSecure to find and update the target record in the u_abonnements table.
- For approval, updates the state to "approved."
- For rejection, updates the state to "rejected" and deactivates the record.
- Returns success or error messages based on the outcome.
if (input && input.op === 'approved' && input.target) {
var gr = new GlideRecordSecure('u_abonnements');
gr.addQuery('sys_id', input.target);
gr.query();
if (gr.next()) {
gr.u_state_update_ca = 'waca'; // Set state to approved
gr.update();
data.result = 'success';
} else {
data.result = 'error';
data.message = 'Record not found.';
}
} else if (input && input.op === 'rejected' && input.target) {
var gr = new GlideRecordSecure('u_abonnements');
gr.addQuery('sys_id', input.target);
gr.query();
if (gr.next()) {
gr.u_state_update_ca = 'wafca'; // Set state to rejected
gr.u_active = false; // Deactivate the record
gr.update();
data.result = 'success';
} else {
data.result = 'error';
data.message = 'Record not found.';
}
} else {
data.result = 'error';
data.message = 'Invalid operation or target ID.';
}
- Mark as New
- Bookmark
- Subscribe
- Mute
- Subscribe to RSS Feed
- Permalink
- Report Inappropriate Content
06-03-2022 12:47 AM
Hi YenGar
Do you mind sharing the code for your widget?
- Mark as New
- Bookmark
- Subscribe
- Mute
- Subscribe to RSS Feed
- Permalink
- Report Inappropriate Content
01-05-2024 08:53 AM
Can you pls share the code for approve selected @YenGar
- Mark as New
- Bookmark
- Subscribe
- Mute
- Subscribe to RSS Feed
- Permalink
- Report Inappropriate Content
02-02-2025 11:12 PM
Hi!
Can you kindly share how did you shift the column labels when you added the checkboxes at left hand side?