- Mark as New
- Bookmark
- Subscribe
- Mute
- Subscribe to RSS Feed
- Permalink
- Report Inappropriate Content
07-24-2019 06:38 AM
Hi,
I have acquired a personal ServiceNow Instance and a trial version of Zendesk to test integration between the two using oAuth 2.0. I have gone through the documentations of both and have configured everything required except for Zendesk scope parameter for Tokens.
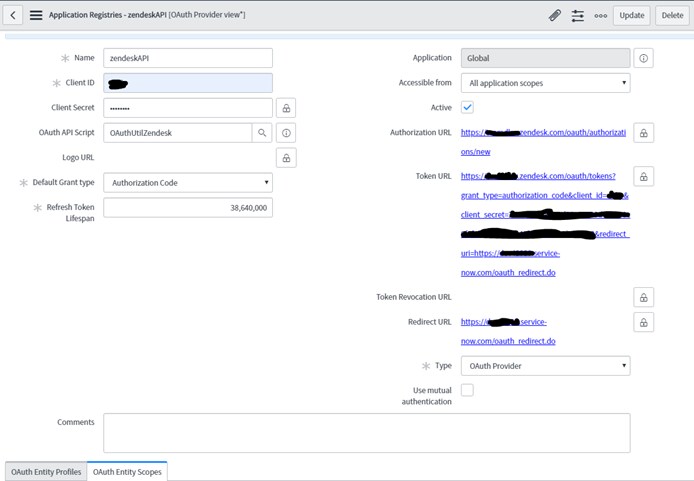
According to Zendesk documentation, while getting oAuth token the url should contain the parameter scope=read OR scope=read write. Attaching the application registry (please do any sanity check):

The "Get oAuth Token" ui action on the REST message takes me to this page with url : https://<xyz>.zendesk.com/oauth/authorizations/new?response_type=code&state=<xyz>&redirect_uri=https://dev<xyz>.service-now.com/oauth_redirect.do&client_id=<xyz>

Upon clicking Allow, it connects successfully to the application however i still do not have any access rights to read and write the data.
The Rest Message "POST" method test runs result an error as scope missing "write".
If I copy the url and append "&scope=read write", then it takes me to the desired page. I am unable to get the image but just imagine these 2 lines (not exact) above "Deny" and "Allow" buttons in the above image.
1. Allow read access to data
2. Allow write access to data
Now, ServiceNow provides a related list called "oAuth Entity Scopes" in oAuth Application Registry form where it specifies to add the scopes according to the documentation:

I have tried whereas permutations and combinations of scopes along with some urls but nothing seems to work. My understanding suggests that this is the place where those scope needs to be passed. Can anyone tell what those values should be?
Or if there is any other way I can pass those parameters in the authentication URL? If I pass it in the field available, then the URL structure becomes invalid as it will append client id, and redirect uri.
The integration is otherwise successfully established but this issue nullifies all the work.
Also, this is my first approach to setup integration between these 2 applications so there might be some room for improvement.
Thanks and Regards
Solved! Go to Solution.
- Mark as New
- Bookmark
- Subscribe
- Mute
- Subscribe to RSS Feed
- Permalink
- Report Inappropriate Content
07-24-2019 07:48 AM
Hello,
There are two steps required when configuring scopes.
1) Define the scopes. You've done this already based on the screenshot above.
2) Associate the defined scopes with an OAuth Profile <-- this is probably what's missing.
The UI in the screenshot above is used to define all of the possible scopes you might want to send to the API provider. However, it's possible that you'll have multiple profiles, each with different scopes. With this in mind, you must now go add the scopes you defined to the default profile.
Here's what this might look like (I'm using an example from a GitHub OAuth configuration I have on hand):
Open the default profile

Double click Insert a new row...

Select the scope you created

Repeat these steps for each scope you defined and want to associate with this OAuth profile - the profile form should look something like this:

Now that these are attached to the profile, they'll automatically get added to the Authorization URL when you initiate the OAuth flow.
- Mark as New
- Bookmark
- Subscribe
- Mute
- Subscribe to RSS Feed
- Permalink
- Report Inappropriate Content
07-24-2019 07:48 AM
Hello,
There are two steps required when configuring scopes.
1) Define the scopes. You've done this already based on the screenshot above.
2) Associate the defined scopes with an OAuth Profile <-- this is probably what's missing.
The UI in the screenshot above is used to define all of the possible scopes you might want to send to the API provider. However, it's possible that you'll have multiple profiles, each with different scopes. With this in mind, you must now go add the scopes you defined to the default profile.
Here's what this might look like (I'm using an example from a GitHub OAuth configuration I have on hand):
Open the default profile
Double click Insert a new row...
Select the scope you created
Repeat these steps for each scope you defined and want to associate with this OAuth profile - the profile form should look something like this:
Now that these are attached to the profile, they'll automatically get added to the Authorization URL when you initiate the OAuth flow.
- Mark as New
- Bookmark
- Subscribe
- Mute
- Subscribe to RSS Feed
- Permalink
- Report Inappropriate Content
07-25-2019 02:14 AM
Hi,
Well, that was easy. Thanks.