


Michael Ritchie

ServiceNow Employee
Options
- Subscribe to RSS Feed
- Mark as New
- Mark as Read
- Bookmark
- Subscribe
- Printer Friendly Page
- Report Inappropriate Content
09-21-2016
01:46 PM
During my tenure at ServiceNow, I have always stressed the importance of "data-driven" code. What I mean is make workflows, business rules, etc dependent on tables and records in ServiceNow that can be maintained outside of your internal enhancement release process. In other words, I shouldn't have to promote code to change something as simple as an approver in a workflow. I find that ServiceNow Administrators are often bogged down maintaining data instead of enhancing the process to be more efficient and save time. Examples:
- Use the task's configuration item whenever possible to store important process attributes for that particular item. In a workflow "dot-walk" to the Task's CI for things like Approval Group, Support Group, Owned By, Location, etc and leverage those attributes instead of hard coding the values in a workflow or code.
- Create your own custom tables to store data in support of your process. Does the incident category really need to be a choice type field that only admin's can add choices? No! You can easily create a custom category table and change the category field to be a reference instead. Then create ACL's to allow users to maintain this data for you.
- Don't be afraid to add attributes to out of the box tables like locations and departments. I have seen cases where locations have a specific support group for that campus, building, or floor. Instead of creating code to determine the group based on the location in the task, simply add a Support Group attribute to the location record that can be maintained outside of code and use that in your workflows and code.
Coding in this way takes more time up front to do the right look-ups, but it will save you a ton of time in the long run and make your ServiceNow administrators happy. Plus you will have the ability to "delegate" the maintenance of this data to people outside the ServiceNow Administration group if you so choose. I cringe every time I hear of administrators being asked to manually make changes to data in ServiceNow "just because" they are the only users that have access to update that data. Mistakes can and will happen! So instead, modify the ACL's, create access, etc for the users that own that data to do it themselves.
Easy Import:
I am sure this all sounds good, but I commonly get a follow up question... how can non-administrators maintain data in these custom tables, especially if there are a lot of rows to maintain? The answer is usually to import a spreadsheet. Unfortunately data imports in ServiceNow are an admin function and import sets can be very confusing to setup. The Fuji release introduced "Easy Import" where it will automatically create an import and update template for you:
http://wiki.servicenow.com/index.php?title=Easy_Import#gsc.tab=0
Unfortunately the Easy Import feature is only available to administrators out of the box, but this can be changed. Navigate to System UI \ UI Context Menus and search for name = Import and open the record.
You will see this is a global action that available to anyone with the 'admin' role (see the condition). If you want to make this feature available on a specific table, you can easily clone this record and set it for a specific table and a specific role. Simply change the table from Global to your specific table and then change the condition to something more appropriate:
Condition Example: gs.hasRole('YOUR-CUSTOM-ROLE') && !ListProperties.isRelatedList() && !ListProperties.isRefList()
- gs.hasRole('YOUR-CUSTOM-ROLE') part of the condition checks the logged in user's roles to see if it matches the role between the quotes.
- !ListProperties.isRelatedList() part of the condition prevents this action from showing on up related lists.
- !ListProperties.isRefList() part of the condition prevents this action from showing up on reference list popups.
You may also want to change the name from Import to something else because the administrators will see duplicate actions when they are logged in and this way they know which one is which. Then click Additional Actions > Insert. Once this is done non-administrators will now have access to Easy import for your specific table.
Even Easier Import:
Now truth be told, while Easy Import is an awesome feature, it can still be somewhat confusing especially to non-technical people. By default it also allows for inserting and updating of every field on the table. What if you wanted to simply provide a locked down excel import template with a fixed list of columns and allow them to import data into ServiceNow? Again out of the box importing spreadsheets is an admin function, but fortunately there is another way... Service Catalog Record Producers. Record Producers are a very powerful platform feature that have many uses. They are great because they are accessible from the Service Catalog that all users have access to, you can utilize User Criteria to restrict/enable access to them, put data into any table in ServiceNow, and they can call a script.
In order to make this write up easier, I am choosing to walk you through importing data into an out of the box table. But the concept of creating an import template that is loaded by a record producer can be applied to any table in ServiceNow as the process and code is very similar. Lets first start with a use case to set the context of what I will be walking you through...
During conversations about incident and change management, customers often ask "how can I associate an incident or change to 100s to 1000s of CIs". The Affected CI related list is the best out of the box solution allowing you to list all of those CI's. The Geneva release introduced a new UI to add affected CI's to a change record and this can certainly be extended to other tables like incident and problem, but sometimes importing a spreadsheet of CI's can be easier especially if this is a change that you perform on a recurring basis.
The steps below will walk you through the necessary pieces to make this work: Import Set table, transform map, and record producer. Once complete, users will be able to access this feature from the service catalog to download the import template and be prompted for the task to associate the list of CI. The final solution will look like this:
- First we need to create the import set staging table and transform map. I won't be going into every detail about import sets since it is well documented.
- Create the import template that you would like your users to utilize. Name your columns in words that the end users will understand.
- In my example use case, I created an Excel spreadsheet with one column for the Configuration Item, though again you can add any number of columns to the spreadsheet. Since I don't want the users to have to enter the change number 100s to 1000s of time on the spreadsheet, I will prompt for the Task in a record producer variable.
- Populate the spreadsheet with test data and save the spreadsheet somewhere on your computer.
- In my example use case, I created an Excel spreadsheet with one column for the Configuration Item, though again you can add any number of columns to the spreadsheet. Since I don't want the users to have to enter the change number 100s to 1000s of time on the spreadsheet, I will prompt for the Task in a record producer variable.
- Navigate to System Import Sets \ Load Data. Choose Create table, name your import set table and then choose your import template.
- Click Submit. ServiceNow will automatically create an Import Set staging table for you and import the data from the spreadsheet.
- Once complete, click Loaded data. Since we are prompting for the Task in the record producer, we need a place to store the task ID so we need to add a new field to the import set table.
- While viewing the import set table, Affected CI Imports in my use case, click on one of the "hamburger" icons beside one of the column headers, then Choose Configure, and finally Table.
- Write down the Name of your import set table since you will need it later in the setup.
- Click New in the Columns section to create a new field.
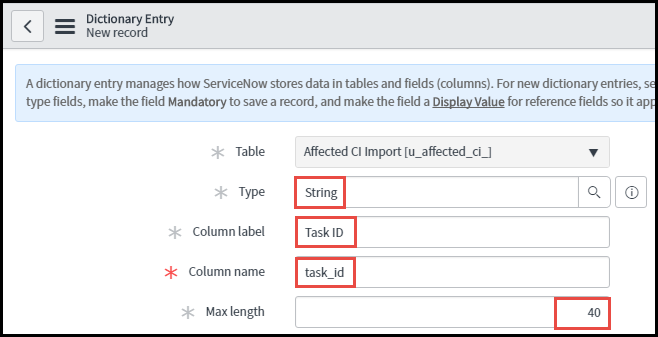
- Enter the following information:
- Type: String
- Column label: Task ID
- Column name: u_task_id
- Write down the name of your new column since you will need it later in the setup.
- Max length: 40
- Click Submit to create the new field.
- Click Update on the Affected CI Import table record so you are taken back to the Affected CI Imports list of imported records.
- Click Transform Maps under Related Links on the Affected CI Imports list so we can create a new transform map for this new table.
- Since we don't have a transform map yet the list will be empty, but Click New to create a new Transform Map.
- Name your Transform Map and set the Target Table. In my example use case the target table is CIs Affected (task_ci). All other fields can remain default.
- Click Mapping Assist under Related Links.
- If your spreadsheet column names match the field labels, you can click Auto Map Matching Fields instead which will automate the creation of field maps.
- Don't click the submit button because that will require extra steps to further create the field maps.
- Map your source fields to the target table fields. In my example use case there are two field maps: Configuration Item to Configuration Item and Task ID to Task.
- Click Save.
- Since the Configuration Item field is a reference you can make further adjustments like setting whether to create a record in the reference table if the CI in the spreadsheet isn't found in the CMDB. We don't want that to happen, so lets edit the field map. More details can be found here: Creating New Transform Maps - ServiceNow Wiki
- In the Field Maps related list at the bottom, click "u_configuration_item" to edit this record.
- Set Choice Action to reject since in our example use case we don't want to process this CI in the event the CI entered in the spreadsheet is not valid.
- In other use cases you may want to set it to Ignore if you have additional columns in your spreadsheet and you want to process the row but just ignore the invalid value in the one column.
- Other cases you may want to create a record in the target table so you can choose create.
- You may also find the Referenced value field name attribute useful. In my example use case I am expecting the CI's name to match a record in the CMDB but what if you prefer to enter the CI's serial number or asset tag instead. You can enter the column name (database column name, not label name) in this field and it will perform a lookup against that field instead of the default name.
- Click Update.
- In the Field Maps related list at the bottom, click "u_configuration_item" to edit this record.
- Click the "hamburger" Additional Actions button and choose Copy sys_id and paste this into a text file because we will need it later in the setup.
- If multiple transform maps need to be leveraged, repeat the steps above to capture the additional sys_id's of the transform maps.
- We are now done with the Import Set Components.
- Create the import template that you would like your users to utilize. Name your columns in words that the end users will understand.
- Second we need to create a Service Catalog Record Producer for users to access from the catalog that will provide a link to download the import template as well as prompt for the task to link the list of CI's. The approach will be that the record producer will create a Import Set Data Source record with the Excel Import file attached to it. The record producer script will automatically execute the processing and transforming of the excel file.
- Navigate to Service Catalog \ Catalog Definitions \ Record Producers and click New.
- Set the Name and Short description to something that will make sense to your users, in my example I am setting both to "Affected CI Import".
- Set the Table name to Data Source (sys_data_source).
- For easy access and administration we will attach the import template directly to this record producer. Either drag and drop your Excel import template into your browser or click the paperclip to browse for it.
- Right-click on your attachment and choose Copy link address in Chrome or Copy link location in Firefox, etc.
- Now that we have the URL for the import template, we can add a clickable link in the Description text.
- Set the Description to provide instructions for your users. In my example description, step 1 includes a step to download the template by "clicking here". We can make the click here a clickable link.
- After entering the description text, highlight the text you want to make the clickable link to download the template and then click the Insert/edit link button.
- Paste in the URL into the URL field and then click OK.
- Click the Accessibility tab and choose the Catalog(s) that you want this Record Producer to be in along with the category within that catalog.
- Click the "hamburger" Additional Actions button and choose Save so we can add the Task reference variable.
- Scroll to the bottom of the form to the Variables related list and click New.
- Set the following fields:
- Type (Top of form): Reference
- Mandatory (Top of form): true
- Question (Question Section): Task Number
- Name (Question Section): task_number
- Reference (Type Specifications Section): Task (task)
- You could specify a specific type of task like change_request
- You could also specify a Reference qualifier condition such as active is true
- Click Submit.
- Now we need to set the script to run when the record producer is submitted. Go back to the What it will contain tab and scroll to the script and paste in the following script. The script has embedded comments to explain what everything is doing.
- Navigate to Service Catalog \ Catalog Definitions \ Record Producers and click New.
// Set the following variables with the name of your import set table and task id column
var importSetTableName = "u_affected_ci_";
var importSetTaskIDFieldName = "u_task_id";
var transformMapIDs = "SYS-ID(s) OF YOUR TRANSFORM MAP(s) TO UTILIZE";   //Use a comma to specify multiple transform maps

// Setup data source for attachment
current.name = "Affected CI Import for:   " + producer.task_number.getDisplayValue();
current.import_set_table_name = importSetTableName;
current.file_retrieval_method = "Attachment";
current.type = "File";
current.format = "Excel";
current.header_row = 1;
current.sheet_number = 1;
current.insert();

// Process excel file
var loader = new GlideImportSetLoader();
var importSetRec = loader.getImportSetGr(current);
var ranload = loader.loadImportSetTable(importSetRec, current);
importSetRec.state = "loaded";
importSetRec.update();

// Update processed rows with task sys_id
var importSetRow = new GlideRecord(importSetTableName);
importSetRow.addQuery("sys_import_set", importSetRec.sys_id);
importSetRow.query();
while (importSetRow.next()) {
       importSetRow[importSetTaskIDFieldName] = producer.task_number;
       importSetRow.update();
}

// Transform import set
var transformWorker = new GlideImportSetTransformerWorker(importSetRec.sys_id, transformMapIDs);
transformWorker.setBackground(true);
transformWorker.start();

// Take user to task
gs.addErrorMessage("Data import may take time load, please reload record to see all the Affected CIs.");
var redirectURL = "task.do?sys_id=" + producer.task_number;
producer.redirect = redirectURL;

// Since we inserted data source already, abort additional insert by record producer
current.setAbortAction(true);
- Set lines 2-4 within the script using the information you copied down in the earlier steps. If you were following along and naming everything exactly as I provide in these instructions the importSetTableName and importSetTaskIDFieldName variables should be similar, but you will need to paste in the SysID of the transform map you created.
- Click Update.
- Additional ideas for you is to create a Catalog Client Script that will ensure there is an attachment on the record producer before proceeding. Check the community for solutions on how to do this.
- You have now completed creating the record producer.
Now its time to test! Cross your fingers that you followed along closely and that this will work on the first try.
- Navigate to the Service Catalog and to the category you chose to add your record producer and click it.
- Or feel free to open the record producer again and click Try it.
- Be sure to test that the template download link works.
- Choose a task you want to test with, attach a completed import template with a list of Configuration Items
- Click Submit.
- It will take a few seconds to start the processing of the data load but the record producer script will take you to the task you chose so you can view the list of Affected CI's that were imported. As noted in the message at the top of the screen, it may take several seconds to process the entire data load so reloading the record may be required to validate.
Hopefully you found this useful. Again I chose to use an out of the box table as an example, but these steps can be applied to any table in ServiceNow. The record producer script is generic enough to plugin in your own tables and additional steps. Enjoy!
- 249,738 Views
63 Comments
- « Previous
-
- 1
- 2
- 3
- …
- 7
- Next »
You must be a registered user to add a comment. If you've already registered, sign in. Otherwise, register and sign in.

