


Adam Stout

ServiceNow Employee
Options
- Subscribe to RSS Feed
- Mark as New
- Mark as Read
- Bookmark
- Subscribe
- Printer Friendly Page
- Report Inappropriate Content
10-12-2020
10:19 AM
In the Performance Analytics & Reporting Office Hours on July 23rd, we discussed different ways to query data from multiple tables, including Dot Walking, Related List Conditions, and Database Views. One of the use cases reviewed was pulling data from multiple m2m tables and joining data with non-reference joins using a Database View to report on what Reports are on what Dashboards.
In this post, we’ll review in more detail how to achieve this. I’ll assume you already know the basics of Database Views. If not, be sure to listen to the record from Office Hours before continuing.
Create a Database View
Navigate to Database Views and click “New”.
Note: Creating a database view requires admin access.
Once there, give the view a Name and fill out the Label, Plural (Label), and Description.
What these are isn’t necessary since they are just labels but remember what you used. Once this is complete, right-click on the header and click “Save”.
Add the Tables
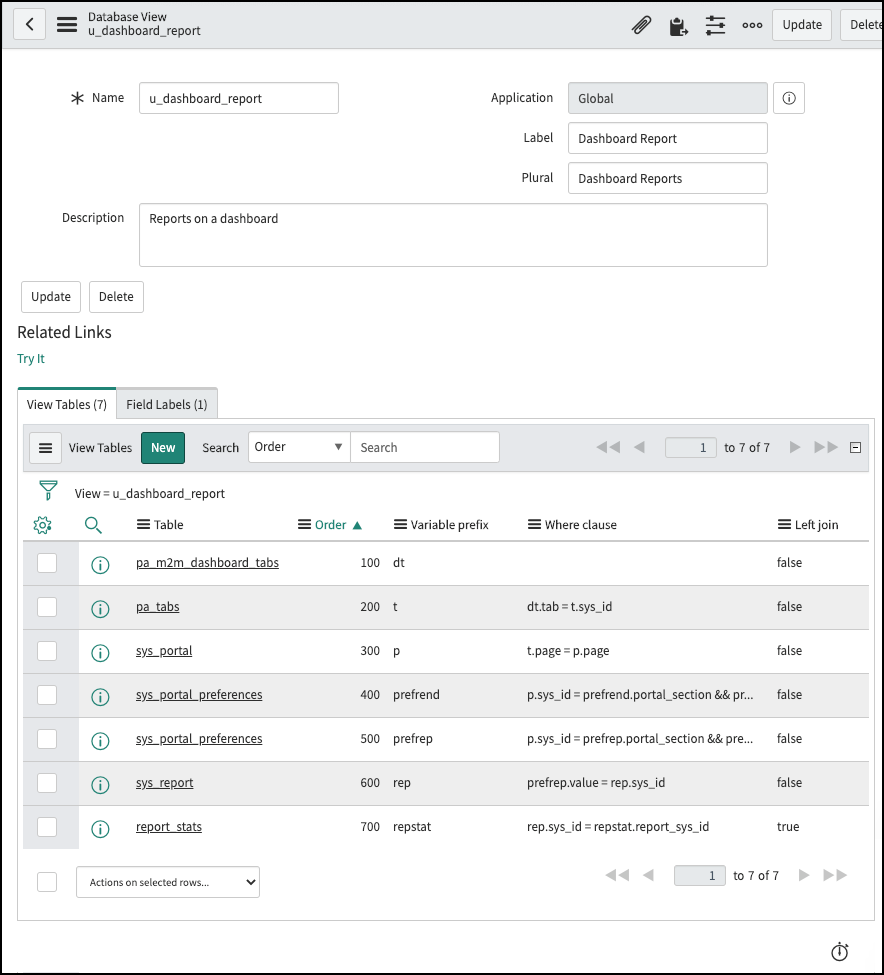
Now that we have a view, we need to specify what tables to use. This view requires more tables than I usually use, given the complexity of the data. Here are the tables we need to add along with the variable prefix and where condition.
|
Table |
Order |
Prefix |
Where |
Left Join |
|
pa_m2m_dashboard_tabs
|
100 |
dt |
|
false |
|
pa_tabs |
200 |
t |
dt.tab = t.sys_id |
false |
|
sys_portal |
300 |
p |
t.page = p.page |
false |
|
sys_portal_preferences |
400 |
prefrend |
p.sys_id = prefrend.portal_section && prefrend.name = 'renderer' && prefrend.value = 'com.glide.ui.portal.RenderReport' |
false |
|
sys_portal_preferences |
500 |
prefrep |
p.sys_id = prefrep.portal_section && prefrep.name = 'sys_id' |
false |
|
sys_report |
600 |
rep |
prefrep.value = rep.sys_id |
false |
|
report_stats |
700 |
repstat |
rep.sys_id = repstat.report_sys_id |
true |
Tip: You’ll notice that pa_dashboards is NOT included in this view. This is not needed because pa_m2m_dashboard_tabs includes a reference to Dashboards so you can dot-walk to the Dashboard record if you want information from that record (like Owner or Group).
What my final view looks like:
Restrict the Fields
While not required, I recommend going back into each table record and set the “View Fields” to only the fields I need in the view. If you don’t, you have all the fields from all seven tables, making reporting a bit messy. The exceptions for this view are sys_report and report_stats, which I do not specify fields for, so all of the table fields will be included.
Here is an example of what the first table looks like:
Relabeling View Fields
For this view, the field labels still make sense even when combined, but if you needed to change the labels, check out this post on how to do that quickly and easily.
Verify the Results
We should be all set, so now click on the UI Action “Try It” to view the results.
Which gives us:
What’s Next
Now that we have this Database View, we use it where needed. Perhaps we add it as a related list on the Dashboard properties page or on the Report form (although this isn’t viewed very often). Maybe some reports and a dashboard based on this will help you as well.
Leave me a note in the comments about how you are using this.
Labels:
- 34,851 Views
26 Comments
- « Previous
-
- 1
- 2
- 3
- Next »
You must be a registered user to add a comment. If you've already registered, sign in. Otherwise, register and sign in.
