- Subscribe to RSS Feed
- Mark as New
- Mark as Read
- Bookmark
- Subscribe
- Printer Friendly Page
- Report Inappropriate Content
Asset Audits: Scanning by Serial Number
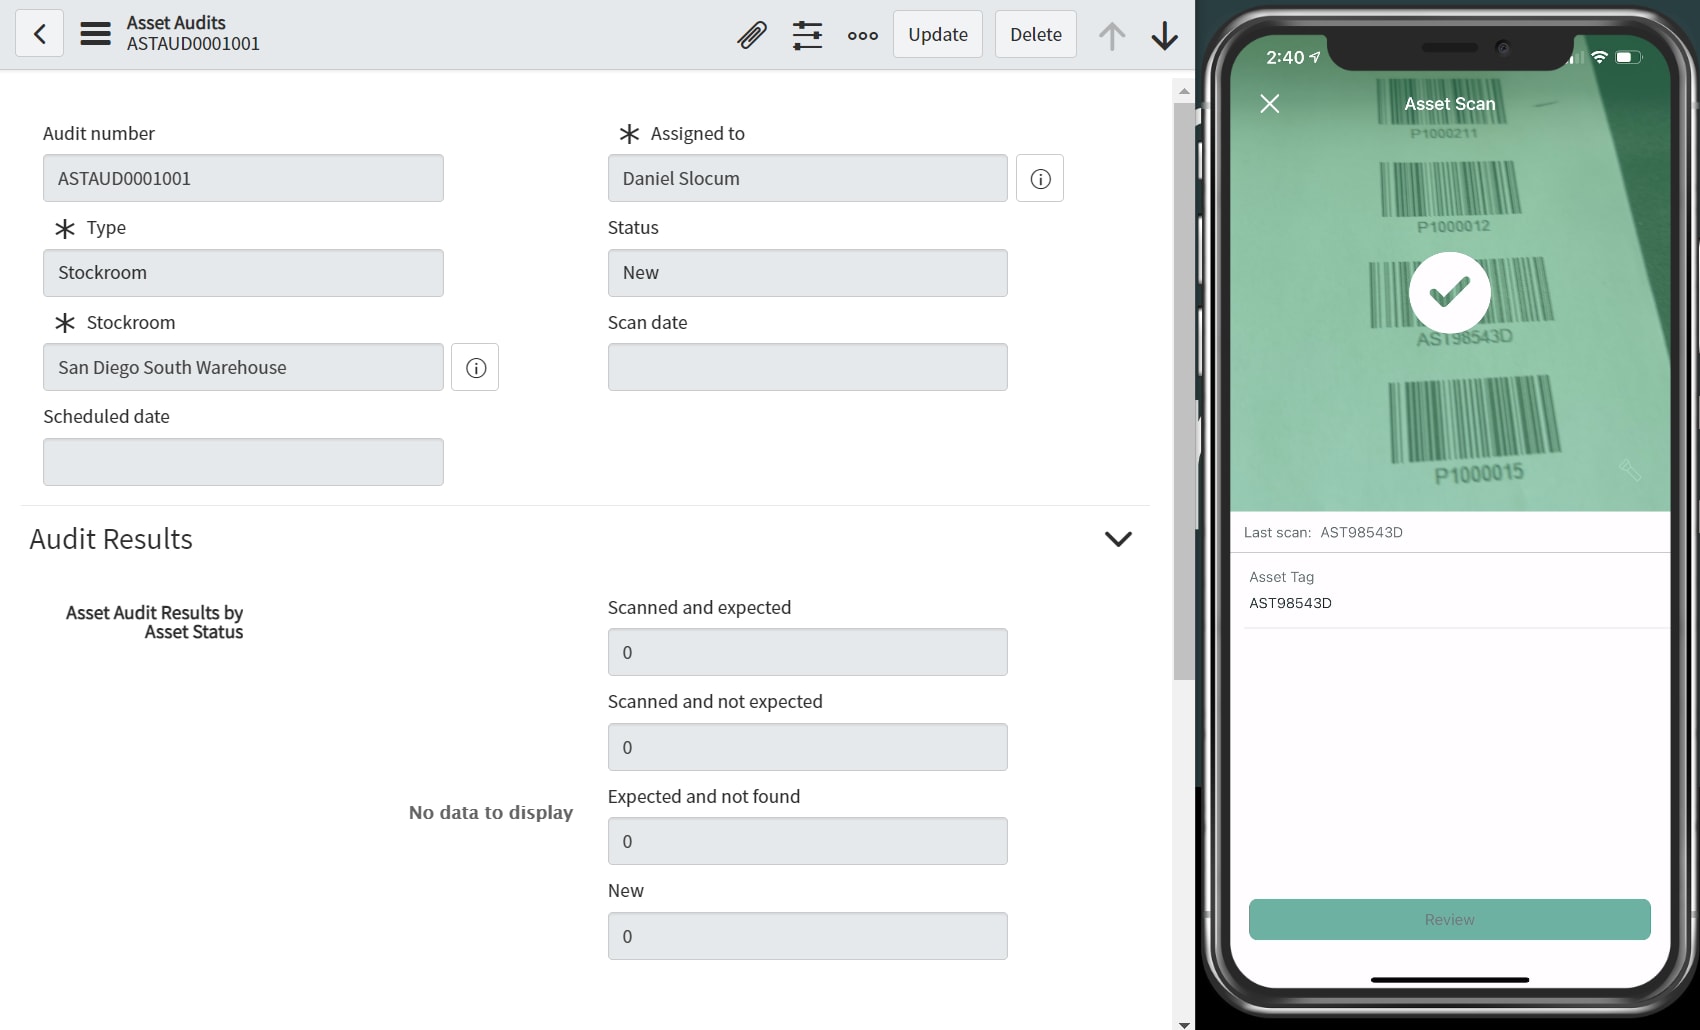
Here’s the dilemma, you are the Asset Manager for an organization that either now or at one time didn’t have complete Asset Tag coverage across all your trackable hardware assets. This leaves you needing to scan assets utilizing the manufacturer’s Serial Number bar code to perform an Asset Audit in ServiceNow’s Hardware Asset Management (HAM) product. You might even need the option to scan either an Asset Tag or a Serial Number but off the shelf, HAM’s mobile support only allows for scanning by Asset Tag as seen in the image below where I’m scanning from a sheet of barcodes. You would, of course, scan the Asset Tag on the hardware asset.
Asset Tag scan input

Asset Tag scan result

What is the solution?
The solution is to modify the System Mobile function that both presents the Asset Tag attribute within the Mobile Agent application and processes the scanned inputs within the ServiceNow instance. You can find it here: System Mobile -> Functions -> Asset Scan.

Three Steps to Success
Before we start making changes, it is important to note that this is a customization. As such, it may not be supported by ServiceNow Tech Support. Be sure to test your changes thoroughly before deploying them into a Production Instance.
There are three steps (other than testing) to configure the Asset Scan Function to accept either Serial Numbers or Asset Tags as inputs. Be sure to commit the changes to a Hardware Asset Management scoped Update Set so you can move the configuration up your ServiceNow instance stack. I’ve attached an Update Set created in Quebec Patch 4 Hotfix 2b and tested in Rome EA to this blog. Using it might work just fine for you, but I’d encourage you to read on to understand exactly what the Update Set changes in your system. You may also want to configure the system yourself, to be sure there aren’t any issues should your instance not be on Quebec Patch 4 Hotfix 2b or Rome EA.
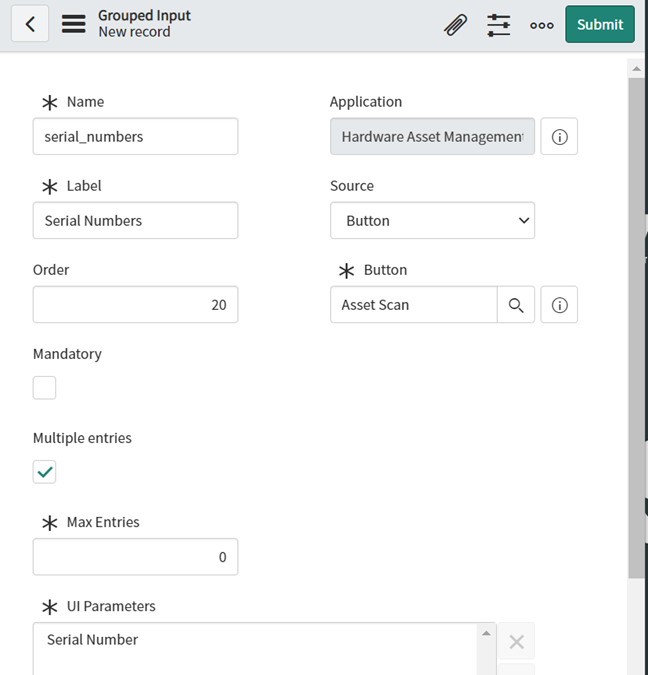
Step 1: Add Serial Numbers as a Grouped Input.
In this step, you’ll add a Grouped Input record to the Asset Scan Function I referenced above. Here are the values you’ll use to set it up correctly once you click on the Grouped Inputs “New” button. When you are done, Serial Numbers will appear along with Asset Tags in the Mobile UI.

Step 2: Change the “Mandatory” setting on the asset_tags Grouped Input
This is an important step so you can choose either Serial Numbers or Asset Tags as inputs. You can even get crazy and choose both. However, without removing “mandatory” from the asset_tags Grouped input, the Mobile UI will raise an error when you attempt to submit your scanned Serial Number bar codes without including any Asset Tags.
To make the change, you can either open the record and change the attribute or you can do it right from the list view in the Grouped Inputs tab as shown below. Be sure to click the green Save checkmark or the Enter key on your computer to save the change.

Here we see both inputs in the Mobile Agent.

Step 3: Modify the Audit Scan Action Item to account for Serial Number inputs.
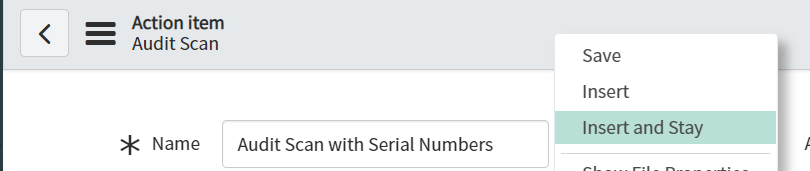
Near the top of the Asset Scan Function record we’ve been working in there is a reference field with Action Item as the label. You’ll find the reference field populated with “Audit Scan”, which is the Action item used to process the scanned inputs from the Mobile Agent. In this step you’ll need to either update the out of box Audit Scan action item or copy it and modify the copy. There are arguments for both approaches. In my example we’ll copy the original Audit Scan action item record and use that copy going forward.
Start by opening the Audit Scan Action item. Then modify the Name attribute to your liking. I’ve chosen “Audit Scan with Serial Numbers”. Once you’ve altered the Name attribute choose “Insert and Stay” from the right-click menu in the gray header bar. You can also find “Insert and Stay” via the “hamburger” button at the top left of the window.

Now that you’ve copied the original processing action item you can modify the Execution Script to account for Serial Number inputs. I’ve attached the new Execution Script to this Blog entry for easy use. You can simply open the attached file, then cut and paste its contents over the entirety of the Execution Script in the form. However, if you’d like to be more hands-on, you’ll need to make the code updates as I describe below. Use the file I’ve provided as a comparison to help you make the necessary changes.
Note: Code line numbers referenced below are from the Quebec Patch 4 Hotfix 2b release. If you attempt to make the identified changes on your own, be careful to find the correct lines on which to commit updates.
The new Execution Script leverages the out-of-box script. The out-of-box script is broken into three main sections: Lines 1- 57 declare the WriteBackAction function and then populate tables used to compute the final scan results shown in the UI. Lines 59 – 167 process Asset Tag inputs. Lastly, lines 169 – 210 compute the final scan result numbers returned to the UI.
Copy the out-of-box portion of script that processes Asset Tags (lines 59-167) then insert it as a new section for the processing of Serial Numbers. Insert it below the original (at line 168) and above the final number computing section giving the new script four major sections of code. The new Serial Number computing section is modified substituting Serial Number references in the place of Asset Tag references and appending “SN” to each of the declared variables and uses of those variables within the code.
The Asset Tag processing section and the Serial Number processing section are then placed into “if” statements which preclude processing if either no Asset Tags or no Serial Numbers are submitted from the Mobile Agent. Be sure to provide an open bracket and a close bracket around each section. Because asset_tags and serial_numbers (the names of the Grouped inputs we modified in Step 2) are arrays, we can test to see if the array object is undefined. Undefined means no data for that object was sent for processing by the Mobile Agent. Code examples are below:
if (input.asset_tags != undefined) { do the work defined in the asset tag processing section }
if (input.serial_numbers != undefined) { do the work defined in the serial number processing section}
Once you’ve completed all the changes and put the Asset Tags processing Section and the Serial Numbers processing sections into the “if” statements shown above, you are ready to save the code and test the results. There is no need to modify the last section of code that computes the final numbers sent to the UI.
Testing
Be complete in your testing approach. At a minimum, you’ll need to account for the scenarios I’ve outlined below.
- Scanning Serial Numbers of assets existing in the identified stockroom or location audit.
- Expected result is “Scanned and expected”.
- Scanning Serial Numbers of assets existing in ServiceNow but not in the stockroom or location audit.
- Expected result is “Scanned and not expected”.
- Scanning Serial Numbers of assets not found in ServiceNow.
- Expected result is “New”.
- Scanning Asset Tags of assets existing in the identified stockroom or location audit.
- Expected result is “Scanned and expected”.
- Scanning Asset Tags of assets existing in ServiceNow but not in the stockroom or location audit.
- Expected result is “Scanned and not expected”.
- Scanning Asset Tags of assets not found in ServiceNow.
- Expected result is “New”.
- Scanning a combination of Asset Tags and Serial Numbers in any state and submitting them at the same time.
- Expected result is correct processing of both Asset Tags and Serial Numbers.
Testing Results
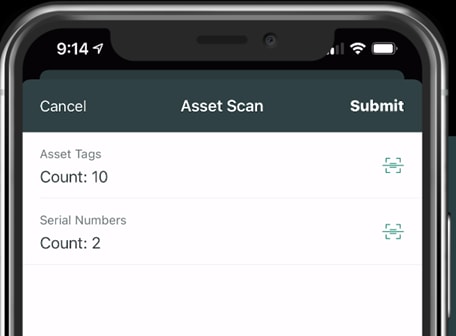
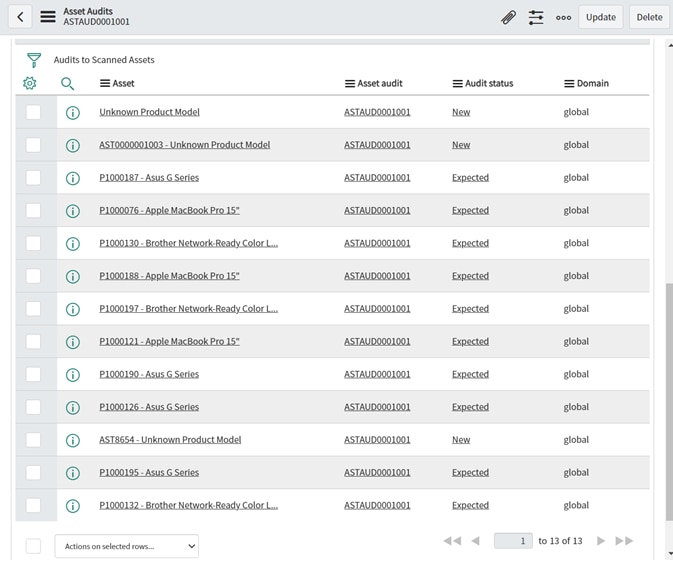
For brevity’s sake, I’m showing testing of just the last scenario below. In the Mobile Agent, you can see that I’ve scanned ten Asset Tags and Two Serial Numbers. Two of the Asset Tags (AST0000001003 and AST8654) are expected to not be found in ServiceNow and should create “New” assets. The two Serial Numbers scanned are expected to create one new asset and update an existing asset. Considering we scanned just one Asset Tag to open this blog, the number of Scanned assets should increase to 13 (we are scanning 12 now). We are expecting three new assets and all the others to be “Scanned and expected”.
 | This is the Mobile agent reflecting ten asset tags and two serial numbers ready to submit. |
Here is the Asset Audit after scan submission: Three new assets along with ten scanned and expected assets for a total of 13.

This is a listing of the Scanned Assets.
The first record reflects “Unknown Product Model” and no Asset Tag. This is the asset created by the new Serial Number scan. The list view is configured out-of-box to show the Asset Display value, which is the “Asset Tag Number – Model”. Since there is no Asset Tag, the system reflects just the default Unknown Product Model that is assigned to all new assets created by Serial Number scanning.
The two other “New” records are as expected. They were created by scanning Asset Tags that were not in the ServiceNow Instance.
Lastly, P1000187 was updated by the second serial number scan. That asset had both an Asset Tag and a Serial Number. In my test, I scanned a barcode for the serial number of that asset. The record properly updated as Expected.

Final Considerations
This change may be exactly what you need to meet your use case of scanning Serial Numbers during an Asset Audit but keep in mind, this code may not be supported by ServiceNow Tech Support because it will likely be considered custom as it wasn’t shipped with the product as developed by the ServiceNow ITAM Business Unit. Be sure to fully test the modification to be sure it doesn’t negatively impact system performance or conflict with other configurations in your customer instance. I wish you the best as you walk your ITAM journey.
To see more of ITAM in action, visit our demo library at https://www.servicenow.com/lpdem/demonow-it-asset-management.html
- 22,509 Views
- « Previous
-
- 1
- 2
- Next »
You must be a registered user to add a comment. If you've already registered, sign in. Otherwise, register and sign in.