


Adam Stout

ServiceNow Employee
Options
- Subscribe to RSS Feed
- Mark as New
- Mark as Read
- Bookmark
- Subscribe
- Printer Friendly Page
- Report Inappropriate Content
07-10-2020
11:45 AM
Interactive Filters allow me to build robust and reusable Dashboards for my users. While the standard filters cover many use cases, they don’t cover all of them. To meet these non-standard use cases, I need to build Custom Interactive Filters.
Custom Interactive Filters are very useful but can contain a lot of code. To ensure that these are not affected by instance upgrades and other changes, it is important to test them before and after any significant change.
Testing manually can be tedious and is too often skipped which results in poor outcomes for users. To ensure that thorough testing is always completed, I leverage the Automated Test Framework built into the Now Platform.
In this post, I’m going to walk through the basic steps needed to test a Custom Interactive Filter in the Automated Test Framework. We also discussed this during Office Hours on July 1. You can view that recording and get the presentation here.
The code to get you started with using ATF with Responsive Dashboards can be found in this Share project. You can build these yourself as well or you can install it by loading in the update sets in that project. Be sure to subscribe to get any updates moving forward.
The Custom Interactive Filter
For this example, I am using a very simple Custom Interactive Filter based on the example in the documentation. A simple Dynamic Content Block with in-line JavaScript.
[Generally, I recommend a more robust solution as outlined in this K19 lab, but this post is about the testing not the Custom Filter]
Here is the Jelly I used in the Content Block:
<?xml version="1.0" encoding="utf-8" ?>
<j:jelly trim="false" xmlns:j="jelly:core" xmlns:g="glide" xmlns:j2="null" xmlns:g2="null">
<script>
var my_dashboardMessageHandler = new DashboardMessageHandler("my_unique_id");
function publishFilter () {
var filter_message = {};
filter_message.id = "my_unique_id";
filter_message.table = "task";
var value = gel('cfShortDescription').value;
filter_message.filter = "short_descriptionLIKE" + value;
SNC.canvas.interactiveFilters.setDefaultValue({
id: filter_message.id,
filters: [filter_message]
}, false);
my_dashboardMessageHandler.publishFilter(filter_message.table, filter_message.filter);
}
function clearFilter() {
var filter_message = {};
filter_message.id = "my_unique_id";
filter_message.table = "task";
filter_message.filter = "";
gel('cfShortDescription').value = '';
SNC.canvas.interactiveFilters.setDefaultValue({
id: filter_message.id,
filters: [filter_message]
}, false);
my_dashboardMessageHandler.removeFilter();
}
</script>
Short Description:
<input id="cfShortDescription" type="input" value="" /><br/>
<input id="removeCustomFilter" type="button" value="Clear" onclick="clearFilter();" />
<input id="addCustomFilter" type="button" value="Search" onclick="publishFilter();" />
</j:jelly>Once this is created, we start with the testing...
One-Time Configuring the Automated Test Framework
To reduce the amount of time needed to configure a test, I have configured the Automated Test Framework to perform several common tasks. Once this is setup, we’ll go over what a specific test looks like.
Step Configuration
To avoid the need for scripting in the tests themselves, I created Test Step Configs to parameterize these actions:
- Create Responsive Dashboard
- Add Report to Dashboard
- Add Performance Analytics Widget to Dashboard
- Add Content Block to Dashboard
- Add Debug Widget to Dashboard
- Add Custom Widget to Dashboard
To save you time, there is a project in Share to setup these configured test steps to save you some time.
This will allow me to simply select the dashboard and widget to have it added without having to know what is happening in the background.
Setup the Test
Be sure to either build your own Step configurations or load the update set available in Share before proceeding.
Now that the framework is in place, I’ll create an ATF Test.
With the name and description saved, I can click on “Add Test Step” which lets me choose which type of step to run.
Since we defined these steps, I now am just asked for the key information. In this case, I only need a name for the Dashboard and who it should be shared with.
After the first step, variables can be passed from one step to the next. For example, the Dashboard created in the first step, will be re-used in many of the subsequent steps.
Test Steps
To test my Custom Filter, I go through the following steps:
- Create a dashboard *
- Add the Custom Filter *
- Add the Debug Filter *
- Open the Dashboard form
- View the Dashboard
- Add the search text
- Submit the filter
- Validate the filter is applied
* These steps were made available from the Share project, the rest are available Out of the Box with ATF
Run the Test
Now that we have the tests built, I can run them in a sub production environment (there are system properties to prevent these from running in production).
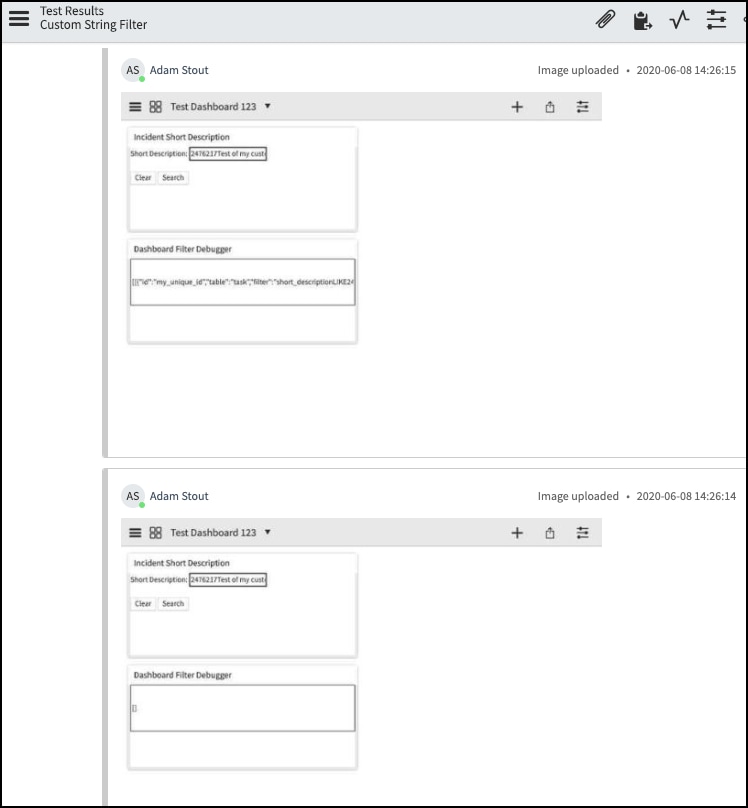
We can then review the test results which shows me the filter is working:
A great feature of the Automated Test Framework (especially in the unlikely case that the filter isn’t working) is the screen capture. I customized this form to show me the screenshots that are attached to the results record.
Reference Links
Here is a collection of the links I referenced above.
Share
- Responsive Dashboard Test Step Configs - https://developer.servicenow.com/connect.do#!/share/contents/4650296_responsive_dashboard_test_step_...
Docs
- Interactive Filters - https://docs.servicenow.com/bundle/orlando-performance-analytics-and-reporting/page/use/dashboards/c...
- Custom Interactive Filters - https://docs.servicenow.com/bundle/orlando-performance-analytics-and-reporting/page/use/dashboards/c...
- Debug Filter - https://docs.servicenow.com/bundle/orlando-performance-analytics-and-reporting/page/use/dashboards/c...
- Automated Test Framework - https://docs.servicenow.com/bundle/newyork-application-development/page/administer/auto-test-framewo...
- Script Includes - https://docs.servicenow.com/bundle/orlando-application-development/page/script/server-scripting/conc...
Community
- K19 Lab - Building custom visualizations and interactive filters - https://community.servicenow.com/community?id=community_article&sys_id=40562f5cdb9d3b0422e0fb2439961...
- Automated Testing of Dashboards - Office Hours - July 1 Recap - https://community.servicenow.com/community?id=community_blog&sys_id=9130c1bcdb7518d0414eeeb5ca961955
Conclusion
Don’t be afraid of building and using Custom Interactive Filters but be smart about it. If an OOTB filter works for your case, use that. If not, build one, but be sure to build the automated tests to go with it.
Now that you have gotten a taste of the Automated Test Framework, what else do you see testing with it? What other steps do you need to make that simpler?
Let me know how this works for you in the comments below.
Labels:
1 Comment
You must be a registered user to add a comment. If you've already registered, sign in. Otherwise, register and sign in.
