


sabell2012

Mega Sage
Options
- Subscribe to RSS Feed
- Mark as New
- Mark as Read
- Bookmark
- Subscribe
- Printer Friendly Page
- Report Inappropriate Content
02-25-2016
09:56 AM
A couple of requirements were presented to me by one of our clients that caused me to think "outside-the-box". The client wanted a set of Service Catalog Items that had to have configurable choice lists. These choice lists would need to be restrictable (via ACLs, Roles, Query Business Rules, etc), and user maintainable (i.e. ITIL Admin let's say).
Normally you would use the Question Choice table for such things, but you hardly want to make that available to your user base; no matter how restricted. This would open up a can of worms: What records would you allow to be shown? How would you restrict certain records? How would you filter the records? What effect would these changes have on the normal out-of-the-box operation of Service Catalog Items?? Ugh! No thank you!
So, the obvious solution was to create a custom choice table. Now, that has it's own problems. Namely: How do you tie that into your Service Catalog Variables? How would you tie pricing to the variable choices? How could you restrict the variable choices to show only for that Catalog Item AND Variable combination? How would you order the choices?
All of these would have to be addressed before the solution would be usable.
With this lab example I will demonstrate one method of implementing a Custom Choice Table for Service Catalog Items.
So let us set up the scenario for our fictitious company Rickety Rocket Enterprises!
The Requirements
NOTE: Don't forget that you want the requirements traceability throughout your project!
- Rickety Rocket Enterprises has decided to make their merchandise available via ServiceNow
- Rockets will be available under Service Catalog -> Hardware (makes sense right?)
- The customer will be able to select a rocket class, and a rocket type. The rocket class will all be the standard $1-billion with a recurring $1-million a year maintenance cost. The type will be an add-on cost.
- Rocket Classes available:
- Can select more than one
- Will change the quantity listed
- Rockets to be listed (however, for now only Moon and Mars rockets are available):
- Two Stage Negative Orbit
- Two Stage Almost-Orbit
- Three Stage Multi-Orbit
- Single Stage Super Duper
- Three Stage One-Way Mars Trip
- Five Stage One-Way Moon Shot
- Five Stage Two-Way Moon Day-Tripper
5. Rocket Types available
1. Can select only one
2. Types to be listed:
- One Engine, One Seater, no extra cost
- Two Engine, One Seater, $500 for the extra engine
- Four Engine, Two Seater, Two Ejection Seats, $20,000 extra
- Four Engine, Two Seater, One Ejection Seat, $5,000 extra
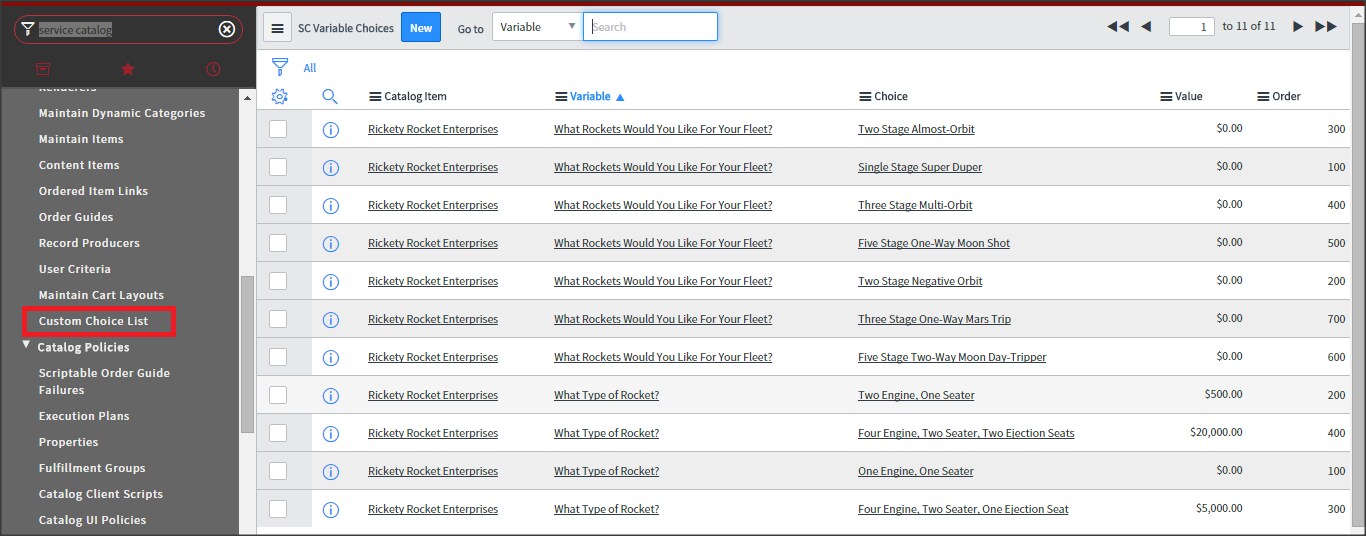
6. Technical Requirement: Generic Table that contains Service Catalog Variable choices. This will have to mimic the Question Choices (question_choices) table to a degree; such as price per choice.
- The choices will need to be tied to the variable.
- The choices table will have to be user accessible, and restrictable from the Service Catalog administrator's menu.
- The choices will need to be orderable (sequence).
- Will be available to ITIL Admins on the Service Catalog; in the Definitions section
- Since this will be a custom table it can be controlled via ACL at a later time.
The Design
- Create a new table (Req #6)
- Name: SC Variable Choices
- Columns:
- Catalog Item - Reference, Service Catalog Items table
- Variable - Reference, Service Catalog Variables table
- Choice - String, length: 100
- Value - Price
- Order - Integer
- Data: Values as listed in the requirements.
- Create a new module (Req #6.2)
- Name: Custom Choice List
- Location: Service Catalog -> Catalog Definitions -> Custom Choice List. Last module in the Catalog Definitions section
- Roles: ITIL Admin
- Service Catalog Item (Req #1, 2)
- Name: Rickety Rocket Enterprises
- Category: Hardware
- Price: $1,000,000,000
- Recurring: Annually - $1,000,000
- Variables (Req #3, 4, 5)
- What Rockets Would You Like For Your Fleet? List Collector. Tied to values in the custom table. See values provided in the requirements.
- What Type of Rocket? Lookup Select Box. Tied to values in the custom table. See values provided in the requirements.
- Scripts
- Catalog Client Script: onLoad. Reference: custom table. Filters the list so only Moon and Mars rockets appear on the List Collector. (Req #4.3)
- Catalog Client Script: onChange. Of the What Type of Rocket? Select Box. Will update the Quantity field in the Shopping Cart. (Req #4.2)
- Script Include: For Reference Qualifier of the What Type of Rocket? Select Box. Will pull the proper type values from the custom table. (Req #5)
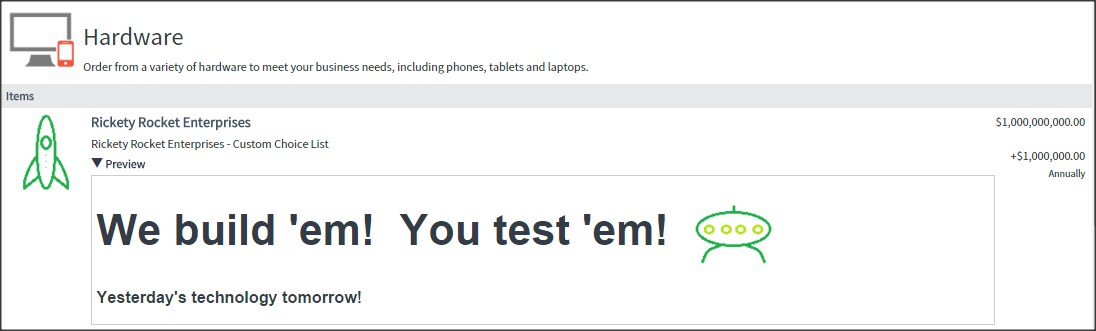
Catalog Item Mockup displayed from the Hardware Catalog:
Catalog Item Mockup (form):
The Development
1. Create the Custom Table (Req #6)
a. Navigate to System Definition -> Tables. The Tables List View will be displayed.
b. Click on the New button. The New Table form will be displayed.
c. Fill out the form with the following (Design #1.2):
i. Label: SC Variable Choices
ii. Name: u_sc_variable_choices
iii. Create Module: Uncheck
iv. Right click on the form header to bring up the context menu and click on Save to save your new table. The Columns list will appear on the form.
v. Click on the New button. This will display the New column form.
vi. Fill out the form with the following:
1. Column Label: Catalog Item
2. Column Name: u_catalog_item
3. Type: Reference
4. Reference: Catalog Item
5. Click on the Submit button to save your new column.
vii. Click on the New button. This will display the New column form.
viii. Fill out the form with the following:
1. Column Label: Choice
2. Column Name: u_choice
3. Type: String
4. Length: 100
5. Click on the Submit button to save your new column.
xi. Click on the New button. This will display the New column form.
x. Fill out the form with the following:
1. Column Label: Order
2. Column Name: u_order
3. Type: Integer
4. Click on the Submit button to save your new column.
xi. Click on the New button. This will display the New column form.
xii. Fill out the form with the following:
1. Column Label: Value
2. Column Name: u_value
3. Type: Price
4. Default: 0
5. Click on the Submit button to save your new column.
xiii. Click on the New button. This will display the New column form.
xiv. Fill out the form with the following:
1. Column Label: Variable
2. Column Name: u_variable
3. Type: Reference
4. Reference: Variable
5. Click on the Submit button to save your new column.
The column details for the table:
2. Create the Catalog Item (Req #2)
a. Navigate to Service Catalog -> Catalog Definitions -> Maintain Items. The Service Catalog Items list view will be displayed.
b. Click on the New button. The New Catalog Item form will be displayed.
c. Fill out the form with the following:
i. Name: Rickety Rocket Enterprises
ii. Active: checked
iii. Availability: Desktop Only
iv. Catalogs: Service Catalog
v. Category: Hardware
vi. Icon: Spaceship 1.png (I provided as an attachment to this article)
vii. Short Description: Rickety Rocket Enterprises - Custom Choice List
viii. Price: 1,000,000,000.00
ix. Recurring Price: 1,000,000.00
x. Recurring Price Frequency: Annually
xi. Use Cart Layout: Checked.
xii. Description:
We build 'em! You test 'em!
Yesterday's technology tomorrow!
(with Spaceship 6.png I provided as an attachment to this article)
xiii. Right-click on the form header to display the context menu, and click on Save to save your new Catalog Item.
I spiffed things up a big for the customer!
3. Create the Catalog Item Variables (Req #3,4,5)
a. Scroll to the bottom of the Rickety Rockets Catalog Item Form. The related lists tabs will be visible.
b. Click on the Variables tab, and then click on the New button. The New Variable form will be displayed.
c. Fill out the form with the following:
i. Type: List Collector
ii. Order: 100
iii. Question: What Rockets Would You Like For Your Fleet?
iv. Name: v_fleet_rockets
v. Tooltip: Choose all of them if you like!
vi. List Table: SC Variable Choices [u_sc_variable_choices]
vii. Click the Submit button to save the variable.
NOTE: The "v_" naming convention is a good practice. This is outlined in an excellent article written by valor: #SMFlashbook — My Best Tip For Building The Service Catalog
d. Click on the New button again. The New Variable Form will be displayed.
e. Fill out the form with the following:
i. Type: Lookup Select Box
ii. Order: 200
iii. Question: What Type of Rocket?
iv. Name: v_rocket_type
v. Tooltip: Rickety Rockets are da best!
vi. Lookup from table: SC Variable Choices [u_sc_variable_choices]
vii. Lookup value field: Choice
viii. Lookup price field: Value
ix. Include None: checked
x. Reference qual: javascript:getSCChoiceValues(current.cat_item, 'v_rocket_type')
NOTE: Current getSCChoiceValues Script Include Reference qual function does not exist; it will be created in a following step.
xi. Click on the Submit button to save the variable.
You should now have two Catalog Item Variables:
f. Click on the Catalog Client Script related list tab.
g. Click on the New button. The new Client Script form will be displayed.
h. Fill out the form with the following:
i. Name: List Collector - Set Filter
ii. Applies to: A Catalog Item
iii. Active: Checked
iv. UI Type: Desktop
v. Type: onLoad
vi. Catalog Item: Rickety Rocket Enterprises
vii. Applies on a Catalog Item View: Checked
viii. Script:
function onLoad() {
var collectorName = 'v_fleet_rockets';
var filter = 'u_variable.nameLIKE' + collectorName + '^u_choiceLIKEMars^ORu_choiceLIKEMoon';
g_form.setDisplay(collectorName, false);
setListCollector();
function setListCollector() {
// if the collector is not ready then wait and try again
if (typeof(window[collectorName + 'g_filter']) == 'undefined') {
setTimeout(setListCollector, 100); // wait one-tenth second to execute
return;
}
// turn off the query constructor, and the preview display of the list collector
$(collectorName + '_select_0_filter_row').hide();
$(collectorName + '_select_0_filters_row').hide();
$(collectorName + 'recordpreview').hide();
// now set up the filter
window[collectorName + 'g_filter'].reset();
window[collectorName + 'g_filter'].setQuery(filter);
window[collectorName + 'acRequest'](null);
g_form.setDisplay(collectorName, true);
}
}
ix. Click on the Submit button to save the script.
i. From the Catalog Client Script related list tab.
j. Click on the New button. The new Client Script form will be displayed.
k. Fill out the form with the following:
i. Name: Set Quantity
ii. Applies to: A Catalog Item
iii. Active: checked
iv. UI Type: Desktop
v. Type: onChange
vi. Catalog Item: Rickety Rocket Enterprises
vii. Catalog Item: v_fleet_rockets
viii. Applies on a Catalog Item view: checked
ix. Script:
function onChange(control, oldValue, newValue, isLoading) {
if (isLoading || newValue == '') {
return;
}
// how many have been selected
var fleet_rocketsSplit = newValue.split(',');
// update the cart quantity accordingly
$('quantity').value = fleet_rocketsSplit.length;
}
x. Click on the Submit button to save your work.
l. Click on the Update button to make sure you save your Catalog Item.
5. Create the Script Include Reference Qualifier for the Select Box
a. Navigate to System Definition -> Script Includes. The Script Includes list view will be displayed.
b. Click on the New button. The New Script Include form will be displayed.
c. Fill out the form with the following:
i. Name: getSCChoiceValues
ii. Client Callable: checked
iii. Description: Custom choice table query generator
iv. Accessible from: All application scopes
v. Active: Checked
vi. Script:
function getSCChoiceValues(cat_item, variable) {
var choiceList = new GlideRecord('u_sc_variable_choices');
choiceList.addQuery('u_catalog_item', cat_item);
choiceList.addQuery('u_variable.name', variable);
choiceList.query();
var queryString = 'u_variable=';
if (choiceList.next()) {
queryString += choiceList.u_variable + '';
}
queryString += '^ORDERBYu_order';
return queryString;
}
vii. Click the Submit button to save your script.
6. Create the New Module (Req #6.2)
a. Navigate to System Definition -> Application Menus. The Application Menus list view will be displayed.
b. Filter on Title: Service Cat. The Service Catalog application will be displayed.
c. Click on the Service Catalog application. The application form will be displayed.
d. Scroll down to the Modules related list and click on the New button. The New module form will be displayed.
e. Fill out the form with the following:
i. Title: Custom Choice List
ii. Application Menu: Service Catalog
iii. Order: 217 (this will place it right after Maintain Cart Layouts as the last module in Catalog Definitions)
iv. Roles: Admin
v. Active: checked
vi. Link Type: List of Records
vii. Table: SC Variable Choices [u_sc_variable_choices]
viii. Click on the Submit button to save your module.
7. Load the Data Into the Table
a. Download the u_sc_variable_choices.xls file from this article.
b. Navigate to Service Catalog -> Catalog Definitions -> Custom Choice List. The Custom Choice List list view will be displayed. There should be no records present.
c. Right click on the list view column header to bring up the context menu, and choose Import. The import form will be displayed.
d. Fill in the form with the following:
i. Do you want to insert or update data? Choose Insert
ii. Do you want to create an Excel template to enter data? Unchecked
iii. Click on the Choose File button, and choose the downloaded .xls file.
iv. Click on the Upload button. This will upload the data into your table.
e. You should now have a populated custom table.
The Unit Test
1. Navigate to Self-Service -> Service Catalog. The Service Catalog home page will be displayed.
2. Click on the Hardware Category. The Hardware Category home page will be displayed.
3. Note that the Rickety Rocket Enterprises Catalog Item is present. (Req #1,2)
4. Click on the Rickety Rocket Enterprises Catalog Item. The Catalog Item form will be displayed (this may take a couple of minutes to display - List Collectors are notoriously slow).
5. Note that the "What Rockets Would..." List Collector has three items displayed. They should contain either the word "Moon" or the word "Mars". This shows that the filter Client Script is working. The control should only show the Available/Selected components, and a search component. Everything else should be hidden. (Req #3,4,6)
a. Choose a couple of rockets and move them to the selected side of the control. Note the quantity change from one to two. This is our other client script at work.
6. Click on the "What Type of Rocket?" Lookup Select Box (dropdown). You should see a list of four rocket types displayed. This is the Reference Qualifier Script Include doing its job. (Req #3,5,6)
a. Choose the "Four Engine, Two Seater, Two Ejection Seats" type. After all you wouldn't want to leave anyone behind...just in case. 🙂
7. Click on the "Add to Shopping Cart" button. Note that two rockets are in the Shopping Cart for a total of $2-Billion, and that there is an additional $40,000 for the four ejector seats!
8. That completes the unit testing.
You can now add ACLs, Query Business Rules, etc. to restrict the access to the custom table, and/or the records.
This lab shows the approach, and code that can be used to implement a Custom Choice table. I did nothing really fancy to implement this solution, and you will see several usability problems that still need to be resolved. I rely on you, the reader, to take it to the next level!
Steven Bell
If you find this article helps you, don't forget to log in and "like" it and Share it!
- 15,935 Views
6 Comments
You must be a registered user to add a comment. If you've already registered, sign in. Otherwise, register and sign in.
