Decision activities

  • Release version: Zurich
  • Updated July 31, 2025
  • 2 minutes to read
  • Create and define branches with different conditions for different paths between activities.

    Before you begin

    Role required: playbook.admin

    About this task

    Add a decision activity to create a decision tree between activities so that agents in Playbook Experience can troubleshoot if-then situations during runtime. Branches are the different paths with different conditions that agents can follow. For example, in a credit card approval playbook:
    Playbook decisions credit card approval example in Diagram view in Workflow Studio

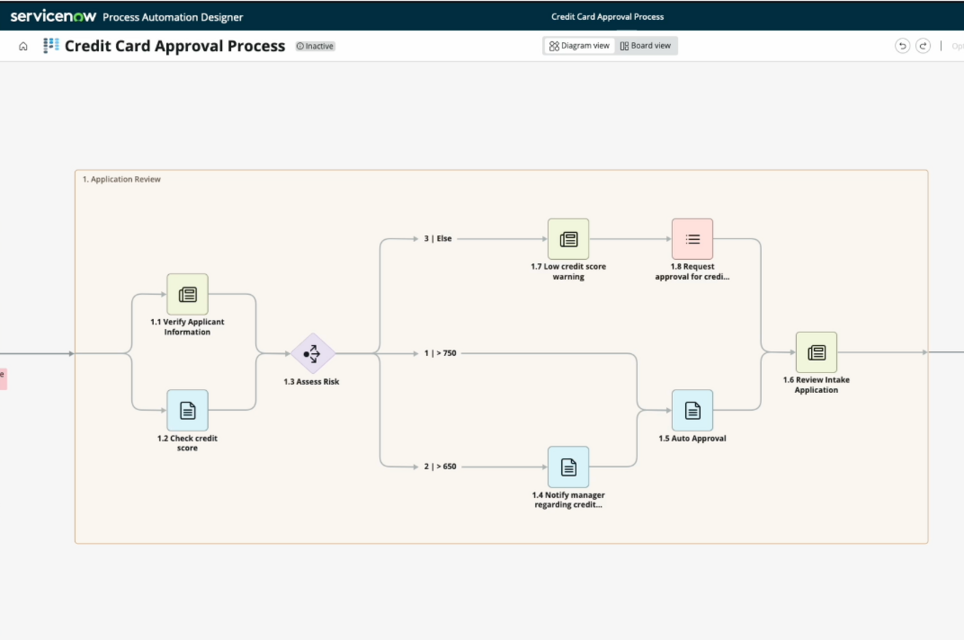
    In this example, an agent can take different actions for different credit scores during a decision activity to assess the risk of a credit card applicant.

    Decisions are also supported for stages. To learn more, see Decision stages.

    Procedure

    1. In Diagram view, hover on the object that you want to insert a decision activity next to, and select the + icon to add an activity.
      Note:
      Decision activities can only be added in Diagram view, but can be modified and viewed in Board view.
      The mini-picker displays.
    2. Select the diamond icon Diamond decision icon in Diagram view mini-picker. to add a decision.
      A decision is added with two branches and the side panel opens for configuration.
    3. Under the Details tab, fill in the following fields.
      Table 1. Decision details
      Label Enter a unique name for your activity. This name appears in your playbook during runtime.
      Description Optionally, enter some descriptive details about your activity.
      Start Rule Choose when you want your activity to start running. Options include:
      • When stage starts: Your activity starts running as soon as its stage starts running. Your stage starts running when your playbook is triggered.
      • After specific activities: Your activity starts running after specified activities have finished running.
      Display order Define the order in which this activity will appear during a playbook run.
      Run condition After the activity starts, the activity runs only if specific conditions are met.
      Start with delay Specify a duration of time to wait before running an activity whose start rule and conditions have been met. Give users a specific amount of time to complete actions. For more information, see Start with delay input properties.
      Restart rules Choose what this activity does when a playbook is restarted:
      • Skip on restart: Skip this activity when the playbook run is due to a restart.
      • Run always: Always run this activity, including first runs.
      • Skip on first run: Skip this activity during the first run.
      For more information, see Restart a playbook.
    4. Under the Branches tab, select your new branch to begin configuring it.
      1. Give your branch a unique label.
      2. Select the Add Condition button.
        The condition builder displays.
        Note:
        Branches can only be added in the side panel.
        Playbook decision activity side panel
      3. Select or enter a field, operator, and value.
    5. Add more branches as needed.
      Branches can only be added via the side panel.
    6. If you add two or more branches, select whether to process all branches with conditions that are met, or just to process the first listed branch with conditions met.
    7. If you selected to Process only the first one that is true, drag and drop the branch that you want to be evaluated to the top.
      Drag and drop branches in the side panel

    Result

    You've added and configured decision branches between activities.