After a scan completes and populates findings, use the AI-Eligible Findings dashboard to generate and apply AI-suggested fixes in bulk or individually to accelerate remediation of technical debt.
About this task
When a scan completes, findings are displayed in the AI-Eligible Findings dashboard. This dashboard shows all violations detected across your instance, grouped by application. You can generate AI-suggested fixes in bulk to accelerate remediation and reduce manual development effort. The same Otto AI engine used in real-time prevention analyzes each violation and generates a fix tailored to your exact code.
Before you begin:
- A scan has completed successfully and findings are available in the findings table
- You have navigated to the AI-Eligible Findings dashboard after the scan completed
Procedure
-
Run a scan and wait for it to complete.
When the scan completes, the findings are populated in the database and you can access the dashboard.
-
Navigate to .
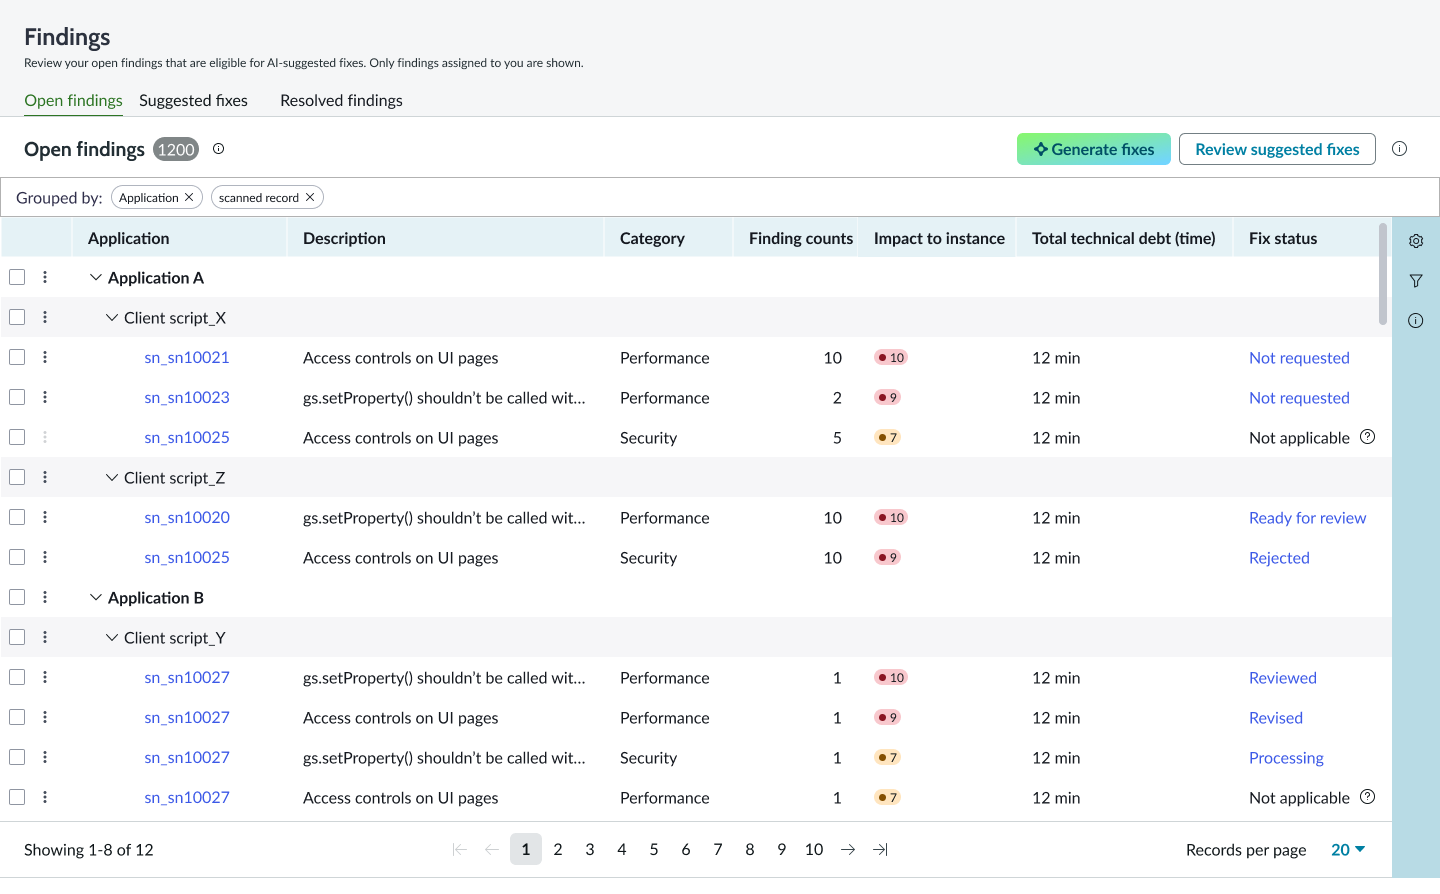
The dashboard opens with three tabs: Open findings, Suggested fixes, and Resolved findings. Findings are grouped by the application where the
violation occurred. Each row shows the application, description, category, finding count, impact to instance, estimated time to resolve, and fix status.
-
Review the findings displayed in the table.
The table shows the following columns:
- Application: The application where the finding was detected. Select the application name to expand and see child violations.
- Description: A brief description of the violation. This corresponds to the scan definition that was triggered.
- Category: The category assigned to this scan definition, for example, Performance, Security, or Style.
- Finding counts: The number of violations with this finding. If a violation occurs in 5 different places in your code, the count is 5.
- Impact to Instance: A number from 1 to 10 within the finding's enforcement level, where 10 is the highest priority.
- Total Technical Debt (time): The estimated time it would take to manually fix all violations of this type. AI-suggested fixes can reduce this time significantly.
- Fix Status: The current state of the fix: Ready for review, Reviewed, Revised, Processing, or Not applicable.
-
Sort by impact to instance or total technical debt to prioritize which findings to fix first.
Note: ACT level findings must be fixed before you can save records. RECOMMEND level findings require either a fix or an exception. SUGGEST and REVIEW findings are lower priority but still important for code quality.
-
Select the findings you want to generate AI fixes for by using the checkboxes on the left side of each row.
You can select individual findings or multiple findings at once. If you are remediating all findings of a particular type together, select all related rows.
-
Select Generate fixes.
Otto analyzes each selected violation and generates a fix. The status changes from "Pending" to "Ready" when the fixes are complete. This process may take a few minutes depending on the number of violations.
-
Select the row for a finding to open the code comparison view and review the generated fixes.
The code comparison displays your original code on the left and the AI-suggested code on the right. Color coding shows changes: green for added code and pink for removed code.
-
Select to Review the suggested fixes before accepting them.
-
Decide whether to accept, reject, or revise the suggested changes.
-
Select Accept to apply all AI-suggested fixes for the selected findings.
A confirmation dialog appears. Confirm your choice and the fixes are applied to your active update set.
-
Select Revise and describe the change you want if you want Otto to modify the suggested fix.
Otto regenerates the fix based on your feedback.
-
Select Reject if the suggested fixes aren't suitable.
The fixes are discarded and you must fix the violations manually or accept them as-is.
-
Navigate to the Resolved findings tab to verify that your accepted fixes appear in the list.
Accepted findings move to the Resolved tab and show the date resolved and the user who resolved them.
Result
Your AI-suggested fixes are applied to your active update set. All changes are tracked with full audit trails. The violations are marked as resolved and no longer appear in the Open findings tab.
What to do next
Before accepting AI fixes in bulk, review the "AI Finding Details" explanation for at least one fix in each category. This button provides a less technical explanation of the violation and the fix, helping you understand why the change improves your code.
After fixing violations, you can create user stories or tasks in your project management system to document the work. This is especially helpful for tracking remediation effort and communicating changes to your team. See Create user stories and tasks for Scan Engine for detailed steps.
Use the findings dashboard to track your progress over time. Run scans regularly and monitor how your finding counts and technical debt time estimates change. This helps you identify recurring violation patterns and adjust your coding standards or training as needed.