This process involves setting up the necessary tables and mappings within your ServiceNow instance. This includes configuring ServiceNow, creating the MCP server, and connecting the MCP client.
Before you begin
Role required: admin
Important: The minimum version required is Australia patch 3 or Zurich patch 10. Microsoft Entra is supported Australia patch 4 or Zurich patch 11 onwards.
Procedure
Configure the OIDC provider
Note: Okta is used as the use case to guide you through the steps.

-
Navigate to the oidc_provider_configuration table and select New.
-
Enter a Name for the OIDC provider.
For example, Okta MCP Third Party.
-
Set the Cache Configuration Lifespan.
The maximum value is 720 hours.
-
Enter the IDP metadata URL into the Metadata URL field.
-
In the User Field, select email.
This maps the user claim from the IDP token to the email field in the sys_user table.
-
Let Enable JT1 claim verification option remain unchecked.
Enabling the JSON Web Token Identifier (JTI) would require the MCP client to reauthenticate with every request. Therefore, disabling the JTI check in the OIDC provider configuration is recommended for MCP third-party
integrations. This is because the client reuses the same token for tool calls until it expires.
-
Select Submit.
Create the MCP server
-
Navigate to the MCP server console and select Create Server.
-
Enter a name for the server and add the required tools.
For example, MCP with Third Party IDP.
After you create the server, ServiceNow automatically generates an entry in the oauth_protected_resource table and populates it with the list of APIs allowed for that server.
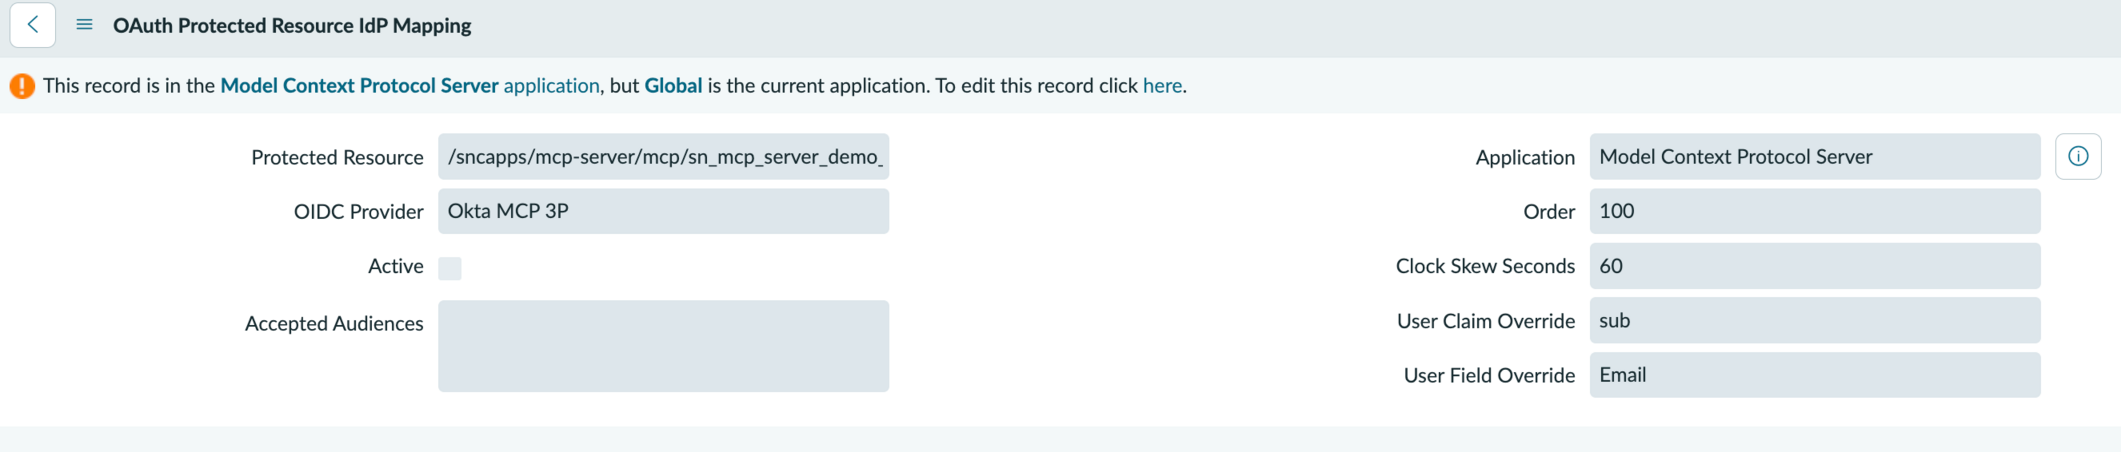
Map the protected resource to the IDP:
-
Navigate to the oauth_protected_resource_idp_mapping table and select New.
-
In the Protected Resource field, select the resource that was created for your MCP server.
If your MCP server name is sn_mcp_server_default, the protected resource path is /sncapps/mcp-server/mcp/sn_mcp_server_default.
-
In the OIDC Provider field, select the OIDC provider configuration you created earlier.
-
Select Submit.
Result
Your MCP server is now configured to authenticate users through the third-party IDP. Users who connect an MCP client to this server are redirected to the related IDP to authenticate.
What to do next
- Configure and set up the third-party IDP. This process involves setting up the application and authorization server within the third-party IDP setup. This document uses Okta as the use case, however, Microsoft Entra
is also recommended.
- Integrate and test from your MCP Client.