Use Playbooks in Next Experience for Demand Management

  • Release version: Australia
  • Updated March 12, 2026
  • 2 minutes to read
  • Playbooks guide a demand through each stage of its life cycle. Use the default playbook or configure a custom one to capture required information and support governance processes.

    Before you begin

    Verify that either the default or custom playbooks are activated.

    Role required: it_demand_user or it_demand_manager.

    About this task

    A playbook defines the standard stages of a demand (for example, Initiation, Planning, Execution, Monitoring, and Closure) and includes activities or action items to complete at each stage.

    Note:
    The playbook presents demand information in a guided, stage-based workflow. The same fields and lists are also available in the Details page of the demand record. You can update demand information from either location, and changes made in one are reflected in the other.
    The demand AI playbook is a standard playbook comprising the following stages:
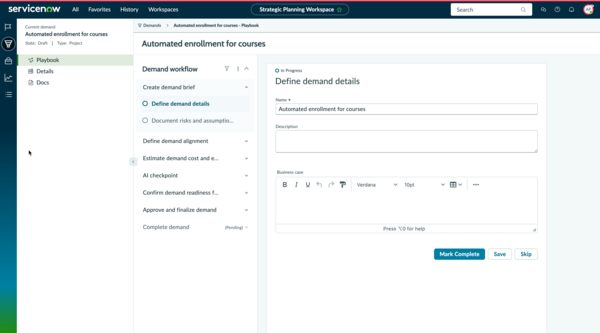
    • Create demand brief
    • Define demand alignment
    • Estimate demand cost and effort
    • AI checkpoint
    • Confirm demand readiness for review
    • Approve and finalize demand
    • Complete demand
    The stages and activities of a demand AI playbook.
    Note:
    The AI checkpoint stage is available if the AI Control Tower plugin is installed and the investment type of the demand is set to artificial intelligence.
    Each stage includes activities, action items, or steps for completing the demand. You can view the Playbook menu only if the demand matches the trigger condition defined for that playbook.
    Note:
    A demand created in Next Experience for Demand Management opens in the playbook page.

    Procedure

    1. Navigate to Workspaces > Strategic Planning Workspace > Demands.
    2. Open an existing demand or create a demand.
      For more information, see Create a demand.
      The demand record opens.
    3. Use the default playbook or create or customize one.
      • To use the default playbook:
        1. Select Playbooks from the second-level navigation menu.
        2. Select a stage to view its activities. Each activity displays its status (In Progress, Pending, or Complete) and the fields or lists to update.
          Note:
          The default playbook is a stage-gate playbook, that is, a stage is unlocked only when its prior stages are marked as completed or skipped.
        3. Complete the activities within each stage. For more information, see Demand default playbook stages and activities.
        4. For each activity, perform one of the following actions:
          • Select Mark Complete to mark the activity as done and move to the next activity.
          • Select Save to save your progress without completing the activity.
          • Select Skip to bypass the activity and move to the next one.
        Note:
        • An activity becomes read-only when you select Mark Complete or Skip.
        • A stage is marked as completed after all activities within it are either completed or skipped.
        • Use the Restart option (available at both the activity and stage levels) to revisit or edit completed or skipped activities.
        • Some stages include an automated task that advances the demand state when all activities in the stage are completed. These automated tasks don't require manual action.
      • To create a playbook, define the trigger condition in Workflow Studio. For more information, see Triggers.
      For more information on how to create and use playbooks, see Building Playbooks and Designing Playbook Experience.