You can set target values for indicators that apply only to specific breakdown
elements and time series aggregations. The target starts to apply at a selected date and
continues to apply until you set the next target. You can set a date on which you expect to
reach the target, and set a new target then.
Before you begin
Role required: pa_target_admin to create global targets that
are visible to all users. Any user who can view an indicator on KPI Details can view targets and create personal targets. Personal targets and thresholds are
visible on KPI Details only to the user that created them.A
responsible user can create a global target to replace the target they are
responsible for, regardless of role. For more information, see Responsibility for global indicator targets.
Procedure
-
Navigate to .
-
Locate the indicator and interact with its name to launch KPI Details for that indicator.
-
To limit the target to a subset of the scores, open the Filter and select a breakdown and a breakdown element.

You can also select a 2nd-level breakdown and element.
-
If you want the target to apply to a specific time series aggregation, select
the time series.
-
Click the target icon (
 ).
).
The Targets panel opens.
-
Click the Create Target icon (
 ).
).
-
Select either For everyone or For
me.
The For everyone option creates a global target. The
For me option creates a personal target.
You see all the existing global or personal targets on this indicator
that apply to whichever breakdown elements or time series you selected. You can
select and deselect breakdown elements or a time series interactively, and the
list of targets updates.
Note: Instead of creating a new target, you can edit one of these existing
targets. Select the tile for a target to edit that target. You can only
change the absolute value of the target and the start and review dates.
For more sophisticated target editing, see
Edit targets in KPI Details.
-
In the Based on field, select either New
value, Average score, or
Previous target.
New value is an absolute value for the target that you
enter.
Average score selects the target as an improvement
to the average score. You set the amount of the improvement. The average is
calculated over the time span shown in the chart. This average is shown as a
read-only value in the
Average value field.
Previous target is available only if a
previous target exists. The new target is a calculated value based on a
change from the active target. The active target appears in the read-only
Reference value field.
-
If you selected New value, enter the target value in the
New value field.
-
If you selected Average score, or Previous
targetcomplete the following options:
| Option |
Description |
| Direction |
Select Increase or
Decrease.
Increase means the target will be
higher than the average score or previous target, while
Decrease means it will be lower.
By default, the value corresponds to the indicator's
direction. |
| Change |
Enter the amount by which you want the target to differ
from the average score or previous target. This value can be
in absolute units or a percentage. |
| % / Unit |
Set whether the change is an absolute unit or a
percentage. |
When you have completed these fields, the calculated target value
appears in the read-only New value field.
-
Select a start date.
You can set a date in the future.
-
Select a review date.
The target applies from the selected start date until the start date of the
next target, if any. If you do not define a later target, the target applies
indefinitely. Thus, the review date serves as a reminder to consider changing
the target. Whether or not you change the target value after review, consider
selecting a new, future review date.
If you select a review date, you display
a status icon on the chart indicating whether on that date you are on track
to meet the target.
Note: KPI Details does not support overlapping
targets. Only one target at a time can be active.
-
Click Save.
Creating a target
It's November 1 and your Number of Open Incidents in the Network category has varied considerably for the last month, with a recent sharp downturn.
As an incident manager, you want the number of open incidents to go down. You are not sure from your scores on a good target to set. You would be happy if it stayed below the average for October. So you start by basing the
target on the average score for that month.
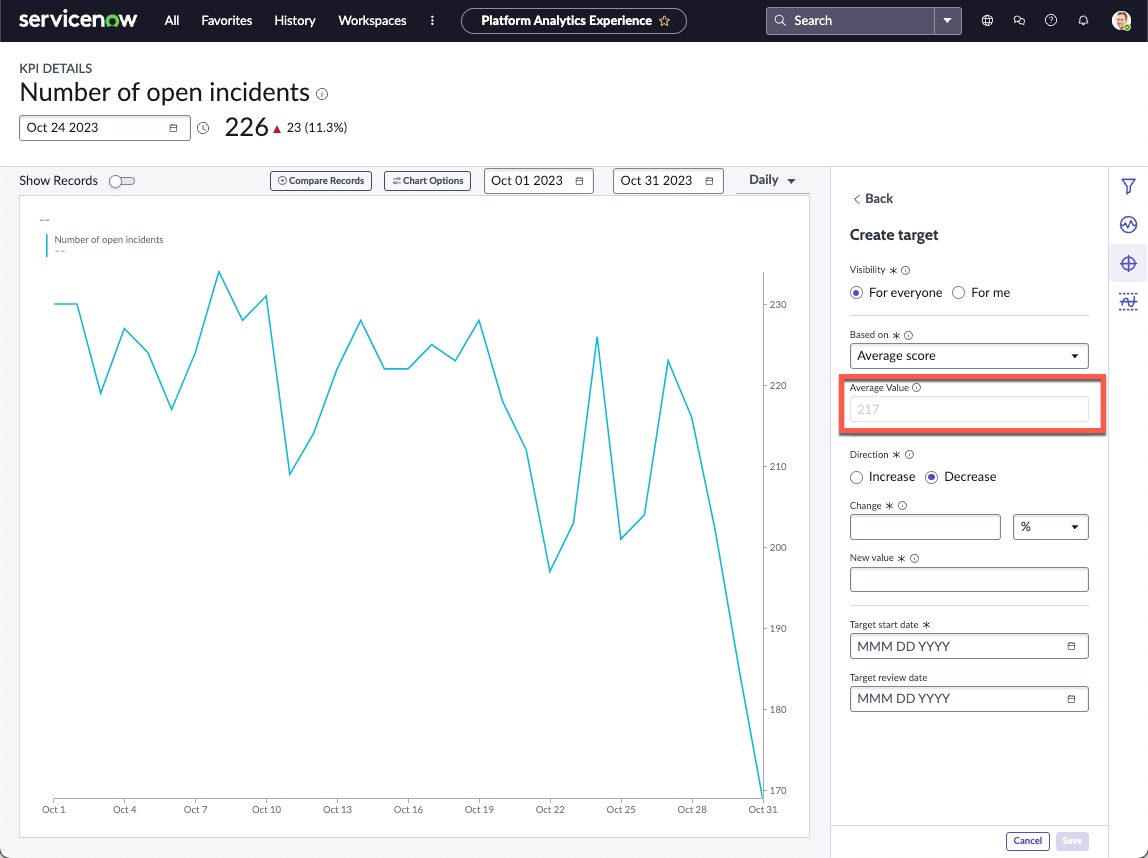
You see that the average value is 217, but you are an optimist and think your team might do a little better. So you leave Decrease selected, as indeed you want the number of incidents to decrease. Most of
the low points on the chart were around 200, so you decide on that as the new target.
Finally, you decide to put your target into effect on the beginning of the next
month. You hope to reach the target by the end of the month, so you set the last
workday of the month as the review date.
When you click Save, you create your target. For an example of
what such a target looks like in KPI Details, see Indicator targets and thresholds in KPI Details.
What to do next
After you create a global target, make yourself or another user responsible for
maintaining the target. See Responsibility for global indicator targets.